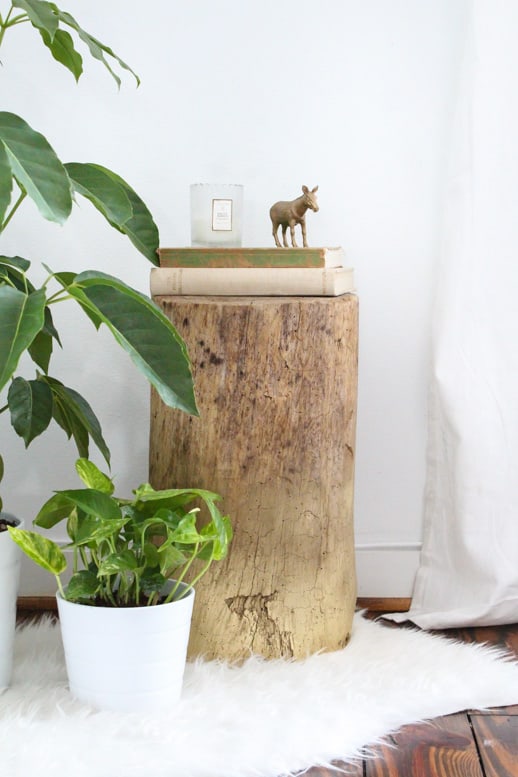
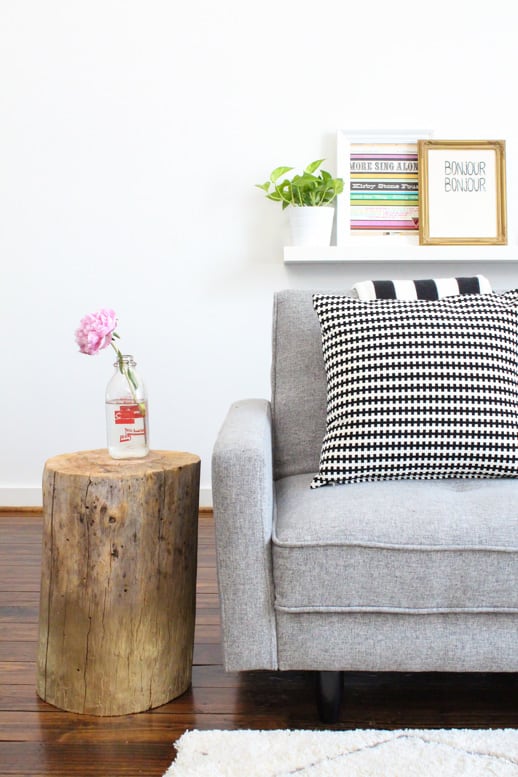
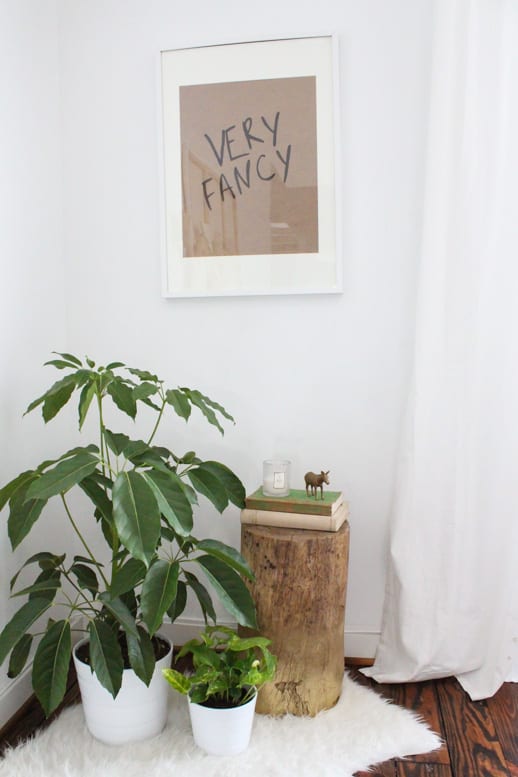
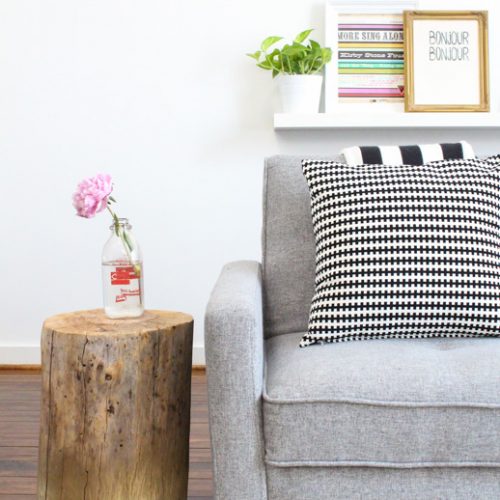
Lately, we’ve been looking to add a new touch to our home, and one of these DIY Ombre Stump Side Tables does the job perfectly!

I’ve been swooning over stump side tables for a while now.
But, call me crazy. I can’t seem to justify their $200+ asking price (see here) for a stump of wood.
However, thanks to Craigslist and a little perseverance I have no reason to fret about these ridiculous prices!
For less than $15 worth of supplies and some internet stalking (one of my specialties, thank you), I made two Ombre DIY Stump Side Tables.
I also styled them in two different ways in my living room to give you an idea of how you can incorporate them into your home.
And this DIY Stump Side Table is by far one of our top 20 DIY Coffee Table Ideas.
Here’s how–
Materials Needed to Make an Ombre DIY Stump Side Table
Wooden stump
Sandpaper
Spray polyurethane (in a matte finish)
Scrub brush
Gold spray paint (optional)
How to Make an Ombre DIY Stump Side Table
1 — First and foremost, snag yourself a few free stumps.
You can do this by checking your local Craigslist, newspaper, or ad bulletin, or you can go trek the forest if you’d like.
Most people are giving it away to whoever will pick it up, and in this case, that’s you.

Try and find stumps that already have the bark removed and are cut as close to level as possible to that you don’t need to do anything other than sand the rough parts down a bit.
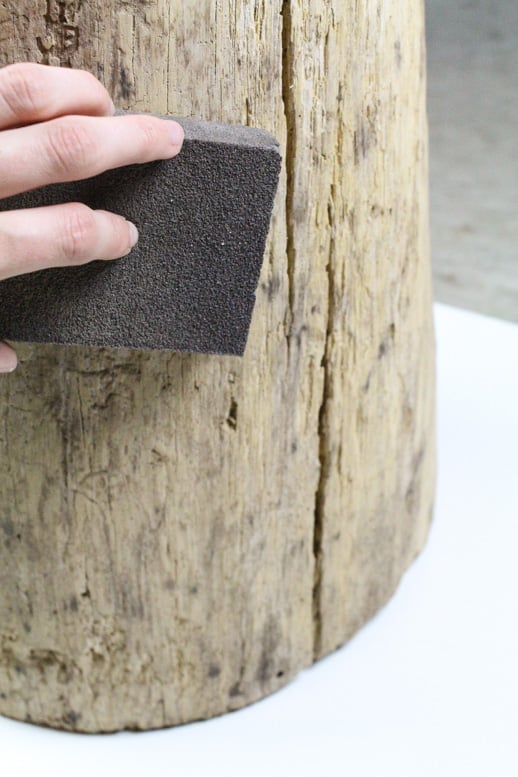
2 — Once you’ve picked your stumps, give them a good brush to get all of the excess pieces and dirt off. You can even wipe them down if you need to.
3 — Next, sand them down to the desired finish and smoothness that you’d like.
4 — Now that you’ve sanded them, turn them upside down and spray paint the bottoms a color of your choice, fading it upwards.
5 — Once the color is dry, flip them over and give them a few coats of polyurethane so that the wood will hold up to wear a tear a bit better.
When they’re dry, you can go to town styling them. You can pair it with other ombre decor items like these DIY Ombre Pillowcases or DIY Watercolor Art.
And considering they’re practically free, I’m sure you’ll find lots of places to put them!
Quick Tips In Choosing a Tree Stump for a Side Table
Here are a few tips to help you choose the right stump for your side table:
— Look for a stump that is at least 18 inches in diameter. Anything smaller is likely to be too unstable and could topple over easily.
— Choose a hardwood stump over a softwood stump. Hardwoods are more durable and will last longer.
— Avoid stumps with cracks or rot. These defects can weaken the overall structure of the stump and make it more likely to break or collapse.
— Make sure the stump is cut evenly on all sides. This will help create a stable base for your side table.
— Be sure to sand down the stump before use. This will help create a smooth surface and prevent splinters.
If you’re looking for more easy DIY table projects, see some of my favorites below
- Ikea Hack Side Table
- Mini Patterned Side Table
- Mid Century Modern Side Table
- Marble Table Top With Gold Accents
DIY Ombre Stump Side Table
Equipment
- Sandpaper
- Scrub brush
Materials
- 1 wooden stump
- 1 spray polyurethane in a matte finish
- 1 gold spray paint optional
Notes
Instructions
- First and foremost, snag yourself a few free stumps.You can do this by checking your local Craigslist, newspaper, or ad bulletin, or you can go trek the forest if you’d like.Most people are giving it away to whoever will pick it up, and in this case, that’s you.
- Once you’ve picked your stumps, give them a good brush to get all of the excess pieces and dirt off. You can even wipe them down if you need to.
- Sand them down to the desired finish and smoothness that you’d like.
- Now that you’ve sanded them, turn them upside down and spray paint the bottoms a color of your choice, fading it upwards.
- Once the color is dry, flip them over and give them a few coats of polyurethane so that the wood will hold up to wear a tear a bit better.

Be sure to share your DIY Ombre Stump Side Table with us on Instagram using the hastag #sugarandclothloves, so we can follow along, too! We always love seeing all of your creations!

I was wondering if this beautiful “stump” would then be weather-resistant?
Hi Tina! Polyurethane sprays are water resistant but not completely waterproof. It could probably hold up outside under a covered patio but probably not sitting outside under the sun. Hope this helps!
Thank you! Picked up 3 free tree stumps today!!!
You have shared such a great idea and I am going to share it on https://sawadviser.com/
.It is a real beauty and I am going to apply it as soon as possible.
Hey, Thank you for sharing this beautiful DIY wood table design. really look amazing.
Thank you!
Thanks for sharing!
Where is that black and white pillow from? I love it!
Where is the couch from?
It’s from Hayneedle several years ago, but it’s made by Serta :)
This is such a great idea, I am will be on a hunt for a Wooden stump
soon
haha, I totally support that!
nice post, excellent and creative idea…!
Its amazing what you can do with just one log. This is how las vegas landscaping works you create beauty out of plain things.
this is so great! and your styling is lovely :)
Even better, since I see you have this on a wood floor, you should get a piece of felt and glue to the bottom. :)
Hello! Could you please tell me the brand of your couch? Thanks xx
This is an excellent and creative idea…!
Love it! I’ve been meaning to do a log table DIY for awhile – I have some logs in my backyard just waiting to become something lovely like this!
Love the subtleness of the ombre, Ashley.
I like how natural the gold looks with the wood. So pretty!
My husband would probably not be impressed with altering the colour of wood, but I LOVE that touch of gold!!
Loooove these stumps, OMG!!!!
I absolutely love the touch of gold here, Ash! And as I’ve already told you, I’m moving in!
I’ll never be able to look at another stump the same.
I’ve SO wanted to know if this was doable after seeing so many in magazines and catalogs. Thanks for breaking it down for us!
Love this! The subtle touch of gold is so pretty!
Absolutely love this! Now to find a couple stumps…
THANK YOU for posting this! We actually have a ton of wood in our backyard. We lost a tree in a storm a few weeks ago. I will totally be using this tutorial!
It looks lovely! Thanks for sharing!
-Becca
Ladyface Blog
my boyfriend will so be helping me with this!