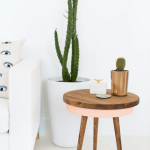
DIY Mid Century Modern Side Table
A colorful and budget friendly DIY Mid Century Modern Side Table that's easy to make, inexpensive and the perfect addition to your home.
Servings: 1
Cost: $110
Equipment
- Drill and 11/64″ drill bit
- Foam brush
Ingredients
Instructions
- Prep the wooden top and legs by staining the unfinished wood the color of your choice with wood stain and a foam brush.
- Optional: Once the stain is dry on the legs, tape off the wood to spray paint the feet gold.
- While that’s drying, place the cake pan upside down. Lay the angle plates where you want the legs to be positioned and mark with a pen.Be sure they’re far enough towards the edges of the table so that it isn’t rickety and unstable when it’s built.Use the drill and 11/64″ drill bit to drill holes for each of the four corners on every plate.
- Attach the plates to the pan with the nut and bolts in all corners.The reason for the flat bolts instead of screws is so that there are no sharp edges when the storage pan is being used.
- Once the plates are attached, spray paint the entire pan and plates the color of your choice. And let dry completely.
- Once it’s dry, screw the tapered legs into the the plates, and flip it upside down. The top of the end table will just rest on the storage.