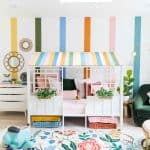
Colorful DIY Toddler Bed
Bring imagination to life with our step-by-step guide on building an adorable DIY toddler bed house, featuring a colorful slate roof that will spark joy in every child.
Servings: 1
Cost: $500
Equipment
- Rotary saw
- Paint brushes
- Drill
- Screws
- Painter's tape or clamps or weights
Ingredients
- 1 Little Seeds Rowan Forest Loft Bed
- 2 plywood sheet or wood board
- Wood slates in your desired length and width
- Paint any colors of choice
Instructions
- Using plywood sheets, cut out the 2 panels for the roof and the roof slates for the toddler bed to your desired lengths. Ours were about 80" x 24" each.
- Paint the bed's windows (optional) and roof slate shingles in your desired color of choice. Allow to dry.
- Attach the plywood sheets to the pitched roof frame with a drill and screws to create the wood roof base.
- To secure the 2 panels together at the top of the roof ridge, drill pocket holes on each side at the top. Attach the 2 roof pieces together through the holes with zip tie cables.
- With the wood glue, arrange and apply the colorful slate shingles to the roof base. Use painter's tape or clamps to hold the wood together while drying.
- Optional: Fasten a basket to each of the painted windows with zip tie cables, and fill with faux flowers or greenery. Remove the painter's tape.
Notes
- If you're unsure about how large you want your roof and roof slates to be, assemble the bed first.
- Project cost dependent on desired wood material and paint. We used leftover paint from a previous house project.