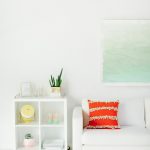
DIY Watercolor Wall Art
Using watercolor paint for a really simple piece of colorful art is so easy to do and here's how...
Servings: 1
Cost: $30
Equipment
- Foam brushes
- Plastic cups
- Frame or mount
Ingredients
- 3 craft paint colors in a similar color family I used mints and greens.
- 1 large piece of printmaking or linen paper size depends on you
Instructions
- Fill 3 plastic cups with about an inch of water.
- Squeeze a dime size amount of paint of the lightest three colors in one cup.
- Squeeze a bit of each paint of the darker two colors in the second cup.
- Squeeze dime size of paint of the darkest color in the last cup.
- Stir the paint and water together so that your colors lineup to be an ombre scheme. If not, adjust the paint as needed.
- Using the lightest color, quickly brush the color across the entire paper leaving a clean white border of at least two inches all around.
- Next, use the medium color starting from one end of the painting and brush it all the way up, just past the center of the paper. Be sure to blend the watercolor excess so you don’t have puddles building up.
- Use the darker paint starting from the same end that you started brushing the second color from, and only paint up to just below the middle.
- Hang to dry until there are no puddles on the page. By hang drying, the weight of the paper won't pull any puckers and won't wrinkle out!
- Once completely dry, frame or mount it as you see fit for your space.