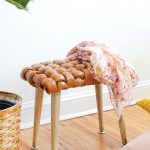
DIY Woven Stool
We'll show you how to make your own DIY Woven Stool using a simple weaving technique.
Cost: $120
Equipment
- Sewing machine
- Staple gun
- 1/2" staples
- Basic sewing supplies pins, scissors, thread, white colored pencil or chalk, etc
Ingredients
- 1 MDF or plywood board 1/2"-1" thick
- 1 yd faux leather or leather
- 9 yd piping cord filler 1" diameter
- Synthetic fiber batting
- 4 tapered wood leg 12" tall
- 4 angled leg bracket
- Lightweight cotton fabric optional
Instructions
How to to make your leather cording strips:
- Cut the faux leather in 4” wide strips at 2 different lengths. You’ll need 7 strips at 29” long and 10 strips at 18” long.
- Cut cording into 7 strips at 26” length and 10 strips at 15” length.
- Once the faux leather and cording is cut, start encasing the cording in the leather strips.
- Center the short cording strips on the short faux leather strips and fold the faux leather in half (around the casing).
- Pin into place.
- Do the same with the longer faux leather & cording.
- Next, thread your machine, and move your needle all the way over so it’s as close to the leather cording as possible. (We used a contrasting thread.)
- Sew a straight stitch along the length of the cording, removing pins as you go.
- Repeat with all cordings.
How to make your woven stool:
- Position the angled leg brackets at each corner of the board.
- Mark with a pencil and the pre-drill holes for where the legs will sit.
- Flip the board over.
- Cut 4 layers of batting the same size as the board and attach onto the board with a staple in each corner.
- Next, begin stapling the long leather strips along the underside of the shorter edge of the board, and the short leather strips along the underside of the longer edge of the board.
- Next, flip the board over and lay the long strips over the length of the board. If you’re familiar with weaving, think of the long strips as your warp (running lengthwise) and your shorter strips as your weft (running right to left).
- If you’re familiar with weaving, think of the long strips as your warp (running lengthwise) and your shorter strips as your weft (running right to left).
- Begin weaving the strips together with a basket type weave comprised of ‘over one, under one.’ Make sure to push the shorter strips back up towards the top, and pull everything very tight as you go.
- As soon as you’ve woven in about 3 short strips, staple those 3 weft cords on the bottom side of the board towards the edge. x
- I didn’t worry too much about the contrast stitching showing, as I liked the handmade quality it added.
- Continue weaving until the entire top of the stool is woven.
- Finish by stapling the long warp strips to the bottom side of the board.
- Then, cut back any strips (& re-staple, if necessary) any that cover up your pre-drilled bracket holes.
- At this point, you may want to conceal the craziness on the bottom of the stool with lightweight cotton fabric.
- This step is totally optional, but we think it creates a more finished looking piece.
- Cut a piece of lightweight cotton 1-2” larger than the size of the board.
- Fold raw edges under so that it’s the size of the board and iron to keep in place.
- Lay the fabric over the bottom of the stool and staple one edge into place.
- Mark pre-drilled bracket holes on the surface of the fabric with a white colored pencil.
- Staple the remaining sides of the fabric into place
- Screw brackets into place and screw in legs.