Geometric DIY Cork Coasters
These easy geometric coaster tutorials are perfect for a quick and easy DIY project!
Servings: 8
Cost: $20
Equipment
- Paint brush
- Pen
- Rotary cutter or craft knife
- Washi tape
- Cutting mat
Ingredients
- 2 craft paint in 2 colors or mix your own
- Cork tiles at least 1/4" thick
- Cardstock
- PDF template download the link for a free template
- Mod Podge or any water base sealer optional
Instructions
- Print out the hexagon template PDF onto the yardstick and cut out the shape. Then, trace the hexagon onto the cork sheeets.
- Using the scalpel/craft knife, cut out the hexagons. Repeat this step for each coaster. Make sure the blade is sharp or otherwise you’ll get rough edges.
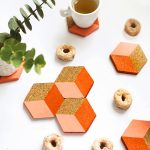
- With the washi tape, mask off an area that’s equivalent to a third of the hexagon, taking the tape from the outer points to the inner point. If you prefer, measure where the middle is to start. Refer to the how-to photos for reference.
- Once you've taped out your shape, start painting the third of the hexagon that’s exposed. You will more than likely need two coats of paint to get a vibrant color. Just make sure you leave each coat to dry before applying the next.
- Once the paint is dry, remove the the tape. Then, mask out another third with some more tape. Make sure that each color stays on the same side of the shape so that the colors fit together perfectly when you have the coasters all together. We painted the left peach and the right side orange. Again, you’ll probably need 2 coats of paint.
- Once the paint is dry, peel away the second lot of tape. Repeat for each coaster. And now you have a set of new coasters!
- Optional: For extra protection, apply a coat of clear matte Mod Podge.