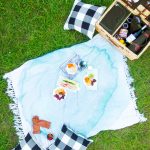
DIY Watercolor Throw Blanket
Add a touch of fall to your picnic with this easy-to-follow tutorial for a watercolor throw blanket!
Servings: 1
Cost: $40
Equipment
- Paintbrush
Ingredients
- 1 throw blanket cotton is easiest to dye
- 1 Rit Dye in the color of your choice
- 3 pitcher for water
- 1 fabric paint optional for added pops of color
Instructions
- Pour hot water onto the center of the blanket in whatever size watercolor circle you’re hoping to make.Less is more because the fabric will absorb water past just where you’ve poured. Using plain water first will help the fabric take to the color.
- Pitcher 1 - Lightly Saturated: In a glass or plastic pitcherpour a small amount of dye into it. Then, fill the rest with hot water. This is going to be your least saturated coat, and also the largest coat. Pour the mixture in the center of the blanket and let it spread.
- Pitcher 2 - Slightly Saturated: Prepare a second pitcher with slightly less water that’s a bit more saturated, and pour it onto the blanket in splotches.
- Pitcher 3 - Super Saturated: Make a small pitcher of highly saturated liquid dye. And use it for fun splatter accents on the blanket by holding the pitcher up higher to create a controlled splatter effect.
- Let the blanket with dye dry thoroughly instead of rinsing it with water quickly. The chenille fabric takes quite a bit more time to absorb the color than cotton did.
- When it’s fully dried and needs a final rinse from the extra dye, pick the blanket it up from the very center and let it drape.Instead of fully submerging the entire blanket in water, only rinse the areas in the center with the dye so that the color doesn’t bleed onto the pure white portions.
- Once well rinsed, dry it in the dryer or on a clothesline in hot weather to fully set the color.
Notes
I liked the idea of taking it a step further to mix lighter splatters on top of the darker dye. So I mixed mint green fabric paint with a bit of water to create an additional effect on top of the other colors.
Let the blanket with dye dry thoroughly instead of rinsing it with water quickly. The chenille fabric takes quite a bit more time to absorb the color than cotton did.
When it’s fully dried and needs a final rinse from the extra dye, pick the blanket it up from the very center and let it drape.
Instead of fully submerging the entire blanket in water, only rinse the areas in the center with the dye so that the color doesn’t bleed onto the pure white portions.
Once well rinsed, dry it in the dryer or on a clothesline in hot weather to fully set the color.
