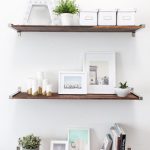
DIY Distressed Wood Shelves
Upgrade your IKEA shelf with our expert tips on how to distress wood, adding vintage charm and personality to any room in your home.
Servings: 1
Cost: $40
Equipment
- Sandpaper medium and fine grit
- Paint brush
- Hammer to create indentations
- Screws to create indentations
Ingredients
Instructions
- Start by sanding the wood with medium-grit sandpaper to create a smooth surface. Focus on the edges, corners, and areas that would naturally receive wear and tear.
- Create indentations on the wood. Use random tools and utensils (like a hammer, chains, nails and/or steel wool) to scrape the wood. This simulates the effects of natural aging and wear. Place screws in various areas and twist them to create small holes. This adds another level of authenticity to the distressing.
- Smooth out any major bumps caused when you were distressing the wood. Focus on the areas that you distressed earlier, smoothing out any rough edges.
- Once the wood is distressed as much to your liking, apply a stain or paint onto the wood. Allow to dry to the touch in between coats.
- For the second coat, only apply in certain areas, and use a rag hand towel or brush to blend the edges of the second coat into the first. This will make certain spots a bit darker than others giving a reclaimed wood effect by having a variety of colors and will give interest to the distressed areas.
- Optional: Apply a clear finish to seal the wood from water.
- Once the stain has dried completely, install the Ikea EKBY shelving ends according to the instructions on the package.