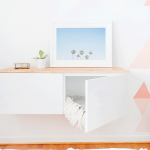
DIY Ikea Hack Floating Credenza
No room makeover is truly completely until it involves a good Ikea hack, and this DIY Ikea Hack Floating Credenza was the perfect fit!
Servings: 1
Cost: $250
Equipment
- Fine sandpaper
- Dry brush for applying stain/polyurethane
- Contact cement glue
Ingredients
- 1 Ikea Besta shelf unit with high gloss white doors
- 2 pieces Besta shelf suspension rails
- 1 piece 3/4″ x 47 3/4″ x 16″ Aspen panel
- Wood stain or a stain/polyurethane combo in the color of your choice
- Clear high gloss polyurethane for top coat
Instructions
- First, build the main IKEA Besta unit exterior, according the Ikea instructions that it comes with. But leave off the doors and the interior shelves.
- Measure and mark where you want the shelf to be place on the wall.
- Next, install the Besta suspension rails to the wall/unit as per the included instructions.
- Once everything else is in place on the wall, attach the unit doors last.
- When the unit is installed on the wall, make sure the Aspen wood panel fits appropriately on top of the shelf.
- Now, sand the wood panel surface down to the touch. Make sure to round out any sharp edges so that the little ones don’t hurt themselves if they bump into it.
- Then, stain the wood with several coats of the stain and let it dry for 24 hours.
- Once dry, apply the polyurethane according to the can instructions and let set it accordingly.
- Lastly, brush on the contact cement to the top of the Besta shelf. You can also use wood glue instead. However, the contact cement doesn’t expand like wood glue, which will save you time from having to clamp it down while it dries.
- Once the glue is all set, you’re ready to fill your DIY Ikea hack floating credenza with toys, dishes, blankets, and in anything in between!