DIY Mid Century Stand Planters
A colorful and budget friendly DIY mid century side table... This baby is easy to make, inexpensive, and the perfect addition to your home
Cost: $80
Equipment
- Drill & drill bit
- Bulldog Grip glue or large screw
Ingredients
- Waddell 3.5-inch & 8-inch tapered legs
- 3 pieces angle plates per stand
- Painter’s tape
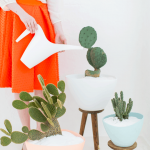
- Planters The Ikea ones pictured are currently sold out, but you can use these similar ones
- 6 pieces wooden plaque per stand
- 1 wood stain in color of your choice. We used American Walnut finish
- Foam brush
- Gold spray paint for the feet
- Spray paint optional for the planter color
- white sand optional
Instructions
- To prep the legs and wooden plaque base, use a foam brush to stain the unfinished wood.
- Then, let dry completely.
- Next, tape off the stained wood section, leaving only the feet exposed so that you can spray paint them gold and let dry overnight.
- To prep the planters, I spray painted them in brighter hues as well to go along the bright studio. But I think the black and white would look awesome with this tutorial as well.
- Lay three angled plates in a triangular shape on the bottom of the wooden plaque.
- Screw each into plant in place. Make sure that the angle is facing outward from one another.
- Then, twist the finished base legs into each plate.
- If you’re adhering the pot to the base, you can use Bulldop Grip glue to adhere wood and ceramic together.
- Or you can drill a large bolt or screw through the drip hole of the planter into the center of the wooden plaque.