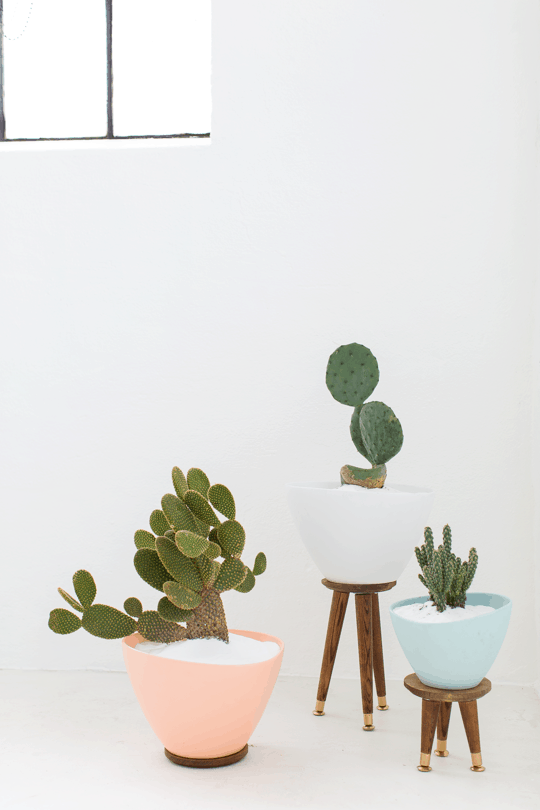
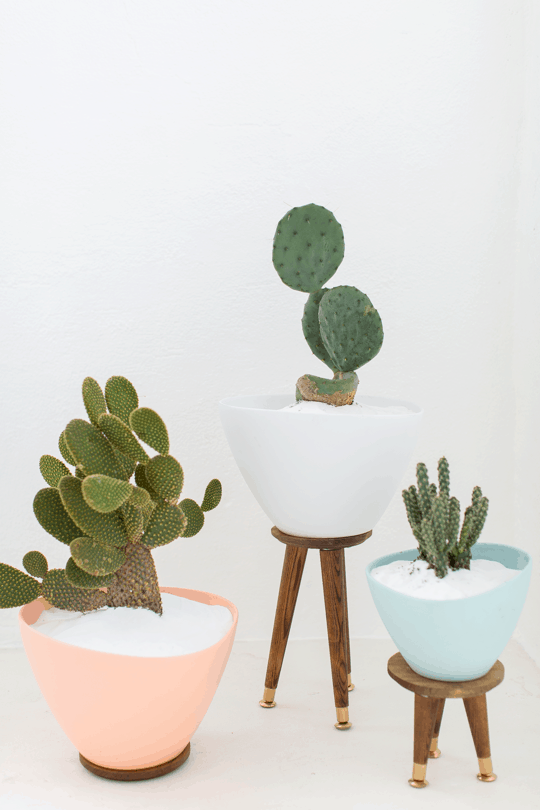
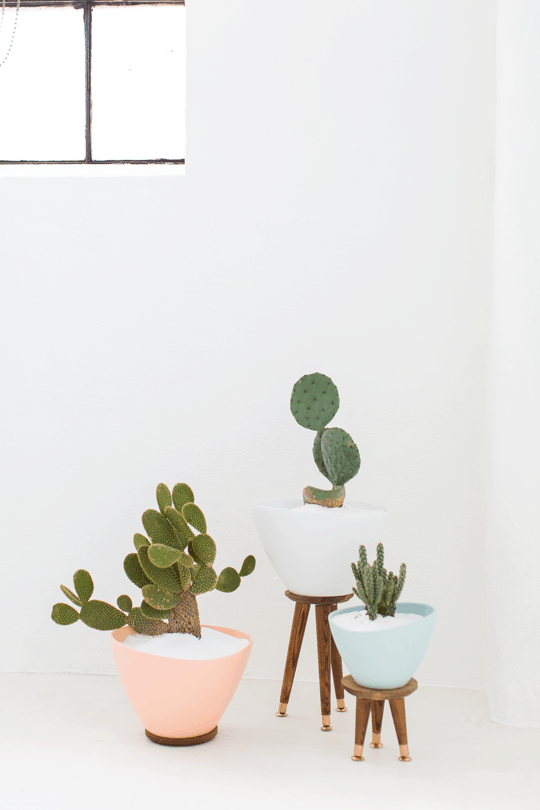
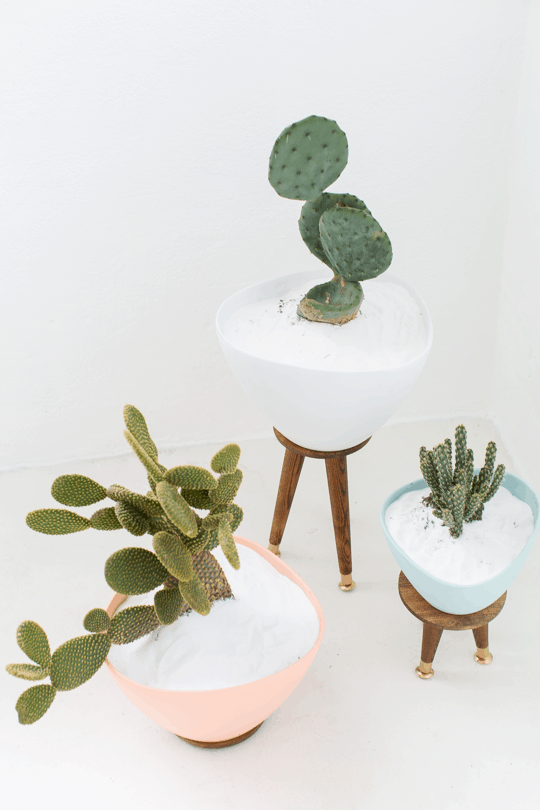
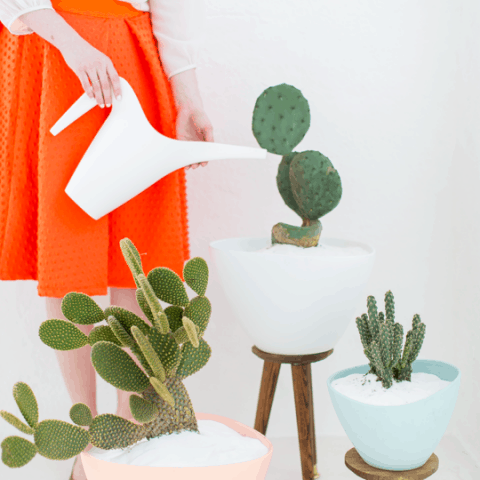
DIY Mid Century Stand Planters
DIY Mid Century Stand Planters — Get ready for spring with these super cute DIY Mid Century Stand Planters. We’re showing the full tutorial. Plus, the secret to inexpensive planters!
All it takes is one good Christmas tree cactus project to set me off on a cacti DIY frenzy. And I’m loving it!
I’ve decided to put them in alllll the places. Two year old’s beware when it comes to visiting the new Sugar & Cloth studio, that’s all I have to say.
Don’t worry though. I’ve made sure to put them on the pedestal they belong on with these DIY Mid Century Stand Planters that you can make on a budget.
Thank goodness! Because “mid cenutry” and “budget” rarely go together. We even made what I’ve now deemed a “drive-thru” version of this project with a spin-off that you can make in less in ten minutes that has no legs at all.
We figured that one out when we accidentally busted the bottom out of the planter and needed to glue a new one in place.
But hey! We made some “delicious lemonade out of those life lemons” with these DIY Mid Century Stand Planters.
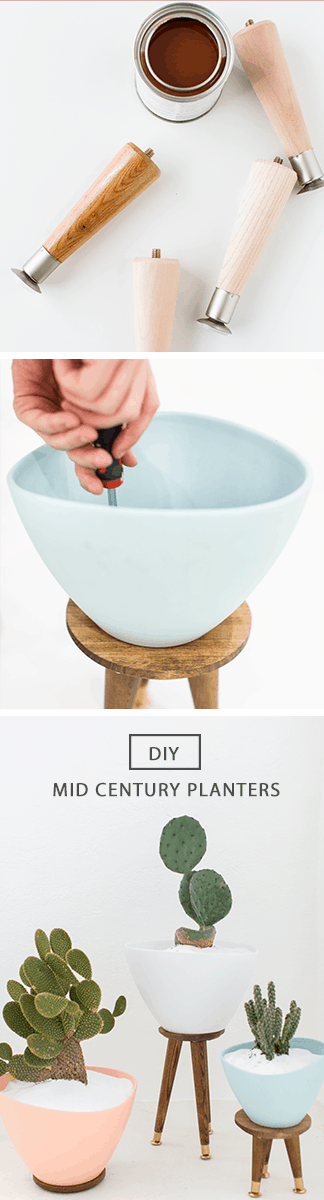
Materials Needed To Make A DIY Mid Century Stand Planter
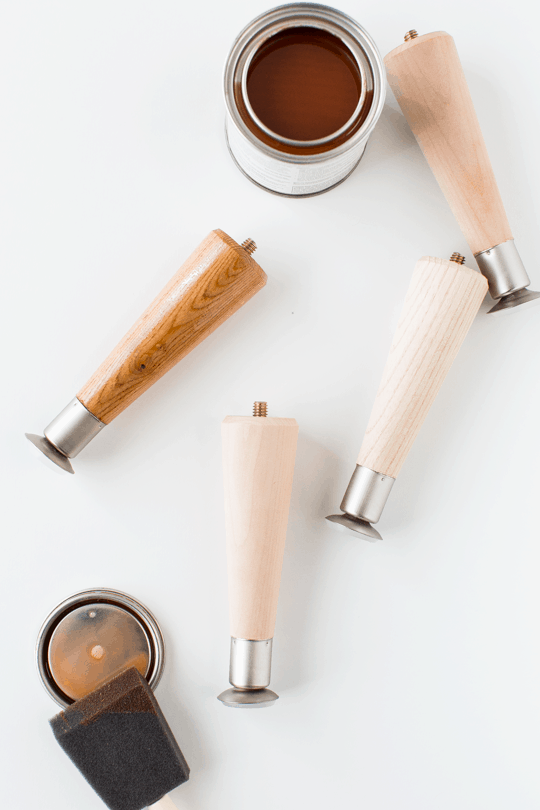
- Waddell 3.5-inch & 8-inch tapered legs
- 3 angle plates per stand
- Painter’s tape
- Planters: The Ikea ones pictured are currently sold out, but you can use these similar ones.
- 6″ wooden plaque per stand
- Wood stain in American Walnut finish
- Foam brush
- Gold spray paint for the feet
- Drill & drill bit
- Spray paint (optional for the planter color)
- Bulldog Grip glue or large screw (optional only if you want to adhere the planters to the stand)
- Optional: white sand
How To Make A DIY Mid Century Stand Planter
1 – To prep the legs and wooden plaque base, use a foam brush to stain the unfinished wood.
2 – Then, let dry completely.
3 – Next, tape off the stained wood section, leaving only the feet exposed so that you can spray paint them gold and let dry overnight.

4 – To prep the planters, I spray painted them in brighter hues as well to go along the bright studio. But I think the black and white would look awesome with this tutorial as well.
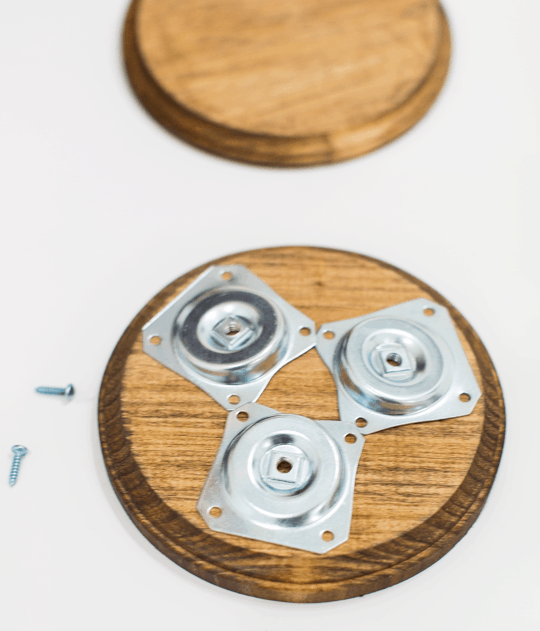
5 – Lay three angled plates in a triangular shape on the bottom of the wooden plaque.
6 – Screw each into plant in place. Make sure that the angle is facing outward from one another.
7 – Then, twist the finished base legs into each plate.
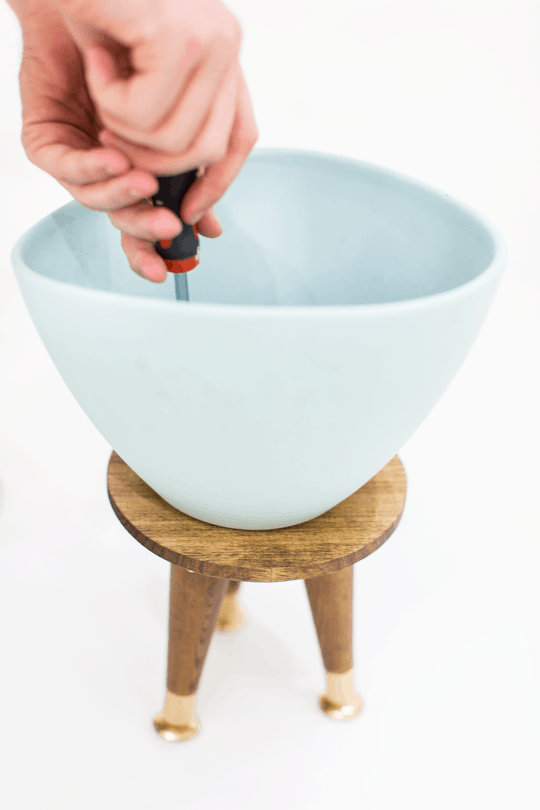
8 – If you’re adhering the pot to the base, you can use Bulldop Grip glue to adhere wood and ceramic together.
9 – Or you can drill a large bolt or screw through the drip hole of the planter into the center of the wooden plaque.
Can You Make The Planters Without Legs?
Yes! You can also just skip the legs altogether and just do a simple wooden bottom for a quicker version of this project.
And I actually like it a teeny bit more than with legs but don’t tell!
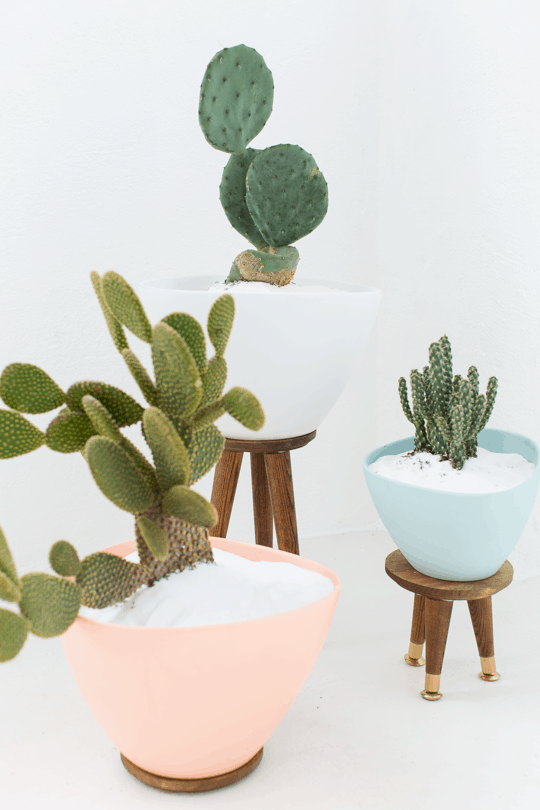
How To Make Planters Look Brighter
To make these DIY Mid Century Stand Planters a bit brighter, I actually used white sand on top of the cactus soil to make them not so stark.
You can purchase white sand online, at your local craft store, hardware store or even in the aquarium section of any pet store.
What Can You Plant In A Bowl Planter?
There are endless ways to style low bowl planters, creating just the right accent or focal point for your space. If you want something more minimal then fill them with succulents and other bright perennials that will liven up any dull room in which they’re placed!
Can Plastic Containers Be Used As Planters?
Plastic containers are an excellent choice for those who need to be careful with their plants or don’t have much water. This lightweight, flexible and durable materials provide the best opportunity possible: long-lasting life in any condition!
Can I Use A Metal Bucket As A Planter?
What would you say to a planter that is not only attractive but also durable? Metal buckets provide the perfect container for your favorite flowers. Making them yourself is cost-effective and easy, all while providing a unique look in any room of home or office!
The only requirement before beginning: prepare those plants so they can thrive inside their new potting soil-lined dwelling–otherwise this beautiful bloom may die before reaching fruition.
If you love our DIY mid century planter, Check out a few of our other internal decor from our archives below —

What do you think?! I’m thinking these little DIY Mid Century Planters definitely need to be in your house this spring!
If you love our DIY mid century planter, Check out a few of our other internal decor from our archives below —
- DIY Rosemary Grapefruit Candle
- 20 Creative DIY Candle Holder Ideas
- 20 Great DIY Plant Stand Ideas That Show Off Your Plants
- How To Make Easy Rattan Drawers
- Cane Decor Trend: The Rattan Furniture We’re Loving
- How To Paint An Accent Wall
DIY MID CENTURY MODERN PLANTER | PASTEL MID CENTURY MODERN STAND
DIY Mid Century Stand Planters
Equipment
- Drill & drill bit
- Bulldog Grip glue or large screw
Materials
- Waddell 3.5-inch & 8-inch tapered legs
- 3 pieces angle plates per stand
- Painter’s tape
- Planters The Ikea ones pictured are currently sold out, but you can use these similar ones
- 6 pieces wooden plaque per stand
- 1 wood stain in color of your choice. We used American Walnut finish
- Foam brush
- Gold spray paint for the feet
- Spray paint optional for the planter color
- white sand optional
Instructions
- To prep the legs and wooden plaque base, use a foam brush to stain the unfinished wood.
- Then, let dry completely.
- Next, tape off the stained wood section, leaving only the feet exposed so that you can spray paint them gold and let dry overnight.
- To prep the planters, I spray painted them in brighter hues as well to go along the bright studio. But I think the black and white would look awesome with this tutorial as well.
- Lay three angled plates in a triangular shape on the bottom of the wooden plaque.
- Screw each into plant in place. Make sure that the angle is facing outward from one another.
- Then, twist the finished base legs into each plate.
- If you’re adhering the pot to the base, you can use Bulldop Grip glue to adhere wood and ceramic together.
- Or you can drill a large bolt or screw through the drip hole of the planter into the center of the wooden plaque.


Please note that we may earn a commission for some of the above affiliate links. However, products featured are independently selected and personally well-loved by us!
Where did you buy the pure white sand?
Hi Rebecca! Great question! We actually just updated the blog post with a link and this info. You can purchase white sand online: https://shopstyle.it/l/bh4bz. You’ll even be able to find it at a local hardware store (i.e. Home Depot), craft store (it may only be in a small size) or even the aquarium section! Hope this helps!
.
What colors of spray paint did ya use?! I am so in love!
I Xavi! Our favorite brand is Montana GOLD Acrylic spray paint. They have a ton of choices but our favorites are – Shrimp pastel & flipper!
https://www.montana-cans.com/en/spray-cans/spray-paint/gold-400ml/montana-gold-400ml-colors
Love this idea!!! A little on the pricey side though. The large planter is
$40 plus all the supplies it’s going to end up over $60! Any cheaper suggestions?
Hi Alisa – we haven’t found too many cheap alternatives that give the same look! Typically, a planter like this would be well over $100 we’ve found!
Amazing idea! Love the gold paint you used for the feet. I will definitely be trying this one out. Thanks for sharing!
So glad you like the idea! xo
Love this project! Can you tell me what type of cactus Is in the white planter? And the pink one too?
Love itttt
So glad!
where did you get the actual pots for this project. I have been looking for something like those for a while now
Hi there! The pots are linked above under the materials section :)
Can you tell us more about this? I’d love to find out more details.
Hi Douglas! What more would you like to know?
I enjoy, result in I found just what I was looking for. You’ve ended
my 4 day lengthy hunt! God Bless you man. Have a nice day.
Bye
So glad!
thE LINK FOR
Wood stain in American Walnut finish IS NOT RIGHT. DO YOU RMEMBER WHERE YOU GOT IT?
As a Newbie, I amm permanently exploring online for articles that cann aid me.
Thank you
We’re all newbies around here! Glad to help!
Love them!! Question: did you spray paint them from black pots?? The only ones on the ikea site are black.
Where do you get the planters from? Or perhaps you make them too?
Hello! This is my first comment and wanted to start with : I love your blog and your ideas are always very tasteful. Thank you.
About the planters, I do have a question. How to you water the plant if it is fixed to the wooden plaque? Usually with cacti, you need to let it dry and then once in a while give it a good watering and the water will drain through the bottom hole. Just curious how you maintain yours? :-)
Beautiful again. Great job!
Alizee
Well thank you so much for the taking the time to say hello and for the kind words!
Cute idea with stands but I second the concern about adhering the pots to the stands…..N O T GOOD IDEA unless you want to end up killing the cacti. They do not like any standing water. Not even the tiniest bit. So be safe and don’t adhere the pots.
where do you find the actual cactus plants? This is all I’m missing…
They are really awesome!!
These are super cute! Reminds me of doll house furniture and good memories of my childhood. Fun.
Thanks so much for this awesome idea! I love MCM furniture and I have been look for planter options but they are all so super pricey. And i never thought to look on amazon for the wood legs either. But im glad i found out. Im working on something now and i was thinking about buying some legs from Pretty Pegs…BUT not now! lol. Amazon here i come. :)
these are fantastic…my sister in law just sent me a link to your blog, and i can’t stop reading!
This is FABULOUS!! I need to make 100 of these ;) Where did you guys those amazing cacti?? They are unreal
That is so cute!!! Love it <3
https://aspoonfulofnature.wordpress.com/
These are so adorable! I love how you make everything your own! Incredible!
WritingMonique
Oh MAN you are just too stinkin’ creativity. I love that your DIY projects don’t LOOK diy. As in, you could sell this stuff at West Elm and I’d be none the wiser. ;) Thank you for sharing this! I am definitely going to look into making these. They’re so cute!
Also, random, but I like the way you put your materials in that little box. So profesh and clean! :)
xo Melyssa
The Nectar Collective
Another CUTE idea! My Grandmother had the greenest thumb in the south and had plants everywhere – even a Christmas Cactus that belonged to her mother! These planters remind me so much of planters and plant stands she had! Thanks for the trip down a very precious memory lane!
What a cute DIY! love it :)
xoxo
Liv Studios
Realy great idea, they look awesome!! I love cacti
Hannah
http://crafternooncabaretclub.com
My favorite! Cacti are so great and you are killing me with these! The white sand is what sets me over the edge! I’m making a frame with my hands right now! This makes me really excited to visit Arizona next week! Home of the cactus!
SO CUTE! I’ve been meaning to use those legs somewhere! I found a pair of vintage ones at a recent rummage sale, but these are such an inexpensive alternative for the look
Where did you get the pots? I really like those with your stands.
Oops, never mind. I saw the link to Ikea on my second read-through. :)
I love this!! This is so beautiful!
LOVE this idea so, so much! Thank you! Bookmarked :)
Circus & Bloom
♥♥♥
I LOVE this idea!!! what kind of spray paint did you use for the planters?
OMG! Those tapered legs are so reasonably priced! Can’t wait to try this and to come up with other ideas for these tapered legs! xo
katie a. // http://bluepoppyblog.com
These are great, Ash. I love ’em.
This is the coolest thing ever!!! I love the white sand, seriously beautiful !!
Absolutely adorable! And quite unique x
FOUND SOME PAPER BLOG
Way to much work.