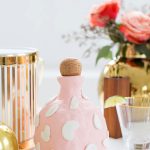
DIY Clay Decanter
Make this fun DIY decanter! It's a great project for beginners, too! You can make it any color you like!
Servings: 1
Cost: $30
Equipment
- Foam brush
- Petite four cutters optional for shapes
Ingredients
- Air dry clay
- 1 cup water
- 1 liquor glass bottle empty and clean
- Gloss shellac
- Wax paper
- Acrylic paint optional in color(s) of your choice if you’re painting the final look
Instructions
- Starting with your empty glass bottle, apply thick layers of the clay in sections pressing down firmly to blend them together.Make sure to leave the top of the bottle last so that you have something to grip when you’re blending and placing the clay.We love the look of the unfinished clay surface. But if you’d prefer yours to be smoother, you can intermittently use a wet foam brush to moisten the clay and smooth the surface with your fingers.Make sure to make the clay go down to the edge of the glass bottom, but didn’t cover the bottom so that it had a nice even surface.
- Once you’ve covered the majority of the bottle, you can finish the top lip. To add a little extra pizazz, cut out shapes using petite four cutters to place around the bottle.
- Let the clay dry for at least 24 hours, making sure it dries slowly.If it dries too quick you’ll get cracks in the clay. To avoid this, you can wrap the finished piece in plastic wrap so that moisture evaporates really slowly.This means you’ll also have to wait quite a few extra days for the piece to dry completely.
- When it’s completely set, use acrylic paints to cover some or all of the pieces.
- Spray the entire bottle with a coat of spray shellac — a food safe sealant— making sure to NOT spray inside the bottle. To avoid spraying inside the bottle, stuffed a ball of paper napkins in the top.