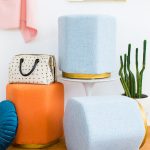
How To Make DIY Metallic Gold Stool Bases
Learn how to make metallic gold stool bases with these easy-to-follow instructions.
Cost: $50
Equipment
- Drill and 3-inch all-purpose screws
Ingredients
- Hexagon stools Or use your own!
- 2 per stool of these 3/4 inch thick MDF rounds that are just smaller than your stool base I used 14″ for the hexagon stools. We purchased ours on Etsy and you can find similar ones here, or online at shops like Amazon or at your local hardware store.
- Gold leaf rub n’ buff
- Wood filler Optional for a more seamless look
- Sandpaper
- Painter’s tape
- Adhesive foam rounds for an extra cushion on the bottom optional
Instructions
- The hexagon stools come with these feet pre-installed. So you’ll have to pull all of the feet out to create a flat surface for the new DIY bases.All you have to do is use your hands and pull up with a twist.
- To make the DIY Metallic Gold Stool Bases tall enough to see them from the side, I stacked two of the 3/4 inch MDF rounds on top of each other for added gold effectWhile you don’t have to do two, I definitely recommend it if you actually want to see the gold well!
- We screwed the MDF rounds into the stool bases first because I thought that was easiest to see the final look as we were figuring everything out.In hindsight, it might be easiest (aka less messy) to apply the gold rub n’ buff and wood filler before screwing them onto the stool.So you could screw them in loosely just to make sure you like the final look.
- To do that, you’ll have to glue the two MDF round pieces together. Let dry before using the wood filler and rub n’ buff. Then, screw them onto the stool last.For using the wood filler, you can apply it with a putty knife or your fingers.I found it was easiest to apply with fingers and then smooth it out with the putty knife.
- Once applied, let it dry completely then smooth with fine sandpaper.Now it’s time for applying the Rub n’ Buff, which is basically my favorite thing ever. It goes on like a wax, and dries permanently.It gives a much more texturized gold look than simple spray paint.
- To apply it, I just squeeze some onto my fingers and rub it on thoroughly in small sections. (I always wear gloves because it stains easily.)
- Once the surface is fully covered in each small section, I run my finger across it in the same direction to essentially polish it. Because whatever the texture looks like while it’s wet, is how it will stay when it’s dried.
- From there, I let the gold dry completely and then adhered the foam feet to the bottom and that was it!