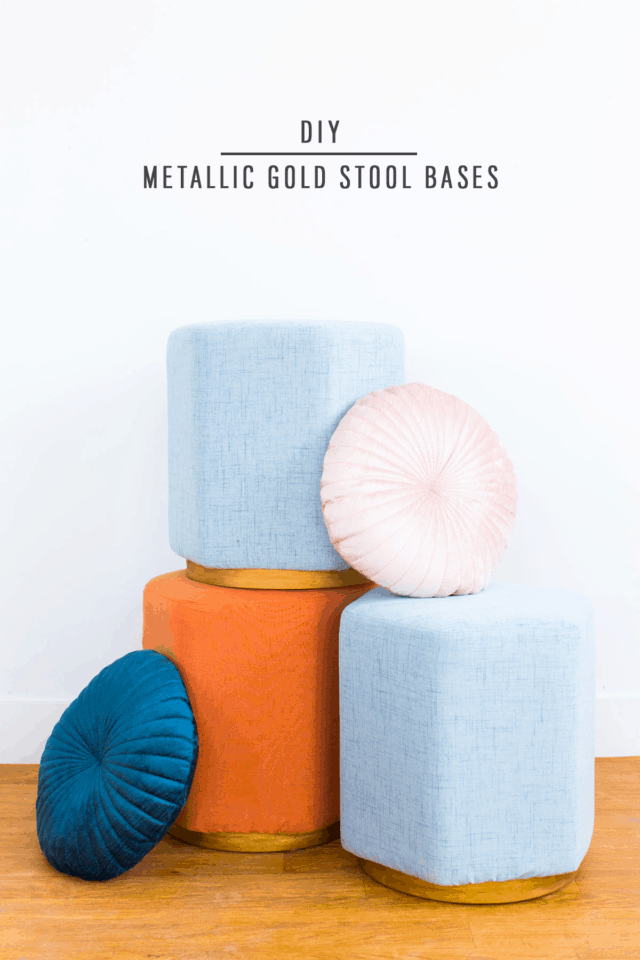
How To Make DIY Metallic Gold Stool Bases
We’re fulfilling those mid-century and gold decor dreams with these DIY Metallic Gold Stool Bases for transforming any ottoman!
I finally have a solution for those gold-bottomed stools that we’ve been hunting for hours online. (Or is that just me searching?!)
On account of my not being able to find any that aren’t $300 plus dollars minimum (if I could find them at all), I finally came up with these DIY Metallic Gold Stool Bases that you can attach to just about any ottoman.
As long as you have a stool or ottoman with a structured base, then these will work for you. (Sadly, no to the floor poufs!)
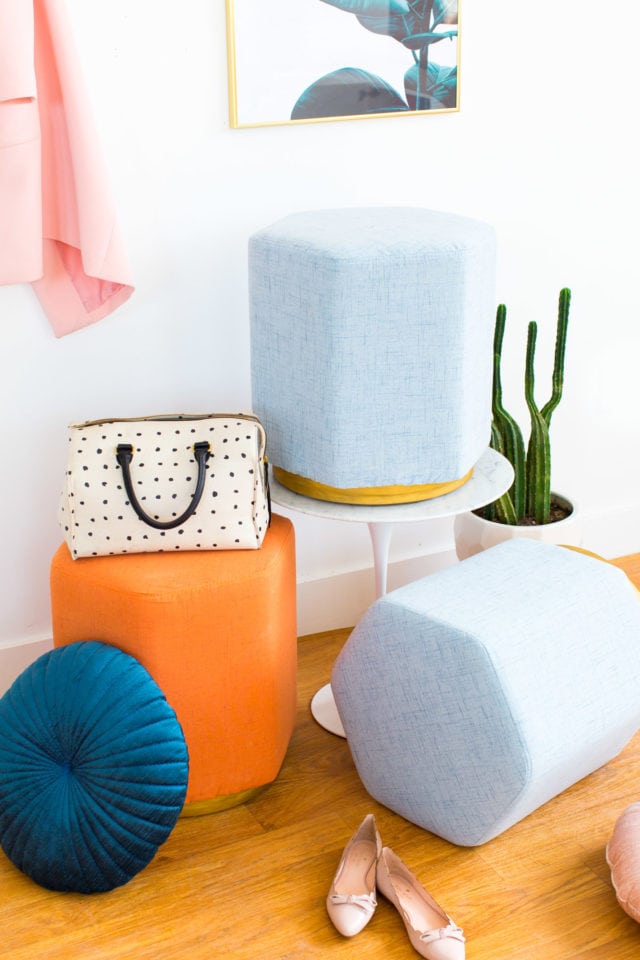
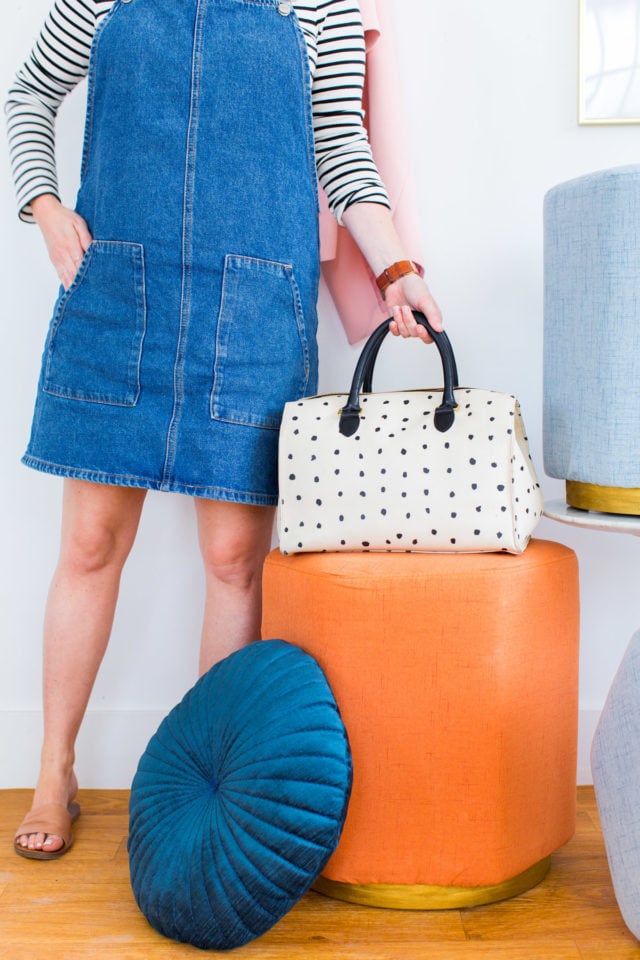
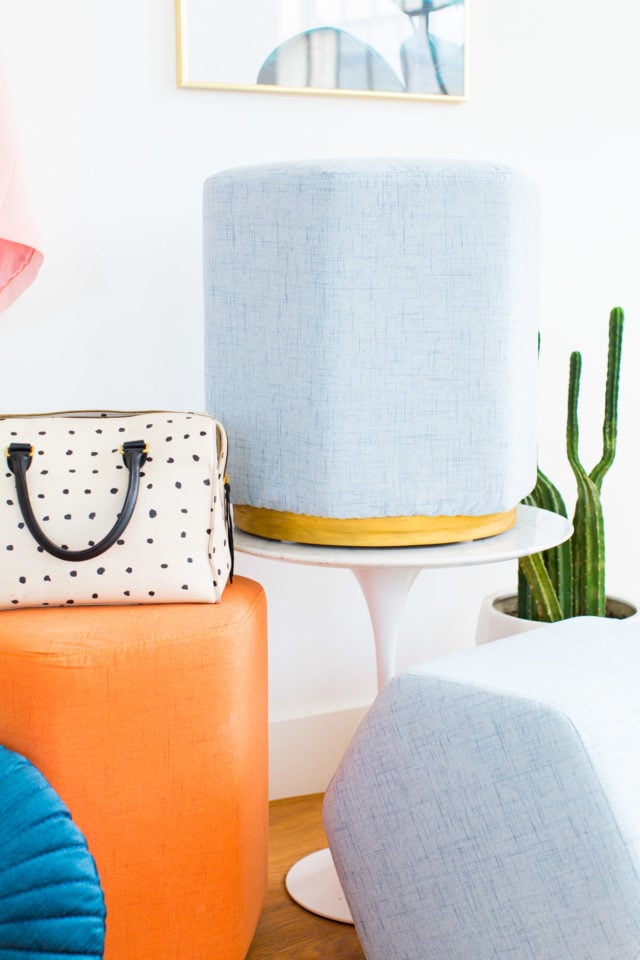
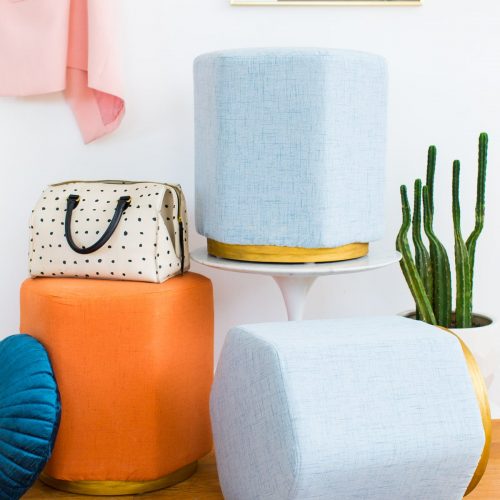
I love the way these DIY Metallic Gold Stool Bases turned out! I’m going to use the two blue ones in our new living room design.
The double bonus is that I made these cuties for $85 apiece, including the price of the hexagon stools themselves!
Are we not totally going to be best friends now, or what?!
You’ll be surprised with how something simple as gold legs can makeover a furniture piece.
Check out the transformations when we changed sofa legs into DIY Metallic Gold Legs and this DIY Marble Tabletop with Gold Legs.
Materials And Tools Need To Make DIY Metallic Gold Stool Bases
Hexagon stools — Or use your own!
2 per stool of these 3/4 inch thick MDF rounds that are just smaller than your stool base — I used 14″ for the hexagon stools. We purchased ours on Etsy and you can find similar ones here, or online at shops like Amazon or at your local hardware store.
Wood filler — Optional for a more seamless look
Drill and 3-inch all-purpose screws
Adhesive foam rounds for an extra cushion on the bottom — optional
How to Make DIY Metallic Gold Stool Bases
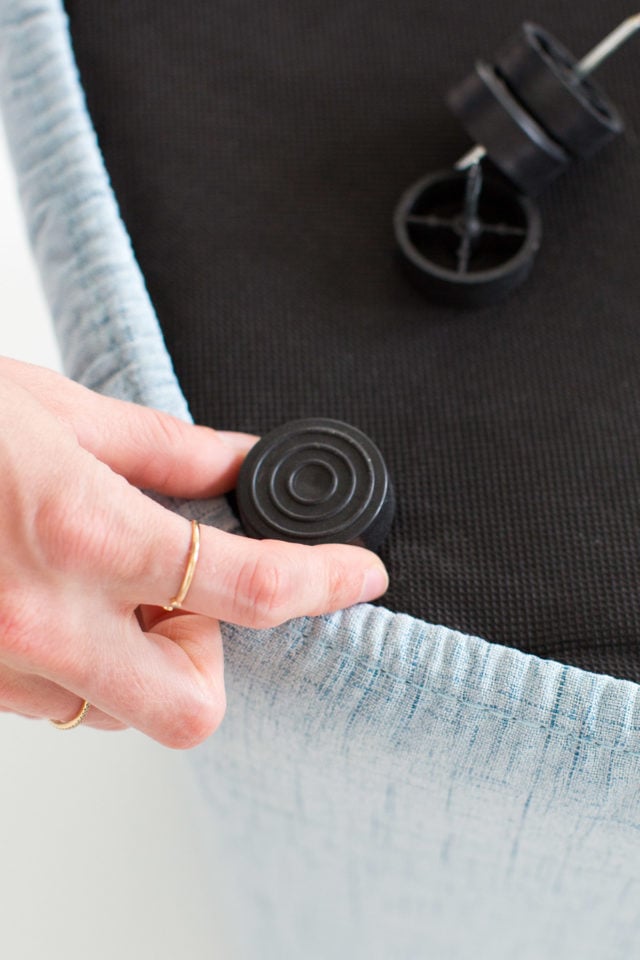
1 — The hexagon stools come with these feet pre-installed. So you’ll have to pull all of the feet out to create a flat surface for the new DIY bases.
All you have to do is use your hands and pull up with a twist.
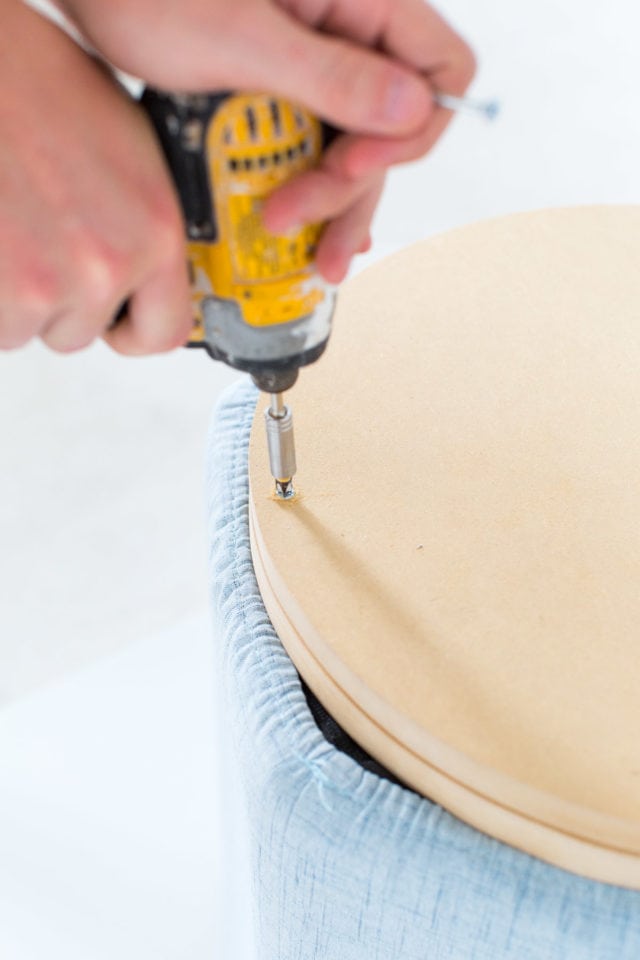
2 — To make the DIY Metallic Gold Stool Bases tall enough to see them from the side, I stacked two of the 3/4 inch MDF rounds on top of each other for added gold effect.
While you don’t have to do two, I definitely recommend it if you actually want to see the gold well!
3 — Now that said, we screwed the MDF rounds into the stool bases first because I thought that was easiest to see the final look as we were figuring everything out.
In hindsight, it might be easiest (aka less messy) to apply the gold rub n’ buff and wood filler before screwing them onto the stool.
So you could screw them in loosely just to make sure you like the final look.
4 — To do that, you’ll have to glue the two MDF round pieces together. Let dry before using the wood filler and rub n’ buff. Then, screw them onto the stool last.
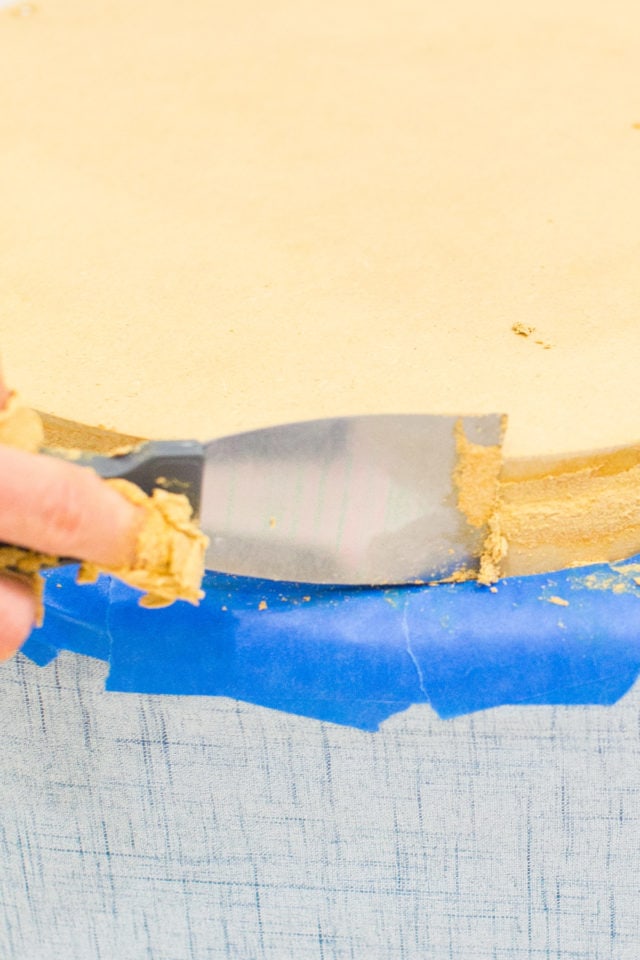
For using the wood filler, you can apply it with a putty knife or your fingers.
I found it was easiest to apply with fingers and then smooth it out with the putty knife.
5 — Once applied, let it dry completely then smooth with fine sandpaper.
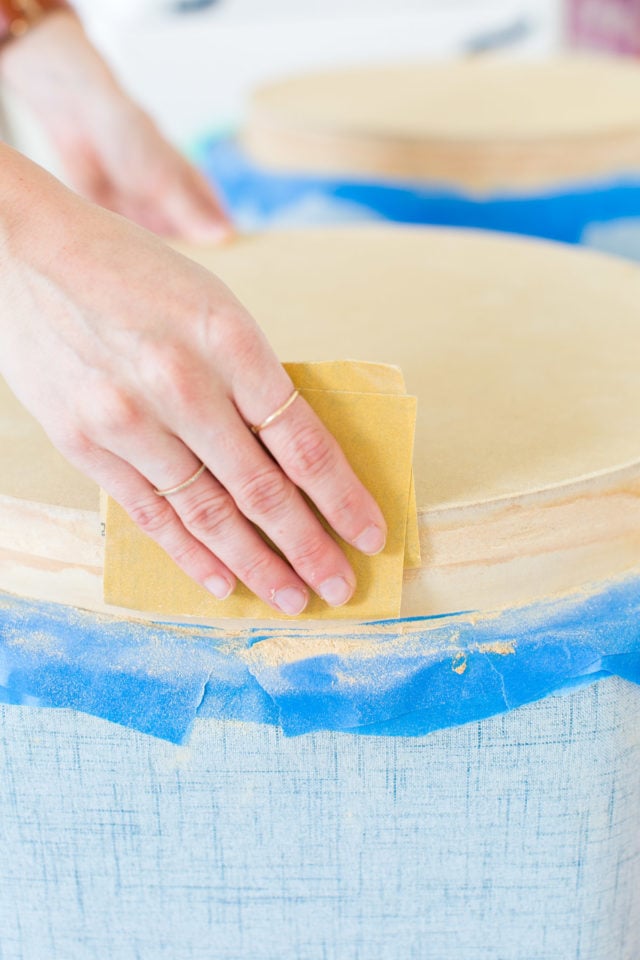
Now it’s time for applying the Rub n’ Buff, which is basically my favorite thing ever. It goes on like a wax, and dries permanently.
It gives a much more texturized gold look than simple spray paint, don’t you think?!
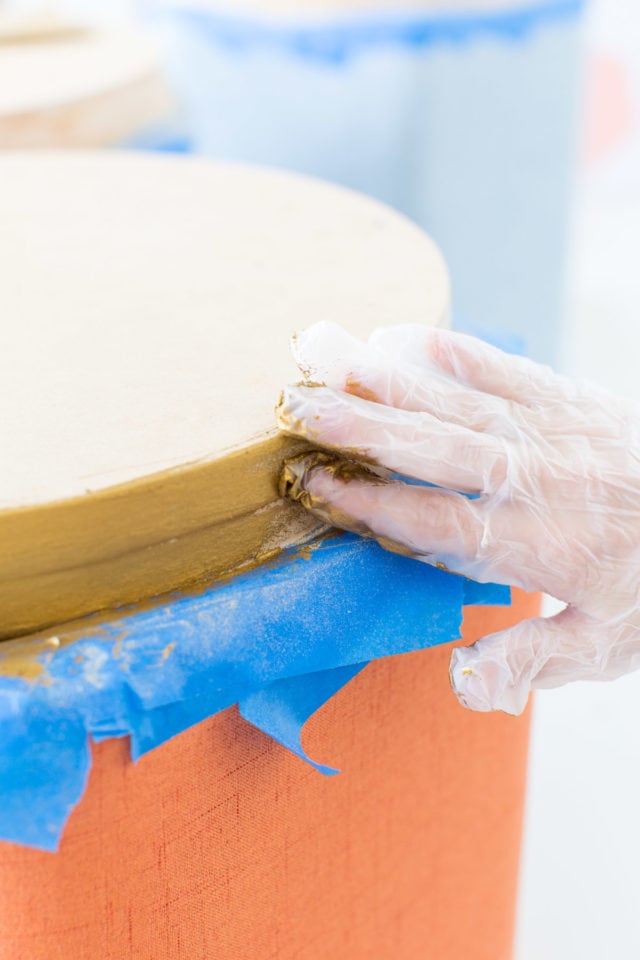
6 — To apply it, I just squeeze some onto my fingers and rub it on thoroughly in small sections. (I always wear gloves because it stains easily.)
7 — Once the surface is fully covered in each small section, I run my finger across it in the same direction to essentially polish it. Because whatever the texture looks like while it’s wet, is how it will stay when it’s dried.
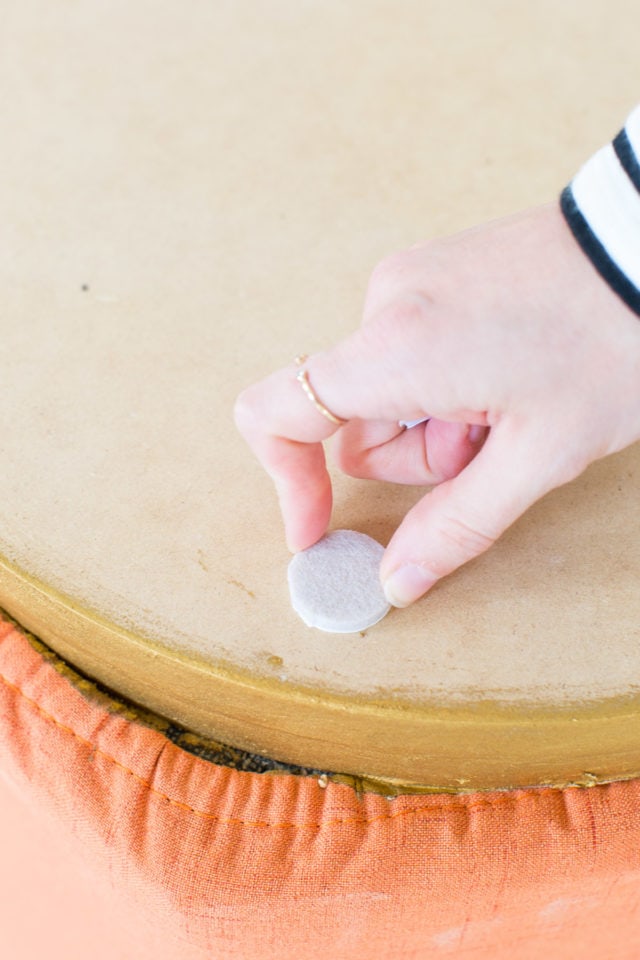
8 — From there, I let the gold dry completely and then adhered the foam feet to the bottom and that was it!
I’m a big advocate for foam pads so that things can be easily scooted around without damaging the floors.
What do you guys think about the way the DIY Metallic Gold Stool Bases turned out?!
Do you see what I mean about making the height tall enough for the bases to make a visual statement? The two 3/4 rounds make for the perfect height!
More DIY Projects To Try
- DIY Woven Stool For Your Home Décor
- Budget Home Decor: 36 Bar Stools under $300
- How to Make a DIY Mid Century Wall Clock
- DIY Painted Chair Makeover
How To Make DIY Metallic Gold Stool Bases
Equipment
- Drill and 3-inch all-purpose screws
Materials
- Hexagon stools Or use your own!
- 2 per stool of these 3/4 inch thick MDF rounds that are just smaller than your stool base I used 14″ for the hexagon stools. We purchased ours on Etsy and you can find similar ones here, or online at shops like Amazon or at your local hardware store.
- Gold leaf rub n’ buff
- Wood filler Optional for a more seamless look
- Sandpaper
- Painter’s tape
- Adhesive foam rounds for an extra cushion on the bottom optional
Instructions
- The hexagon stools come with these feet pre-installed. So you’ll have to pull all of the feet out to create a flat surface for the new DIY bases.All you have to do is use your hands and pull up with a twist.
- To make the DIY Metallic Gold Stool Bases tall enough to see them from the side, I stacked two of the 3/4 inch MDF rounds on top of each other for added gold effectWhile you don’t have to do two, I definitely recommend it if you actually want to see the gold well!
- We screwed the MDF rounds into the stool bases first because I thought that was easiest to see the final look as we were figuring everything out.In hindsight, it might be easiest (aka less messy) to apply the gold rub n’ buff and wood filler before screwing them onto the stool.So you could screw them in loosely just to make sure you like the final look.
- To do that, you’ll have to glue the two MDF round pieces together. Let dry before using the wood filler and rub n’ buff. Then, screw them onto the stool last.For using the wood filler, you can apply it with a putty knife or your fingers.I found it was easiest to apply with fingers and then smooth it out with the putty knife.
- Once applied, let it dry completely then smooth with fine sandpaper.Now it’s time for applying the Rub n’ Buff, which is basically my favorite thing ever. It goes on like a wax, and dries permanently.It gives a much more texturized gold look than simple spray paint.
- To apply it, I just squeeze some onto my fingers and rub it on thoroughly in small sections. (I always wear gloves because it stains easily.)
- Once the surface is fully covered in each small section, I run my finger across it in the same direction to essentially polish it. Because whatever the texture looks like while it’s wet, is how it will stay when it’s dried.
- From there, I let the gold dry completely and then adhered the foam feet to the bottom and that was it!

Don’t forget to share your DIY Dressing table with us on Instagram using the hashtag #sugarandclothloves. We always love seeing all of your creations!
More DIY Recommendations For You!

Please note that we may earn a commission for some of the above affiliate links. However, products featured are independently selected and personally well-loved by us!
These are fantastic! I might need a couple of these for my living room in the purple option. Hoping it’s a nice berry color. I can’t believe how awesome these are! Nice work!
Thank you, Meredith! These would look amazing in purple. Let us know how they turn out when you do! xo
Loved the idea, it’s very simple and I can see a lot of room to experiment, maybe try different colors… but the gold was a nice touch!
I love these! I want to make some for when we move into our new house in a few weeks!
Paige
http://thehappyflammily.com
You so should, Paige! And congrats on the new house! That’s so exciting! xo
How creative, they make the stool look like the right height and looks like a $300+ stool.. Luv it!!
Thank you! That’s exactly what we were hoping for. Glad you love them as much we do! :)
These look amazing Ash. I love ’em!!!
Thanks so much, B! xo
These are awesome!!
So glad you like them, Meg! :)