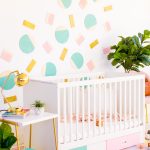
DIY nursery abstract wall decor
Add a little personality to your nursery with this easy and affordable DIY wall decor project.
Cost: $25
Equipment
- Small white nails or heavy-duty artwork adhesive
Ingredients
- Craft wood squares, circles, and small rectangles
- Krylon ColorMaster® Paint + Primer Satin Ballet Slipper
- Krylon ColorMaster® Paint + Primer Satin Catalina Mist
- Krylon Shimmer Metallic in Gold Shimmer
Instructions
- Start by tapng off random edges of your wooden shapes. We chose to match all of the shapes but you can mix and match as well!
- On a disposable surface, in a well-ventilated area, spray your shapes with the Krylon® Brand spray paint colors of your choice. Before you start, read the label for safety and application instructions. We used 2 cans of spray paint.
- Allow all of the shapes to dry. Once the shapes are dry repeat with one more coat of spray paint. To avoid peeling or chipping, the painter’s tape should be removed when the paint is dry to the touch. Once you carefully remove the painter’s tape, you allow the shapes to fully dry. From start to finish this entire project took us about 2 hours.
- Once the pieces are fully dry, you’re ready to create a wall pattern by attaching your color block shapes to the wall!
- The most secure way to attach the pieces to the wall is by using small nails in a discrete color like white, but if you can only have the temporary decor in your space, using something like heavy-duty adhesive artwork tape will suffice as well, just be sure to keep the shapes out of baby’s reach regardless.For instance, the styled crib you see here has about a foot of space between the edge of the crib and the wall to be sure that no little hands can create a dangerous scenario.
Notes
- We chose to go with a more cohesive look and color all of the pieces for each shape in the same color. For this design, I opted to paint the circles in Catalina Mist, the squares in Ballet Slipper, and the rectangles in Gold Shimmer.
