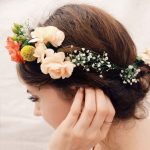
DIY Floral Headpiece
A step by step guide on how to make a floral headpiece for your wedding, prom, or special event.
Servings: 1
Cost: $20
Equipment
- Wire cutters
- Needle nose pliers
Ingredients
- Flowers of your choice
- Floral wire
- Wire twig optional for aesthetics
Instructions
- Make a loop using a floral wire that is a tiny bit bigger than where you’d like the headpiece to lay on your head. We like wearing the crown diagonal on our head. It’s important to make your loop slightly larger than your head. It may not seem the right size, but after you start adding flowers onto the crown it will bulk up.
- Fill the base with filler or wildflowers. To do so, take a 1.5" piece of floral wire and wrap part of it around the middle of the flower stem and the remaining strands of wire around the base loop.
- To attach the larger blooms, string floral wire through the back of the bloom’s base. And then, twist each side of the wire onto the base loop again.Make sure you use the needle nose pliers to push any ends of the wire that may be poking out. They do not feel good!
- Continue filling up the DIY Floral Headpiece with as many blooms as you’d like.If you have lighter hair that the floral wire shows up on, you can use wire twig to wrap around the entire base to add a more rustic look to it.
