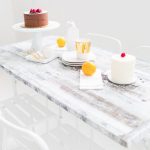
DIY Reclaimed Wood Folding Table
This easy reclaimed wood folding table project is perfect for any small space!
Servings: 1
Cost: $100
Equipment
- Dremel, rotary saw, or table saw
- Drill
- Pencil
- Measuring tape
- Lightweight sandpaper
- Brush
Ingredients
- 2 folding table leg
- 1 piece plywood in the table length, width and thickness size of your choice
- 1 box Stikwood Weathered Wood or any peel and stick wood planks
- 1 box Stikwood Weathered Wood Corner Trim
- Spray paint optional for the table legs
- Craft paint optional
Instructions
To assemble the table:
- Screw the folding table legs on both sides of the plywood to the bottom of the table. And then, fold out the legs.
- Optional: If you want an all-white color scheme, spray paint the legs and bottom of the table. Allow to dry.
Assemble the corner and border trim:
- Measure and mark where the trim overlaps in the corners.
- Use a Dremel or rotary tool to cut out a small 1″ square for the second trim piece to rest in.Rather than making 45-degree cuts to fit the wood trim around the corners, we decided to do 90-degree cutouts for a more modern look.You’ll do this all the way around the table for every edge.
- Peel and stick your trim in place.
Prep the wood boards:
- Lay the pieces of Stikwood onto the table to see what layout you like best. For a mismatched look, alternate lengths of your board. Each board has unique characters so make sure to get your desired design.
- When you've achieved your desired placement, measure and mark where to cut each board to fit within the border of the trim all the way around.
- Assemble the cut boards onto the table by starting with one row and working your way across to the other side of the table.Do not peel the adhesive yet. You want to make sure that all the cut boards fit properly.If not, make any necessary adjustments before adhering.Because once the Stikwood goes down, there’s no peeling it back off in one piece!
Assemble the wood boards:
- Peel the adhesive backing off of the wood board and press the board down firmly in place. Starting with one row and work your way across.
- Optional: Sand down any rough cut edges or corners for a smooth surface.
- Optional: Touch up any exposed raw wood with a bit of black and white paint (or color of your choice) to match the rest of the distressed white color.
Notes
One box of Stikwood comes with more than enough wood for 1 table so we used the remaining pieces for additional DIYs. We wanted to use real reclaimed wood without the price tag and heaviness since this is a portable table which is why we opted for Stikiwood. You can achieve a similar and more budget-friendly look with vinyl adhesives.