DIY Flip Photo Album
This DIY Flip Photo Album tutorial shows you how to create a personalized keepsake album, perfect for showcasing your favorite photos and sparking nostalgic joy!
Servings: 1
Cost: $30
Equipment
- Hole punch diameter of 1/8″ hole
- Foam brush
- Pencil
Ingredients
- 1 wood square size dependent on size of photos
- 1 subway tile or any other desired base material
- 2 shoulder hook
- Wood stain in color of choice
- Instant epoxy glue
- Personal polaroid photos
Instructions
- Thoroughly sand the surface of the wood square for smooth edges and even staining.
- Apply a thin coat of wood stain to your wood square using the foam brush. Let the stain dry completely according to the product instructions. Apply additional coats for a deeper color, if desired.
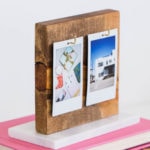
- Hole punch the Instax Mini prints of your choice in the middle of the top white border with a 1/8 hole punch. Lay two prints side by side on the board to use as a guide to mark where to insert your hooks.
- Attach the shoulder hooks to the wood by twisting them into place based on your hole markings. These rings will hold your Instax photos together.
- Apply a generous amount of instant epoxy glue to the bottom of the wood piece. Quickly and carefully press the wood piece onto the center of the marble tile, ensuring its level to create a stand for your album. Hold firmly for a few minutes to allow the glue to set.
- Carefully slip the photos into the shoulder hooks. And now you have your own DIY Flip Photo Album!
Notes
Estimated cost is based on materials chosen. Ours cost us less since we used scrap wood and leftover tile from a renovation project.