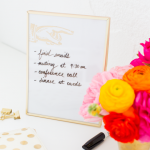
DIY Dry Erase Board
Reinventing the ugly token office supply with this cute desktop organizer, a DIY dry erase board that you can easily make from items already at home.
Servings: 1
Cost: $30
Equipment
- Scissors
Ingredients
- 1 photo frame with glass any size of your choice
- 1 white cardstock or construction paper
- Gold foiling pen optional
- Stencil Optional
Instructions
- Take out the glass from the photo frame and clean it thoroughly to ensure there are no smudges or residue.
- Cut a piece of white paper to the same size as the glass in the frame. Make sure it fits snugly within the frame without any gaps so that you have a nice white backdrop to write on.
- Optional: Personalize your dry erase board by adding decorative elements, like a stenciled drawing or “to-do list” heading. Add your desired permanent graphic or text onto the white paper the gold foil pen. And let it dry completely.
- If the frame has a backing, reattach it to hold the glass and paper securely in place. Now you can write on the front glass from the frame with dry erase markers!