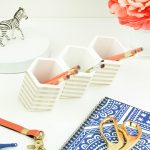
Hexagon DIY Pen Holder
Create a pretty way to keep your desk organized while displaying all your cute things at the same time!
Servings: 1
Cost: 15
Equipment
- Miter saw or hand saw
- Ruler
- Pencil
- Scissors
- Paint brush
Ingredients
- 3 hexagonal wooden cup
- Patterning tape or washi tape 1/4" wide
- White acrylic paint or any other color
- Heavy card stock or chip board
Instructions
- Drawing a diagonal line with a ruler on the side facets of each cup, towards the base. I chose to draw the diagonal at a 22.5 degree angle.
- Set your miter saw to the angle drawn on the cups. In my case, I set the saw to 22.5 degrees.
- Saw along the angled pencil line, cutting off the base of each cup.
- Tape 1/4″ horizontal stripes around each cup with patterning or washi tape. Start at the mouth of the cup and work your way down to the bottom. Press tape down firmly to prevent paint from seeping underneath. Do your best to line up the stripes from cup to cup.
- Paint the outside of the cup, the rim of the cup and the inside of the cup with acrylic paint.
- Allow to dry and apply another coat.
- Trace around the bottom of the angled cup onto the underside of the card stock. Repeat twice more.
- Cut out the 3 hexagons. These will serve as the bottom of the cups.
- Turn cups upside down and attach the card stock hexagons to the bottom of each cup with wood glue.
- Attach the 3 cups together, side-by-side with wood glue.
- Allow to dry and fill with your favorite supplies.