DIY Marbled Macarons
Beautify your macarons with a simple ingredient!
Cost: $35
Equipment
- Toothpicks
- Wax paper
Ingredients
- Almond or vanilla macarons Store-bought or use homemade French macarons or Italian macarons
- Gel food colors
- Whipped cream or Cool Whip
- Edible gold luster dust optional
Instructions
- To start, you can tape down a sheet of wax paper to work on or you can just use paper plates if you’re not making that many. Even better than shaving cream? Whipped cream!
- Use a spatula to smear a thin layer of whipped cream or cool whip onto your plate or wax paper. This is what you’ll be dipping the macarons in!
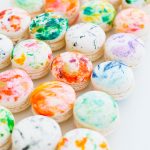
- Using toothpicks, create a design in the whipped cream.Below is a photo of what our food color patterns looked like to achieve each marbled effect. The more color, the more covered and “watercolor-ish” the macron will look.If you’re scarce with the color, it will yield a more marbled effect.
- Once you have your color pattern, place the macaron on top of the whipped cream. Make sure the sides get covered by VERY gently rolling it in the cream
- Lift the macaron back up and wait about 30 second to let the food color sink into the cookie.
- Now dab the whipped cream excess off on un-patterned paper towels.You can gently wipe the cream off if you’d like a more brushstroke effect.