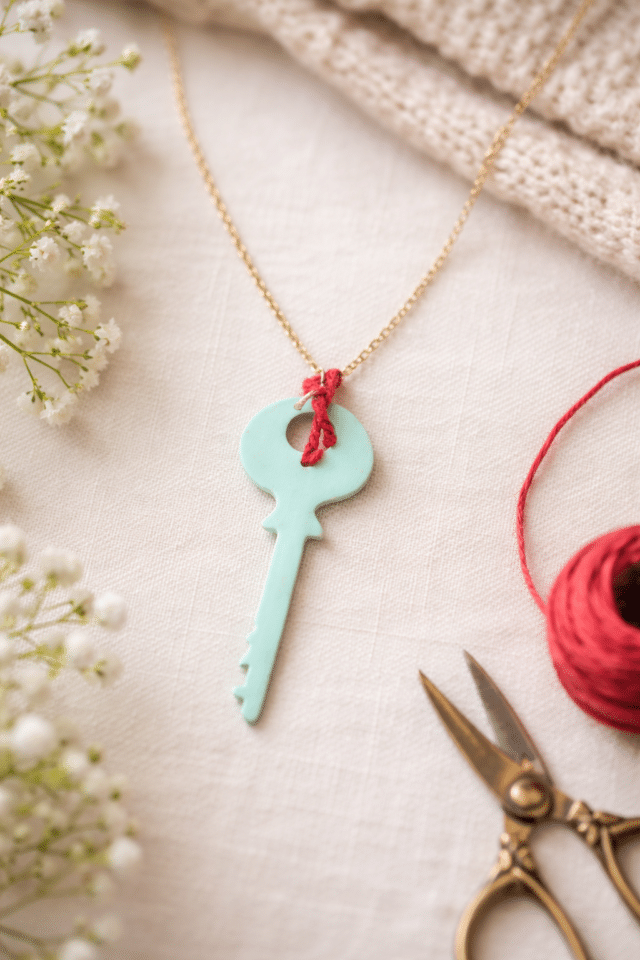
Vintage DIY Key Necklace
Create a charming Vintage DIY Key Necklace with this easy step-by-step tutorial. Learn how to turn antique keys into a unique, timeless jewelry piece perfect for everyday wear or gifting.

Vintage-inspired jewelry has a way of adding charm, personality, and a little bit of story to your everyday style. This DIY Key Necklace tutorial is a simple way to transform an old or antique key into a beautiful piece of wearable art. Whether you’ve found a vintage key at a flea market, thrift store, or tucked away in a family keepsake box, turning it into a vintage key necklace gives it a brand-new purpose.
The best part about this DIY vintage key necklace project is how easy and customizable it is. With just a few basic jewelry supplies, you can create a necklace that feels timeless, romantic, and completely unique. Add delicate chains, charms, or crystals to elevate the look and make your handmade key necklace feel even more special.
If you love DIY jewelry projects that blend vintage style with modern design, this tutorial is a perfect place to start. Not only is this vintage key necklace DIY beginner-friendly, but it also makes a thoughtful handmade gift or a meaningful accessory you’ll want to wear every day.

Materials You’ll Need
- Vintage key: Look for keys with unique shapes, ornate tops, or antique finishes. Thrift stores, flea markets, and antique shops are great places to find vintage keys that add character to your DIY key necklace.
- Necklace chain
- Jump Rings (Charm Hooks)
- Nail Polishes (one in a bold color & one in gold)
- Clear Nail Polish
- Ribbon & String

How to Make a Vintage DIY Key Necklace
Step 1 – Paint the key
Apply nail polish to the vintage key using short, thick strokes. This helps create an even coat and gives the key a colorful, updated look. Let the polish dry completely before moving to the next step.
Step 2 – Seal with a clear coat
Once the paint is fully dry, brush on a clear top coat to protect the color and add a subtle shine. Allow the key to dry again so the finish sets properly.
Step 3 – Add the jump ring
Open a small jewelry jump ring with pliers and thread it through the hole at the top of the key. Close the jump ring securely so the key is ready to hang from a chain or ribbon.
Step 4 – Attach the necklace
Thread a chain, string, or ribbon through the jump ring to create your necklace. For a more rustic vintage look, leave the key unpainted and simply tie a ribbon or twine through the ring for an easy DIY key necklace.


Tutorial Tips
- Mix textures for a vintage look: Combine different materials like ribbon, velvet cord, leather, or delicate chains. Mixing textures can make the necklace feel more layered and visually interesting.
- Add small embellishments: Tie a small bow, add a charm, or attach a bead to the jump ring to personalize your vintage key necklace. These little details can make each piece feel unique.
- Leave some keys natural: Not every key needs paint. Leaving a few keys in their original antique finish creates a more authentic vintage style and adds contrast if you’re making multiple necklaces.

Frequently Asked Questions
What does wearing a key necklace mean?
Keys are seen as a symbol of good luck and fortune in many cultures. The belief dates back centuries ago, when people would wear keys around their necks for protection or wisdom—to open any barrier they came across: physically (with hinges), mentally (by understanding) and spiritually too!
What does a key symbolize?
Keys are like the key to your freedom. They can open up new opportunities or lock you away from everything that matters most in life– whether it is opening locks for others, providing security by means of possession only one person knows how these things work!

Please note that we may earn a commission for some of the above affiliate links. However, products featured are independently selected and personally well-loved by us!
We really love your website, it has engaging information, Thank you!
Thanks Raleigh!
Vintage malls… best place for a vintage key!
hey! I stumbled upon your site and found this post help and inspiring! thanks for sharing :)
what gold glitter nail polish did you use?
Hey Kate! I used Glow Up Already by OPI and added a few sprinkles of Martha Stewart Gold glitter while it was still wet. Let me know how it turns out for you :)
Amazing! What a cute blog. The kind i always wanted to have but been too lazy to build :(
Keep it up, so happy to check it everyday :)
Thanks Sandra! You’re the reason I try to keep up with it :)
Oh my, so cute! I never thought of painting keys with nail polish; what a great way to revamp them! And the ribbon is an adorable touch. If you’re into key jewelry, you might like this project we have on our site:
http://www.allfreebeadedjewelry.com/Wire-Necklace/Secrets-at-Midnight-Necklace
It has a little lock too!
Thanks for sharing this tutorial! I’m definitely going to have to give it a try :)
Let me know how it works out for you! And thanks for the link!
I saw Maize Hutton share a tutorial exactly like this last summer.
I’m not familiar with Maize Hutton, but I’ll have to check it out! I’m new to the blogging world :) Thanks for sharing!
Hi! Have you tried the crackle nail polish for this? I wonder if that would make for a more distressed look? Idk…hmm perhaps I’ll have to try… Lovely blog doll, have a nice day!
I haven’t tried the crackle nail polish but that idea is brilliant!
So cool! I will definitely try to do it, I just need to find the vintage keys :)
This just gave me the best idea! How cute and easy would it be to cut out key shapes from card stock, paint/glitter them up, and use them as part of gift wrap or other craftinesses?
So classy!
Where do you find your vintage keys and what’s the best place to look out for some?
I actually had a bag of them sent to me recently as a gift (from Seth’s mom), but i’ve had the most luck finding them in old antique shops (not nice, new shops), and estate sales.
I had the same question, try ebay, i saw quite a few listings.
So true! The best question would be what is Ebay not good for.
ebay will be expensive, i have an obsession with skeleton keys. I would suggest thrift stores or antique places. and patience, dont spend too much on the first ones you see. happy hunting
Love this! Great idea.
These look so good!
I love the origami garland you featured
OMG, these are so darling, I love it!
this is so pretty. i’m glad i found your blog!
thank you, that’s so nice of you to say!