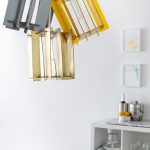
DIY Cardboard Pendant Light
Learn how to transform a simple cardboard box into a stylish pendant light using just a few basic tools and a light kit.
Servings: 1
Cost: $50
Equipment
- X-Acto knife or scissors
- Ruler
Ingredients
- 1 cardboard box or cardboard sheet
- 1 pendant light kit
- 1 light bulb 25-watt
- Spray paint optional
- Electrical tape optional
Instructions
- Cut the top and bottom panels: Start by cutting two 6" x 6" cardboard squares. In the center of each square, cut a circle about 1.5" wide.
- Make the side panels: Cut eight strips of cardboard, each measuring 1 3/4" x 9 1/2". On each strip, measure 3/4" from both the top and bottom edges, then cut a thin slit about 1/2" long. These slits are where your strips will slot into the top and bottom panels. Use the first strip as a template so they’re all identical.
- Assemble the frame: Lay one square panel flat on your table. Insert the strips into each side, sliding them into the slits you cut. Then, carefully place the second square on top and fit the strips into its slits as well. You should now have a lantern-like cube with vertical cardboard sides.
- Customize: Spray paint the exterior for a polished look. You can also wrap the edges with electrical tape for extra durability and contrast.
- Insert the light kit: Thread your light cord through the hole in the top panel, pulling it through until the socket sits snugly.
- Hang: Attach the pendant to your ceiling following your light kit’s instructions, add your bulb, and switch it on.