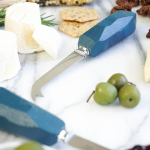
DIY Cheese Knives
Learn how to make stylish DIY cheese knives with this easy tutorial! Perfect for entertaining or gifting, these custom knives add a personal touch to your charcuterie boards.
Cost: $40
Equipment
- Mitre saw or hand saw
- Belt sander
- Electric Drill fitted with a 7/32″ drill bit
- Industrial strength adhesive
Ingredients
- 3 piece cheese knives blanks tool set
- 1 piece small 2×4 pine board
- Spray paint in the color of your choice
- High gloss clear polyurethane spray
Instructions
- Cut the 2×4 board into two 4-inch sections. Then, cut each of these 4-inch pieces vertically down the center, resulting in four 1×4-inch pieces. You’ll only need three pieces, so set aside or discard the fourth.
- Using a miter saw or hand saw, cut facets into each wood piece to create an angular, crystal-like shape. Work carefully, cutting at various angles to achieve the desired look.
- Use a belt sander to smooth rough edges and add additional facets. To do so, press the wood block’s corners into the sander, holding it in place until a flat plane forms. After sanding, each wood piece should be approximately 3.5 inches long. Repeat Steps 2 and 3 for the other two wood blocks to create a total of three “wood crystals.”
- Drill a hole at one end of each wood piece using a 7/32-inch drill bit. The hole should be snug to fit the metal cheese tools securely.
- Apply two coats of spray paint to each wood piece, allowing the paint to dry fully between coats.
- Once painted, seal the pieces with a high-gloss polyurethane spray and let them dry completely.
- Slide the bolster onto the unfinished end of the metal cheese knife.
- Insert the unfinished end of the knife into the drilled hole of the wood crystal. If the fit is too loose, apply a small amount of industrial-strength adhesive inside the hole before reinserting the knife. Allow the adhesive to dry for a few hours if used.