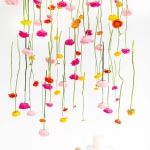
DIY Hanging Flower Installation
Transform your space with a breathtaking hanging flower installation!
Servings: 1
Cost: $450
Equipment
- Drill and drill bit
- Wire cutters
- Scissors
- Pliers
Ingredients
- 1 framed chicken wire base
- 4 screw eye hook
- 4 screw cup hook
- Picture hanging wire
- Fishing line
- Wire loop clamps
- Flowers of your choice
Instructions
- If you haven't already, create your framed chicken wire base. Decide how far down you want the structure to hang from the ceiling. In our case, we hung the installation 2 feet from the ceiling.
- Using your drill and corresponding bit, drill a hole in each corner of your prepared chicken wire wood frame. Screw in the eye hooks, creating anchor points to attach the picture wire.
- Thread the picture wire through the eye hook. Tightly knot the picture wire securely around the eye hook. Wrap any excess wire from the knot around the wire.
- From the top of the hook, measure 2 feet of picture wire (or your desired hanging length). Leave about another additional 4-6 inches of extra picture wire for looping and tying purposes. Cut the measured length of picture hanging wire.
- Using the wire rope clamps, create a loop to hang the structure.
- Repeat for all 4 corners. Make sure all wire and the loops are the same length so that the structure hangs evenly.
- Screw the 4 cup hooks into the ceiling equal distance to where each of your 4 corners of the structure will be placed.
- Attach the loop ends of the picture hanging wire to cup hooks in your ceiling, ensuring the installation hangs level.
- To hang each stem, simply wrap and knot the fishing wire to the end of each flower. Wrap and knot them tightly, but not so tight that it cuts through the stem. Hang each stem from the chicken wire by the other end of the fishing line, placing them sporadically as you go.
Notes
The project cost is dependent on the type & quantities of flowers chosen.