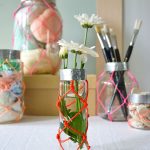
DIY Neon Macramé Jars
Add a pop of color to your home with these easy-to-follow instructions for how to make DIY neon macramé jars.
Cost: $30
Equipment
- Scissors
- X-Acto knife
- Hot glue gun and glue sticks
- Measuring tape
Ingredients
- Neon cord
- Empty jars
- Aluminum foil pan
- Washi tape
Instructions
- Cut five strands of cord, each about 6’. Fold them at the center and tie an overhand knot; you should now have ten 3’ strands of cord. This should be more than enough for a pickle jar – if your jar is smaller/bigger, adjust these lengths accordingly. You can also experiment using fewer strands for smaller jars and more strands for bigger jars.
- If your cord tends to fray once cut, use tape or a lighter to prevent further fraying.
- Using your measuring tape, tie two strands together about 2” from the original big knot. Repeat for the other strands.
- Repeat step 3, but separate the joined strands and tie strands from neighboring knots together, also about 2” apart, creating a net as seen in the image.
- Every once in a while, it’s a good idea to check how your macramé net is fitting over the jar. If you want to change the way the net looks, untie the knots you’re unhappy with and retie at a different measurement.
- Continue tying knots and checking that it fits your jar.
- Stop once your macramé net reaches the mouth of the jar.
- n the bottom of the jar, hot glue the double strands of cord onto the jar. It’s best to do this in a concave area that won’t touch the table – this allows the jar to stand flat.
- Using the Exacto knife, cut off the big original knot.
- Once the big original knot is cut off, the jar should stand flat on the table. If your cord frays a lot, use additional hot glue to seal the raw edges you just cut.
- At the mouth of the jar, hot glue the cord into the threads of the jar.
- Use the Exacto knife to cut off any excess cord.
- As before, hot glue any raw edges to prevent fraying.
- Measure the circumference of the mouth of the jar and cut a strip of aluminum ½” longer; the width should at least cover the threads of the jar.
- If your aluminum strip has raised bumps on it, flatten them by rubbing the handle of your scissors on it back and forth until smooth.
- There may still be some texture when you’re done, but this adds interest to the rim!
- Use hot glue to secure the aluminum strip to the mouth of the jar.There you have it – repeat on as many types of jars as you, please!