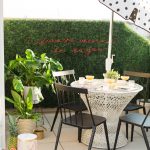
Faux Boxwood Wall with DIY Neon Sign
Bring an element of nature to your home with a cozy and inviting faux boxwood wall and DIY neon sign that requires no maintenance!
Servings: 1
Cost: $200
Equipment
- Needle nose pliers
- Gorilla tape
- Staple gun and staples
Ingredients
- Pressure treated plywood
- Boxwood panels with green zip ties
- 16-gauge wire
- EL wire in the color of your choice
- Heavy duty wide D-ring hangers
Instructions
- Optional: Create a template guide with an engineering print of your design or sketch your desired design or lettering on paper.
- With your template, start shaping your gauge wire letters: Use pliers to bend the gauge wire to follow the shape of each letter. Once you finish a letter, weigh it down with a heavy bowl or paperweight. This keeps the completed letters in place and prevents the rest of the word from getting tangled as you move on to the next one. Then, bend each word to be as flat as possible.
- Lay the pre-shaped gauge wire phrase on the boxwood panels to plan out its placement.
- Now shape the EL wire using your gauge wire as a template. Start by threading the EL wire from the back to the front of the boxwood. Make sure to leave lots of additional room for the EL wire controller to hang behind the boxwood panel and still be within reach.
- Carefully mold the EL wire to the gauge wire template, applying E6000 glue as you go.
- Use twist ties for temporary holding while the E6000 glue dries (24-72 hours).
- After about 2 hours, remove the twist ties. For the bigger letter bends, you can leave the ties on for a bit longer to allow more time for the glue to set.
- Using green zip ties, loosely secure the DIY neon sign to the boxwood panel. It is important to LOOSELY attach the zip ties. Zip ties can potentially damage the delicate EL wire if pulled too forcefully. Also, if sign is secured too tightly, the words will start to get lost in the leaves.
- Conceal excess EL wire with gorilla tape so that it does not shine through the front. Do the same with the wires that are sticking through the back between each word.
- Prepare the backing for your faux boxwood wall and attach the hanging hardware according to the manufacturer’s instructions.
- Assemble the faux boxwood panels.
- Using the staple gun, attach the boxwood panels to the plywood backing.
- Hang the wall securely on your chosen location.
- Connect the EL wire to the power supply following the manufacturer’s instructions.
Notes
- Please refer to the tutorial post for detailed notes and explanations.
- The cost of the project is dependent on your desired wall size.
