How To Make Easy Clay Sculptures For Decor
Sharing how you can create and customize your own easy clay sculptures (on a budget and without a kiln) for your home!
Servings: 3
Cost: $10
Equipment
- Rolling pin or Sculpey Sculpting Tool Set
- Oven-proof baking surface such metal, aluminum foil or clay mat
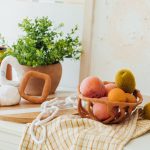
- Oven-safe bowl to make a DIY Clay Fruit Bowl
Ingredients
Instructions
- Preheat the oven to 275 °F (130 °C).
- Create and form your armature (a mold for your sculpture) with the aluminum foil.
- Once your mold is complete, unwrap, prep and soften the clay by kneading it in your clean hands. Combine different colors if you want a custom marbled look. (Refer to the instructions below on how to achieve this effect.)
- Flatten the clay with a rolling pin and shape the clay around the armature.
- Bake the sculpture for 30 minutes per every 1/4 inch thickness. (Recommended times vary depending on the clay used so reference the package instructions.)
To make marbled clay --
- Roll out a large piece of your chosen dominant clay color.
- Sporadically place pieces of your marble accent color on top and roll together the colors flat.
- Pick up and twist the combined clay with your hands before rolling it out flat again. Your marble clay is now ready to be sculpted.
To make the DIY Clay Fruit Bowl --
- Lather the outside of the oven-safe bowl with coconut oil (or any type of grease) to prevent the bowl from sticking to the clay.
- Form strands of clay by hand and place them around the exterior of the bowl to create a clay grid. Press the pieces of clay firmly together to make sure that they all stick when baking.
- Bake the clay over top of the bowl in the oven at 275 °F (130 °C) for 30 minutes per every 1/4 inch thickness.
- Once baked and cooled, remove the clay from the outer shell of the bowl to reveal your own bowl!
Notes
- Before starting any clay project, clean your hands and work surface.
- To avoid staining your clay with your fingers, work with light and white clay colors first.
- Always condition the clay beforehand by kneading until soft and smooth. The softer the clay, the easier to manipulate.
- Do not use a microwave oven or exceed the recommended bake temperatures and time per the package instructions.