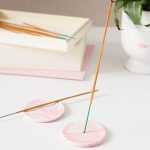
Marbled Clay DIY Incense Holder
Learn how to create a beautiful and functional DIY Incense Holder using polymer clay in this easy tutorial.
Servings: 1
Cost: $10
Equipment
- Rolling pin
- Parchment paper
- X-Acto knife
- Poking tool like a paintbrush
- Circle cookie cutter or lid
Ingredients
- 2 polymer clay in colors of choice
Instructions
- On a clean work surface, divide each block of clay into roughly equal portions based on your desired marbling intensity. Condition your clay by gently warming it in your hands until pliable. Then, mold each color into cylinder rope-like shapes.
- Combine the 2 colors of clay by rolling them together into one long rope.
- Twist and swirl layered clay into a circle.
- Carefully roll out the swirl with your rolling pin, pressing down evenly to create a cohesive marbled design. The thickness should be around 1/4 inch for good incense stick stability.
- With a circle cookie cutter or a lid, stamp out a circle from the rolled out clay. Trim any excess clay off the edges with an X-acto knife and smooth the edges with your fingers. Pull the edges of the circle clay up a bit with your fingers to create a shallow bowl.
- Using your poking tool, carefully create a hole in the center of your clay circle. Ensure the hole is large enough to accommodate your incense stick securely.
- Carefully transfer your shaped holder to a baking sheet lined with parchment paper. Following the baking instructions on your specific polymer clay packaging, bake your creation in the oven until cured.