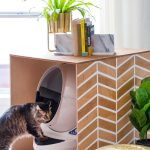
Patterned DIY Litter Box Cover
A simplified way to make your own litter box cover for hiding the unwanted.
Servings: 1
Cost: $90
Equipment
- Drill
- Ruler
- Pencil
- Foam brush
- Fine sandpaper
Ingredients
- 1 29" x 26" plywood
- 2 29" x 29" plywood
- 4 metal "L" brackets
- 16 wood screw 1 1/2" long
- 2 wood stain any color
- Paint any accent color of your choice for the lines
Instructions
- Sand all edges and flat surfaces of each plywood piece until smooth.
- Stain the 29" × 26" piece of plywood. This will be the top of your litter box.
- For the two 29" x 29" side panels, draw your desired pattern. Tape off the lines to define your design. Using a dry foam brush, lightly apply alternating stain colors. Use a different brush for each color and apply thin coats to prevent bleeding. Allow to dry completely.
- Once the stain is dry, remove the painter’s tape and retape the opposite edges. Paint your accent color (we used white for a clean, modern look). Apply multiple thin coats for a solid line finish.
- Using your L-brackets and wood screws, attach the side panels to the top piece. Drill the brackets on the inside corners for a seamless, polished look.