DIY Giant Birthday Candles
Looking to create a little birthday surprise? Learn how to repurpose plain mailing tubes into DIY Giant Birthday Candles for your next party, photo backdrops, or home decor.

Does it even feel like a birthday without candles? We’d argue they’re kind of essential for celebrating another trip around the sun.
In this DIY, we’re taking simple mailing tubes and turning them into giant birthday candles that double as eye-catching party decor. They’re bold, playful, and perfect for creating a statement moment for when you’re styling a party entrance or setting up a surprise display.

Want to make it extra memorable? Line them up outside a bedroom door or fill the room overnight for a fun birthday wake-up. Even better, these DIY Giant Birthday Candles can double as packaging. Just tuck small gifts inside for a creative (and totally unexpected) surprise.
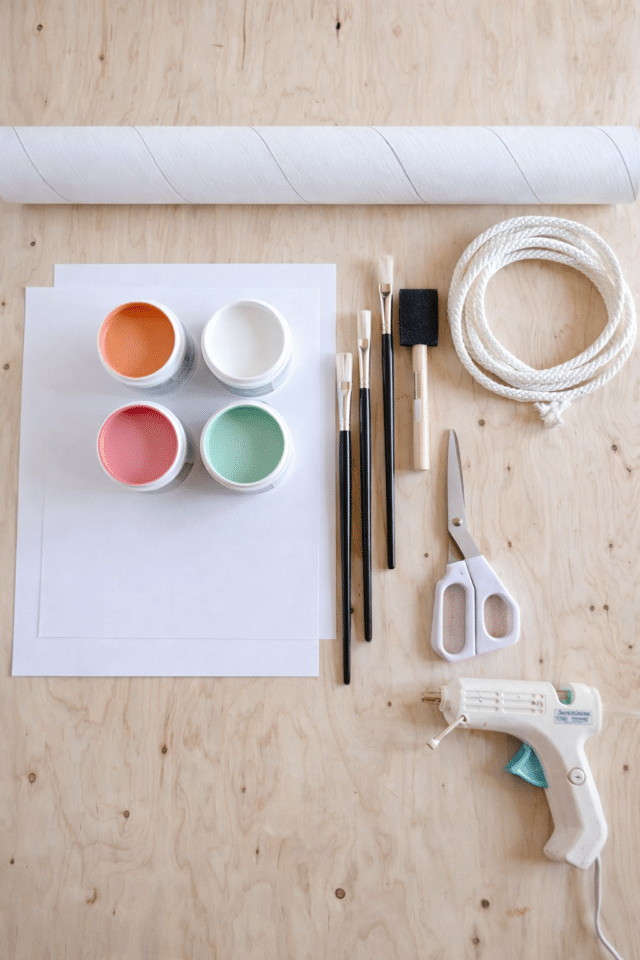
Supplies You’ll Need
- Cardboard tubes: White mailing tubes pictured are 3” x 36”, 2 ½” x 24”, and 1 ½” x 18”.
- White cardstock or craft paper
- Paint: Choose your desired candle stripe colors.
- White rope: To serve as your faux candle wick.
- Paintbrushes
- Hot glue gun
- Scissors or craft knife
How to Make DIY Giant Birthday Candles
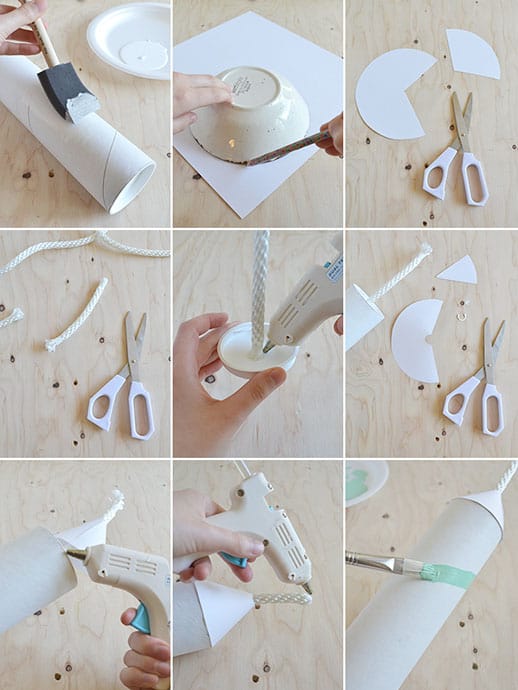
Step 1 — Paint the mailing tubes
Start by painting your mailing tubes with white paint. This helps cover any marks or discoloration and gives them a clean, “real candle” look. If your tubes are already bright white, feel free to skip this step.
Step 2 — Create the cone top
While the paint dries, trace a circle onto white cardstock. Cut out the circle, then remove a small wedge so you can roll it into a cone shape.
Step 3 — Form the candle top
Roll the cardstock into a cone that fits snugly on top of your tube. Trim as needed for the perfect fit.
Step 4 — Make the wick
Cut a piece of rope about 5-inches long. If the ends tend to fray, wrap a small piece of tape around them to keep things neat.
Step 5 — Attach the wick
Hot glue the rope to the center of the mailing tube lid to create the “wick,” then place the lid back onto the tube.
Step 6 — Adjust the cone
Cut a small opening at the tip of your cone so it fits around the rope. Once it sits properly, hot glue the cone closed.
Step 7 — Assemble the candle
Apply hot glue around the rim of the tube and attach the cone top, pressing gently until secure.
Step 8 — Finish the wick
Remove any tape from the rope and add a small amount of hot glue to the ends to prevent fraying.
Step 9 — Paint the stripes
Use the natural spiral line on the tube as a guide to paint your stripes. Let each stripe dry before adding another to avoid smudging.

Tips for the Best Results
- Use thicker cardstock for durability
- Mix heights and colors for a playful look
- Add glitter or metallic paint for extra shine
- Make flames by cutting flame shapes from tissue paper (layer yellow, orange, and red for dimension). Twist slightly and glue them into the center of each candle.

Styling Ideas for Giant Birthday Candles
- Use as a birthday party centerpiece
- Add to a photo booth backdrop
- Display on a mantel or in an empty fireplace for festive decor
- Pair with balloons and banners for a cohesive theme
For more creative birthday decor inspiration, check out our wood birthday cake or browse more DIY decor projects on the site.


DIY Giant Birthday Candles
Equipment
- Paintbrush
- Scissors
- Hot glue gun and glue sticks
Materials
- Cardboard mailing tube
- Cardstock paper
- White rope
- Craft paint
Instructions
- Start by painting your mailing tubes with white paint. This helps cover any marks or discoloration and gives them a clean, “real candle” look. If your tubes are already bright white, feel free to skip this step.
- While the paint dries, trace a circle onto white cardstock to create the candle top. Cut out the circle. Then, remove a small wedge so you can roll it into a cone shape.
- Roll the cardstock into a cone that fits snugly on top of your tube. Trim as needed for the perfect fit.
- Cut a piece of rope about 5-inches long to make the wick. If the ends tend to fray, wrap a small piece of tape around them to keep things neat.
- Hot glue the rope to the center of the mailing tube lid to create the “wick,” then place the lid back onto the tube.
- Cut a small opening at the tip of your cone so it fits around the rope. Once it sits properly, hot glue the cone closed.
- Apply hot glue around the rim of the tube and attach the cone top, pressing gently until secure.
- Remove any tape from the rope and add a small amount of hot glue to the ends to prevent fraying.
- Use the natural spiral line on the tube as a guide to paint your stripes. Let each stripe dry before adding another to avoid smudging.
Notes

Don’t forget to share your home decor projects with us on Instagram using the hashtag #sugarandclothloves. We always love seeing all of your creations! Looking for more interior design inspiration? You can find them all of our home decor tutorials and ideas right here!


Please note that we may earn a commission for some of the above affiliate links. However, products featured are independently selected and personally well-loved by us!
I love these amazing candles! I’m sharing on my 8 Paper Crafts for Birthday Round-up! Thank you for sharing this awesome idea!
http://www.thepaperycraftery.com/paper-craft/8-paper-crafts-for-birthdays/
Such lovely photos! This a beautiful color palette! : )
Vaya ideón!!! Me encanta!!! Creo que las haré para utilizarlas no sé cuando, pero me es que me encantan!!
Gracias por este tutorial tan magnifica
Confeti en los bolsillos
Such a cool idea – love this!
So cute! I love it!
These are about the cutest thing ever.
WOW, i will never look at a birthday candle the same again, the small ones are being thrown out!
What a cute idea! I love these!
-Becca
Ladyface Blog
love these!! I’m soo making them for the next bday party!
That is such a cute idea. Now you’ve got my brain spinning on what else I could make out of mailing tubes. Hmmm…
aaaw this is fun and a cute idea, thank you for the tute and the sharing, love it.!!!!
What a cute idea! I love this DIY to adorn a food table at a bday party. So cute. xx. McKenna Lou