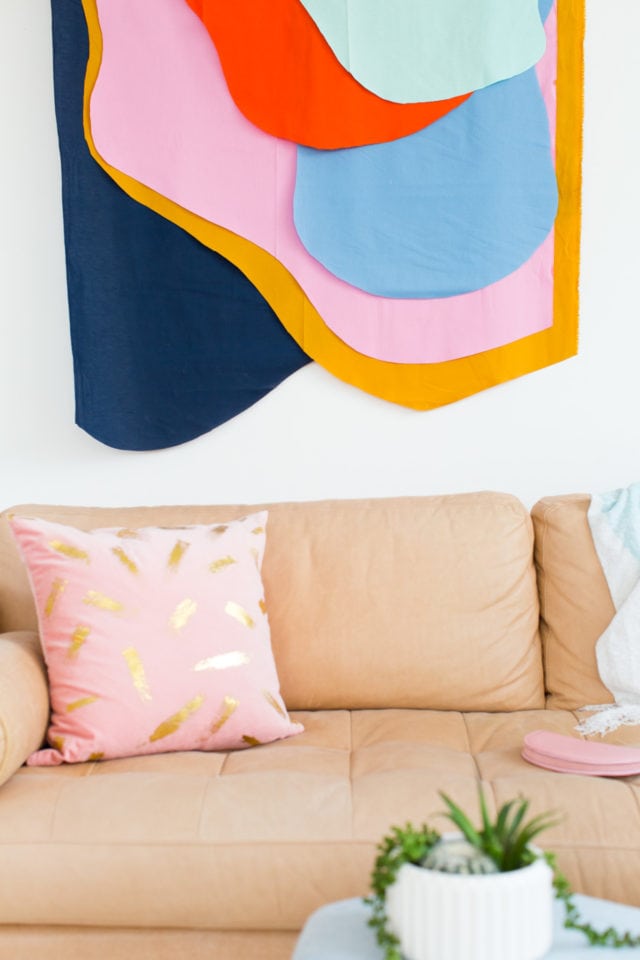
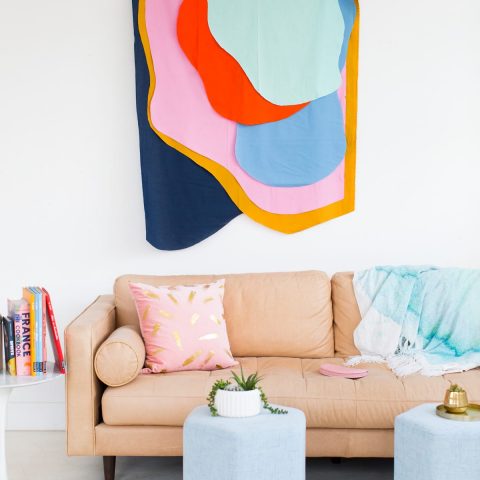
Abstract Shapes DIY Fabric Wall Art
If you’re looking for a statement piece of wall art, this Abstract Shapes DIY Fabric Wall Art is a super inexpensive craft project for updating your home decor!
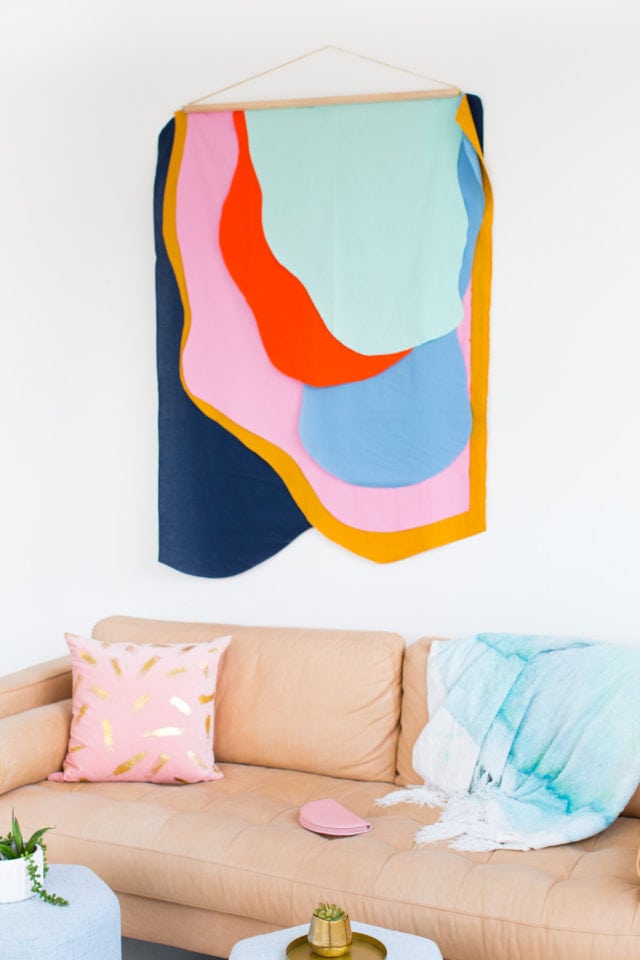
Looking to add a personal touch to your home decor without breaking the bank? We needed a cool backdrop for our animal shelter charity workshop. So we whipped up this Abstract Shapes DIY Fabric Wall Art hanging to go with our color scheme.
We loved it so much that we couldn’t resist making it into its own DIY tutorial! It doesn’t get much better than custom colors, abstract lines, and a giant statement piece for your walls. With a few basic materials and some imagination, you can create eye-catching designs that perfectly reflect your personality.
All in all, this piece cost us about a total of $75 to make in under an hour (which is basically unheard of in the realm of fabric wall hangings these days). Not to mention it’s about 5.5 feet tall and 3 feet wide!
We busted out our DIY gold base stools for styling this again too!
Materials and Tools Needed
- Cotton fabrics in the colors of your choice
- Fabric scissors
- Square wooden dowel rod
- Gold screw hooks
- Gold craft cording
- Staple gun and staples
Please ignore our laziness in not ironing the fabrics before we cut them all out! Clearly, we were in a hurry here. So we’re proud that we even had the mind enough to take photos as we went!
How to Make an Abstract Shapes Fabric Wall Art
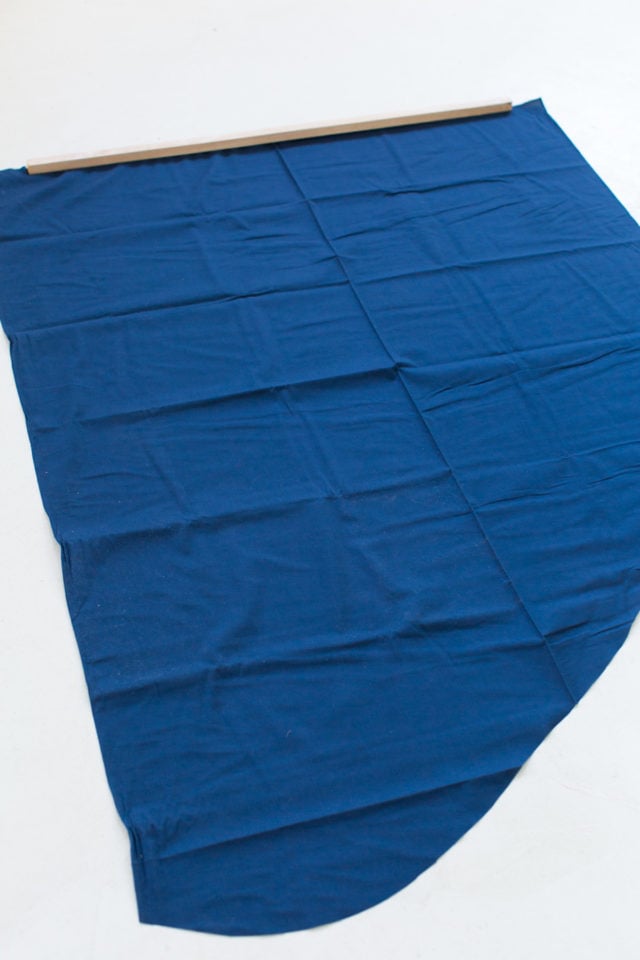
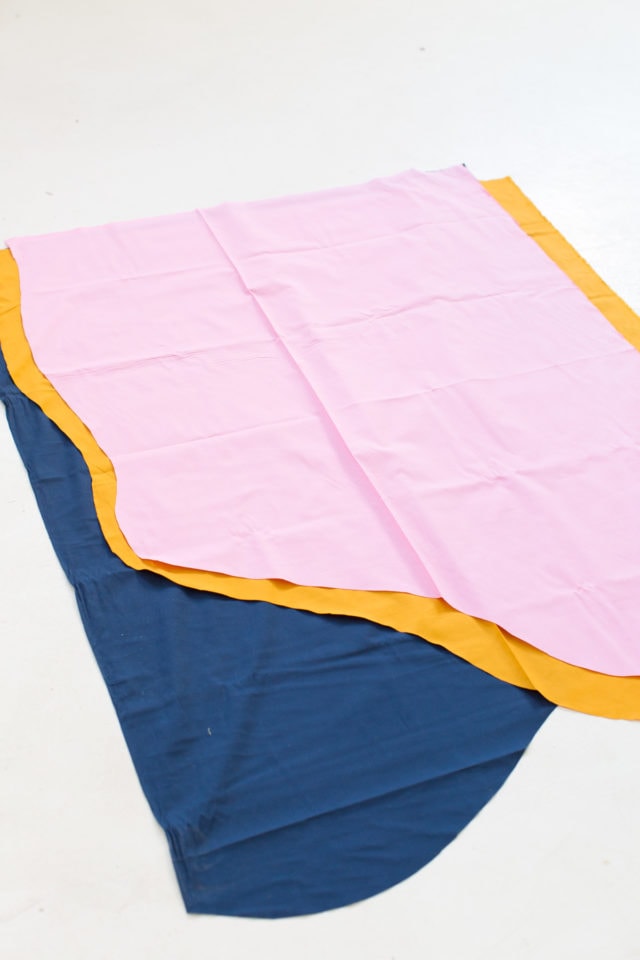
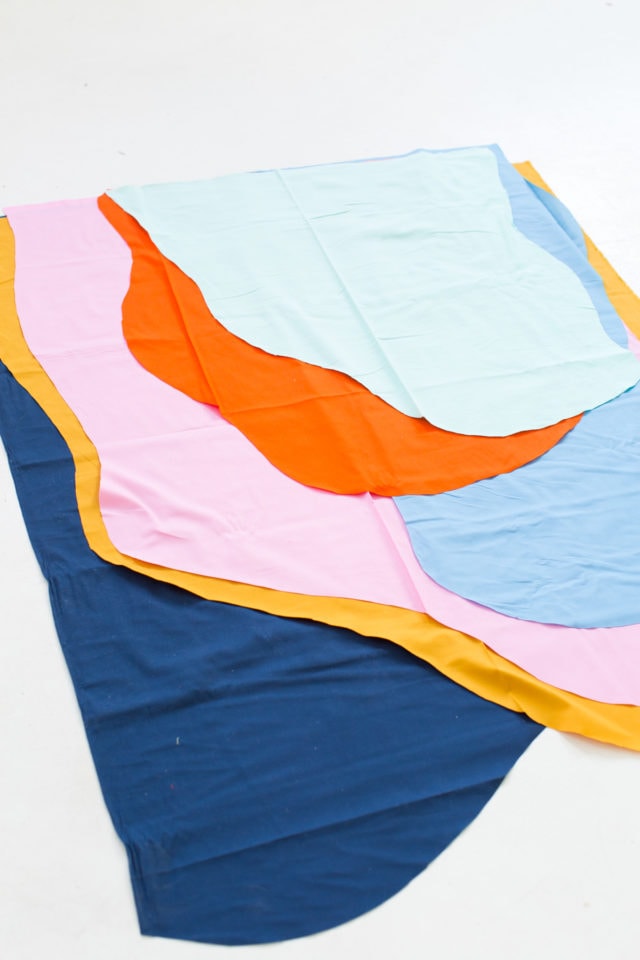
1 — Start by cutting out your abstract shapes, beginning with the largest base shape. As you work, layer the fabrics on top of each other.
This allows you to visualize the overall layout more easily and see how the colors and shapes flow together, rather than cutting them separately and arranging them at the end.
2 — Once your cut-out design is complete, place the square dowel rod across the middle, laying it over all the fabric layers. This will help secure and align your design before the next steps.
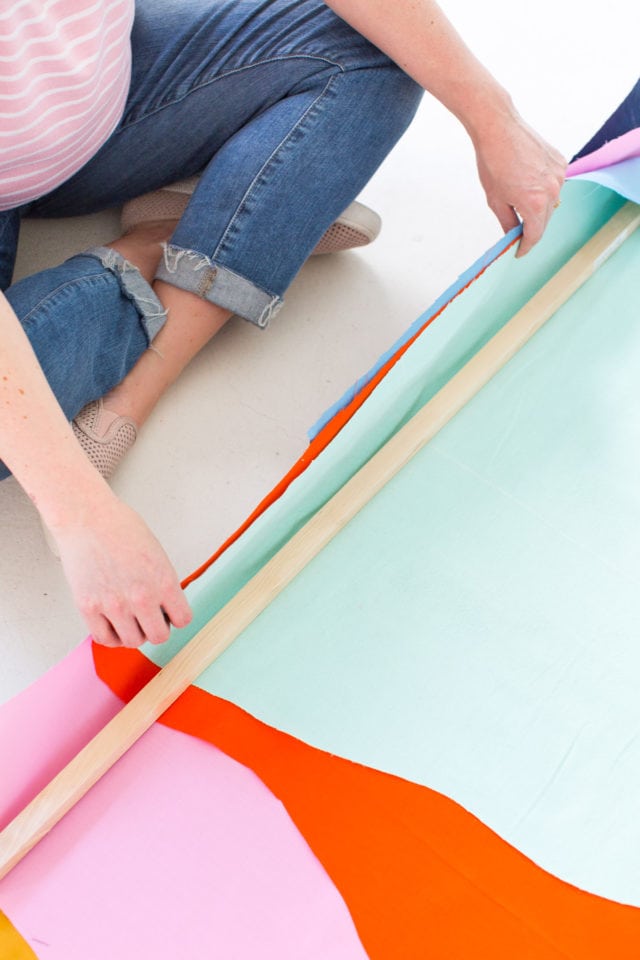
3 — Roll the excess fabric around the dowel rod, wrapping it neatly to create a secure edge. Use a staple gun to fasten all the fabric layers in place along the length of the backside of the dowel rod, ensuring everything is tightly secured.

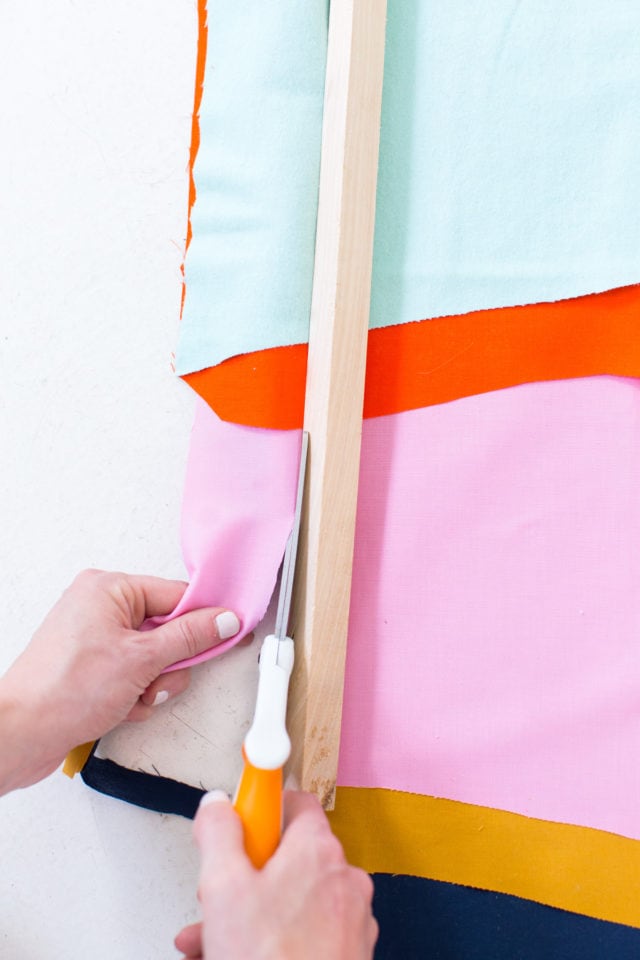
4 — Trim any remaining excess fabric from the top of the dowel rod for a clean finish.
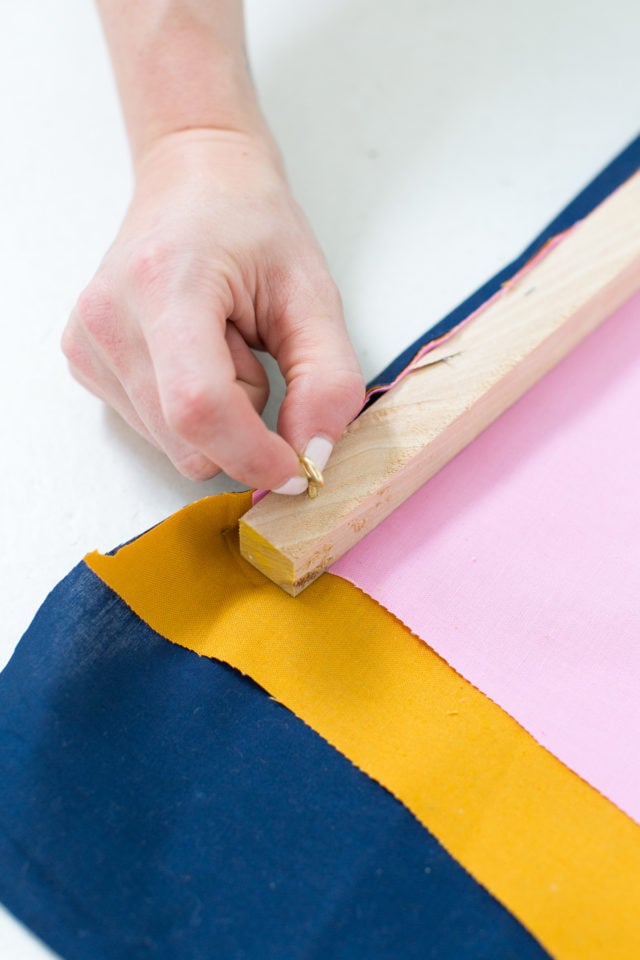
5 — Next, screw in the gold eye hooks at the top of the rod. Use gold cording or picture wire to string through the hooks, creating a sturdy hanger for your new wall art!
How Do You Attach the Fabric to A Wall Without Damaging It?
We hung our wall art up by string, but skip the last step if you want a minimal look without the string.
For the top wood rod, we highly recommend using a heavy duty removable double sided tape. Make sure to purchase a removable tape so that it does not peel off your paint.
It can be difficult to attach the fabric to the wall without causing damage. If you properly hang the wood rod, then you don’t need to attach the fabric. But if you want to secure the fabric, then use a removable double sided fabric tape.
By using a special adhesive that won’t harm your walls, you can give any room in your home a stylish makeover with one of these trendy DIY fabric wall hangings.

More Easy DIY Art to Try
we love the bold color combo too, and it’s much easier to make than it looks right?! What do you think? Is this something cool you can see in your space, or not so much? If you loved this DIY fabric wall hanging, be sure to check out more of our other home decor DIY ideas right here!
- Sassy DIY Printable Wall Art & Digital Wallpapers + New Studio Pieces
- How To Paint An Accent Wall + Guest Bedroom Makeover
- DIY Canvas Art – How To Make Your Own Canvas Print 
- Easy DIY Hanging Flower Wall
Abstract Shapes DIY Fabric Wall Art
Equipment
- Fabric scissors
- Staple gun and staples
Materials
- Cotton fabrics in the colors of your choice
- 1 square wooden dowel rod
- Gold screw hooks
- Gold craft cording
Instructions
- Cut out the abstract shapes (starting with the biggest base shape first). We layered the fabrics on top of each other to get a better visual of the overall layout. It made it a lot easier for seeing how the colors and shapes would flow than to just cut them out separately and place them together at the end.
- Once you have your complete cut-out design, lay the square dowel rod over top of all of the layers in the middle.
- Roll the excess fabric around the dowel rod and use the staple gun to staple all of the fabric layers in place across the length of the backside of the dowel rod.
- Cut the excess fabric from the top of the dowel rod, and then insert the gold screw eye hooks on the top of the rod. Use the gold cording or picture wire to string wire from the top to hang it from.

Please note that we may earn a commission for some of the above affiliate links. However, products featured are independently selected and personally well-loved by us!
This is such a cool idea! Going to have to try this in my daughter’s bedroom with more muted colors!
Kasandra
http://www.downblisslane.com
Thank you, Kasandra!
What is the special adhesive that will not damage walls?
Hi Rachel! We updated the post with some links. Command strips have always been wonderful for us if you want to hang something heavy without damaging the walls. Make sure to select a heavy duty one that can hold a lot of weight. We them cause they’re so easy to remove too. Hope this helps!
The link to Amazon for the dowels did not have a button for me to add them to my basket. I ended up getting mine here: https://www.craftparts.com/product/3-4-x-36-square-dowels/
My daughter and I are super excited to make a couple of these for the play room. Thanks for being a creative genius!!
Hi Susie! It looks like the dowel we used is currently out of stock from the vendor but thankfully, the link includes more buying options and suppliers. We’re so glad you were able to find the dowel from Craft Parts! Thank you so much for posting the source because this is very helpful for us and other readers. Please let us know how it turns out in the play room! And thank you for your kind words.It made our day. :) We are happy to hear that you will be making this! XOXO
I am in fact glad to read this webpage posts which includes tons of
valuable data, thanks for providing these data.
ASHLEY… just wow & wow….
so simple but so beautiful.. pure ingenious ….girl
anyone can do it… seriously… :)
thanks so much for the love, Jam! Let us know if you give it a try and how it turns out :)
This is so absolutely RAD! It really looks like a piece of unique art!
Ahh, this makes our day! Thanks so much for the love, Kristin! xo
I am totally making this!!
yay! be sure to tag me so I can see how yours turns out! xo