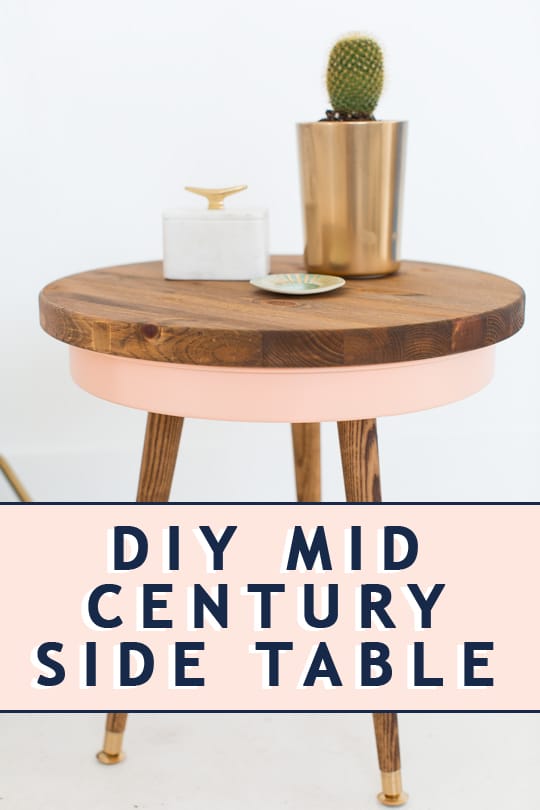
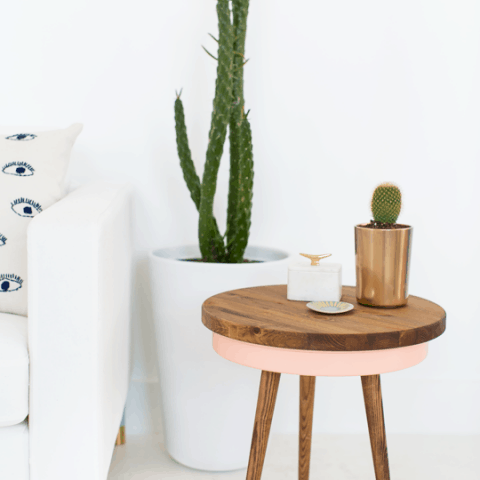
DIY Mid Century Modern Side Table
Get the stylish and functional mid-century look for less with our step-by-step tutorial on building an easy DIY Mid Century Modern Side Table from scratch.
We weren’t really wasn’t messing around when we told you that we were currently obsessed with all things mid century modern. But the style can be pricey so instead, we decided to build mid century furniture ourselves.
If someone doesn’t stop to intervene soon, we might start making pet furniture with tapered wooden legs and watch the Brady Bunch before bed every night while sipping tea out of a Starburst cup.
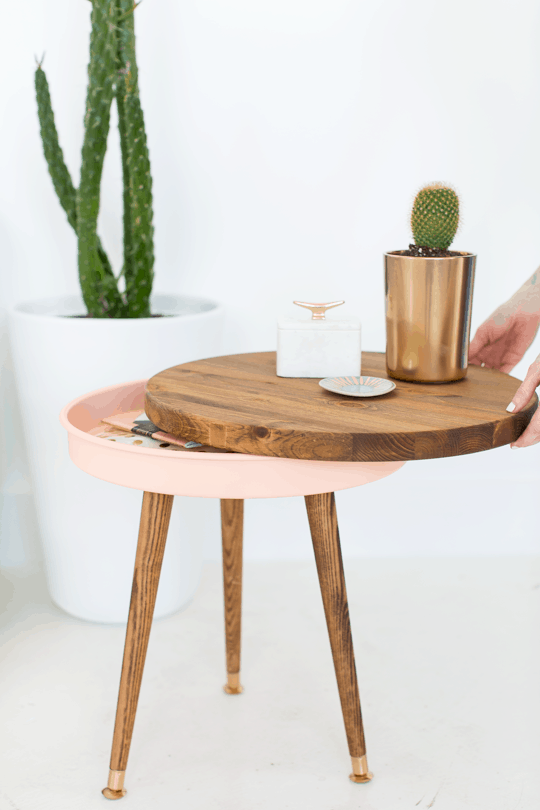
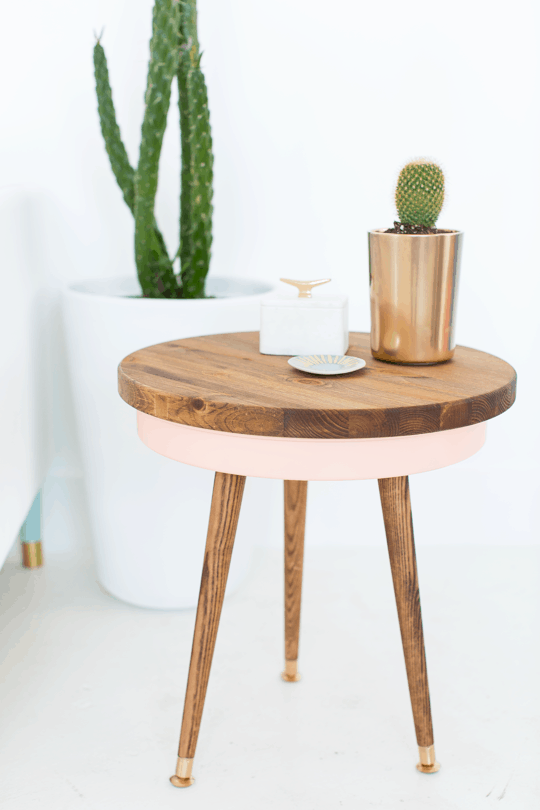
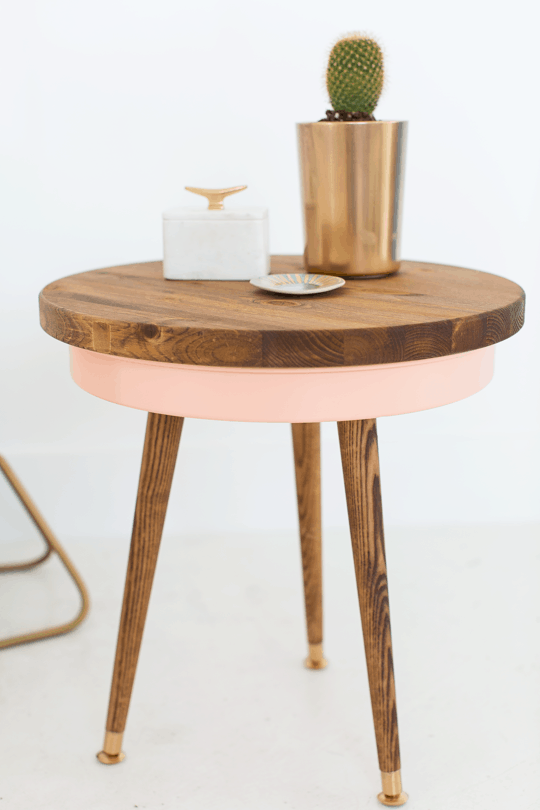
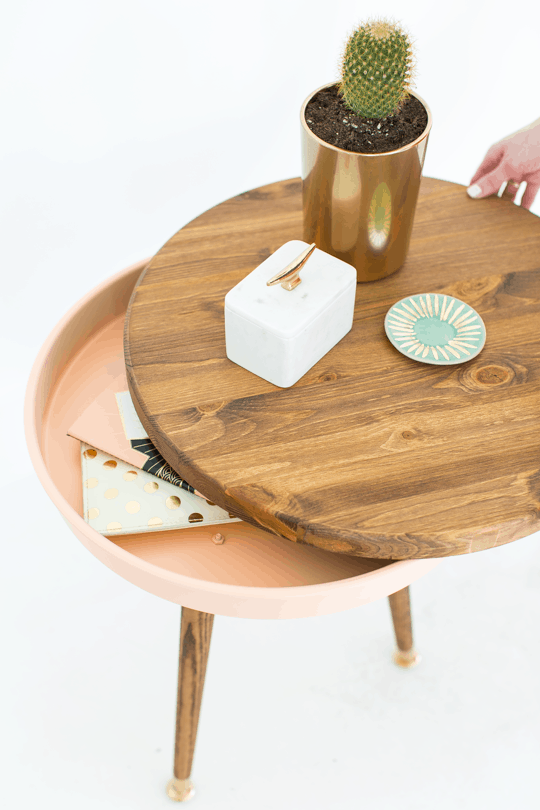
We’ve already made some mid century planters and a DIY daybed. And our latest project is this easy DIY Mid Century Side Table that has a storage feature to house your little but important things like your TV remote controls and chargers.

Materials and Tools Needed
- Round wood circle — You can buy pre-cut circles at the hardware store or cut your own from scrap wood or any wood board of your choice. Ours has a 18″ diameter.
- Round cake pan — We used a pan measuring 16″x 2″. You can use a deeper or wider pan for a larger end table. Just be sure it’s heavy so that the end table isn’t wobbly from being too light!
- Tapered round legs — Ours are 16″ tall.
- Angled leg mounting plates
- Drill and 11/64″ drill bit
- #10-24×3/8 inch round head screws with nuts and bolts
- Wood stain — We used American Walnut brown.
- Foam brush
- Spray paint — Optional in any color of your choice. Our cake pan/storage base was painted Shrimp Pastel Pink, and the table legs were painted gold.
How to Make a DIY Mid Century Side Table
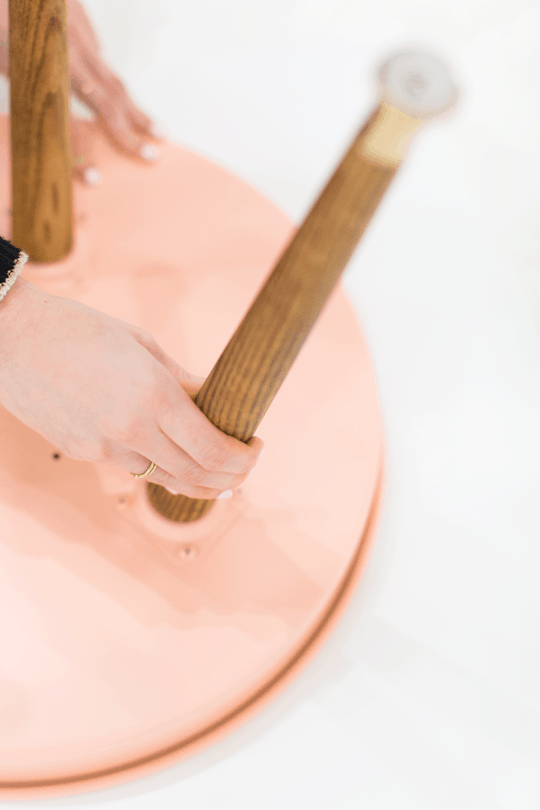
1 — Using a foam brush, stain the wood round circle top and table legs.
2 — Once the stain is dry on the legs, tape off the wood to spray paint the feet gold. This is optional. But if you are wanting to achieve the mid century look, gold tones are very prominent in this decor era.
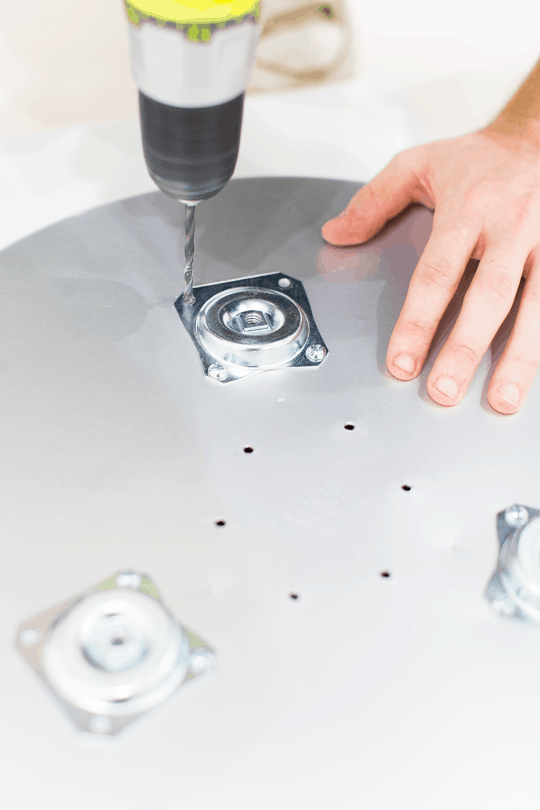
3 — While the legs are drying, place the cake pan upside down. Lay the angle plates where you want the legs to be positioned and mark with a pen.
We made the mistake of putting the legs too close together originally. (Hence, the extra screw holes!) This mistake made the end table seem unsteady. So be sure that the legs are far enough towards the edge of the table. This way, it isn’t rickety and unstable when it’s built.
Use the drill and 11/64″ drill bit to make holes for each of the four corners on every plate.
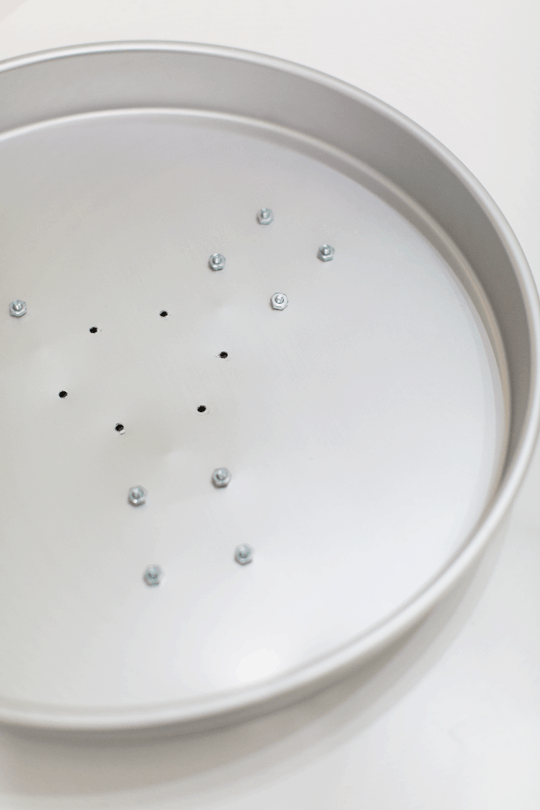
4 — Attach the plates to the pan with the nut and bolts in all corners.
It is more ideal to use bolts instead of screws so that there are no sharp edges when the storage pan is being used.
5 — Once the plates are attached, spray paint the entire pan and plates the color of your choice. Allow to dry completely.
6 — Once dry, screw the tapered legs into the plates, and flip the cake pan upside down. The top of the end table will just rest on the storage.
Project Notes
- Choosing your round wood circle: Your round wood circle can be any size. Even though ours has an 18″ diameter, you can customize yours to have a larger or smaller table top. Just make sure that it is as least 2″ larger in diameter than your cake pan.
- Choosing your cake pan sizing: Our cake pan is 2″ tall which is just big enough to store our TV remotes, magazines, or notebooks and pens. Your cake pan can be any size in depth and width. Keep in mind that the cake pan needs to be 2″ smaller in diameter than your wood circle. This is such an unconventional material, right?!? We creatively turned cake pans into DIY hanging planters too.
- Where to place your table legs: Be sure to adjust the placement or the table legs to be far enough apart so that they hold the weight of the top evenly.
- Make sure to use round head screws: It’s important to use round head screws or even flat bolts with the accompanying nuts so that there are no sharp edges in the storage pan.
More Easy Modern Furniture DIY Projects
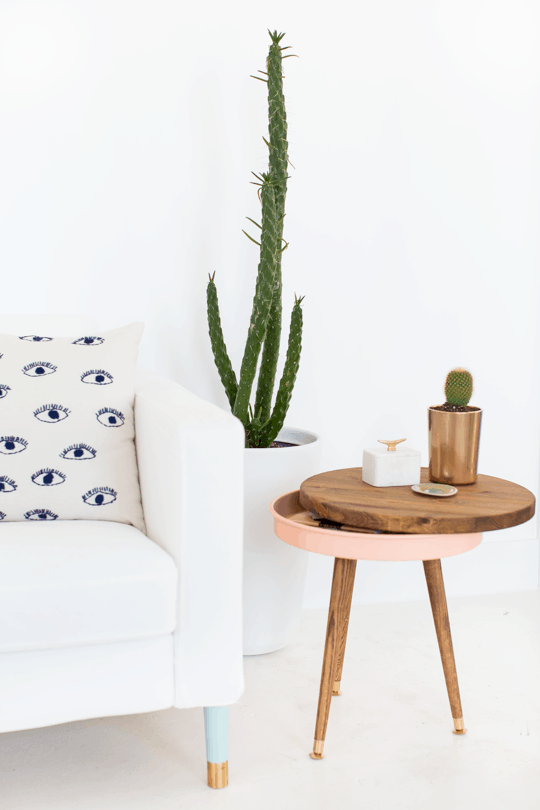
This is definitely a simple project for a last minute weekend DIY on a rainy day. And it’s so budget friendly that you could even make one for each side of your couch. We even love the idea of painting them different colors for a punch of color in a space! If you love our DIY mid century round side table, then check out a few of our diy mid century modern furniture ideas below —
DIY Mid Century Modern Side Table
Equipment
- Drill and 11/64″ drill bit
- Foam brush
Materials
Instructions
- Prep the wooden top and legs by staining the unfinished wood the color of your choice with wood stain and a foam brush.
- Optional: Once the stain is dry on the legs, tape off the wood to spray paint the feet gold.
- While that’s drying, place the cake pan upside down. Lay the angle plates where you want the legs to be positioned and mark with a pen.Be sure they’re far enough towards the edges of the table so that it isn’t rickety and unstable when it’s built.Use the drill and 11/64″ drill bit to drill holes for each of the four corners on every plate.
- Attach the plates to the pan with the nut and bolts in all corners.The reason for the flat bolts instead of screws is so that there are no sharp edges when the storage pan is being used.
- Once the plates are attached, spray paint the entire pan and plates the color of your choice. And let dry completely.
- Once it’s dry, screw the tapered legs into the the plates, and flip it upside down. The top of the end table will just rest on the storage.

Affordable Wall Art: 54 Stylish Prints Under $200
Looking for affordable wall art that still makes a big…
Continue Reading Affordable Wall Art: 54 Stylish Prints Under $200
Easy IKEA Billy Hacks Anyone Can DIY at Home
Get inspired by clever IKEA Billy hacks for living rooms,…
Continue Reading Easy IKEA Billy Hacks Anyone Can DIY at Home
43 Top Amazon Wall Decor Ideas for Every Room in Your Home
Find gorgeous Amazon wall decor that makes a big impact…
Continue Reading 43 Top Amazon Wall Decor Ideas for Every Room in Your Home
28 Decorative Wall Mirrors You’ll Wish You Bought Sooner
Looking for the perfect wall mirror? Explore our roundup of…
Continue Reading 28 Decorative Wall Mirrors You’ll Wish You Bought Sooner
Please note that we may earn a commission for some of the above affiliate links. However, products featured are independently selected and personally well-loved by us!
http://www.diyncrafty.com/diy-farmhouse-coffee-table/
This is AMAZING!!! 💕. I can’t wait to make it – thanks SO much for Sharing!!!
You’re welcome, Janine! XOXO
I really love the colors you used for this table. But, the best part is the hidden compartment! Fantastic.
Hey girl! Thank you a lot for your idea! Based on that, I made similar one, with a pizza board, a cake pan (painted yellow) and drumsticks. It turned out great and now I’m very proud of it!
That’s so wonderful to hear, Susanna! Glad you like it! xo
I found this DIY project the other day and I’m obsessed! I bought all the supplies – will be building soon! :)
So glad you like the DIY table, Sarah! xo
Hi there! Where did you find your 16″ cake pan? I canT find one at kroger, walmart, pr target and was wondering whEre yoU found yours.
Hi Peggy! We are pretty much Amazon addicts and always try to find our supplies there :) http://rstyle.me/n/b72pwsnjn6
This is awesome! How tall is the entire side table? Just trying to plan my own version of this and want to get the height right for my couch. Thanks!
Hi Linda! I would say the table is about 19/20″ tall!
Thank you for this wonderful tutorial. I’m always looking for things to build but only have a power drill. I love how resourceful and creative you are with your beautiful creations!
Thank you so much, Stephanie! Really glad you liked the DIY & found it to be helpful!
Amazing idea! I am definitely trying this.
Glad you like the DIY, Brittany!
So glad to have you here! Thanks for the kind words :)
I know this post is over a year old, but I’m really curious how you measured where each top plate would go? How did you space them evenly on the bottom of the pan?
Measure and mark with a piece of thread and a pencil if you want to be sure of the exact center all the way around :)
This is gorgeous. Love the simplicity of design and the pretty pink enhances gold color feet. Thankyou.
Where did you find the rounded hardwood top? Besides buying a circular cutting board, I’m not sure where I might find this. Thanks! New homeowner and decorating with mid-century modern furniture. This is the exact side table I’ve been looking for!!
Love this! May I ask where that gorgeous eye print cushion is from???
It’s from Urban Outfitters!
incredibly clever! love the pop of pink, and the hidden storage. this is very inspiring!
One idea for keeping the top on. Trace the edge of the cake pan on the bottom of the wooden top and carve out a small indent just on the inside of the tracing so the pan rests inside the lip.
Genius! I need a few side tables, and these look like just the thing!
Amazing! I have the same obsession and will deffinitely be doing this soon!! Love everything about it!
This is simply stunning. I would love to make something like this. <3 I seems completely do-able.
I've actually been looking for those round wooden circles for a separate project and couldn't find them, so thanks for the link!
http://aweekfromthursday.com
Florence Henderson participated in NPR’s Wait, Wait! Don’t Tell Me this past weekend. Brady Bunch is in the ether. Great table! Can’t wait to try it out.
haha, awesome!
This is super cute <3
https://aspoonfulofnature.wordpress.com/
Love this DIY, will certainly be trying it out. That pink/peach color is EXACTLY what I’m looking for to redo an amazing, yet terribly shiny, metal mcm chair! Could you share the brand/color?!
It’s made by Montana Gold and is called Shrimp Pastel! – http://bit.ly/1Dxdoi4
Shut the front door! You made that with a cake pan? Pure genius, and a place to stash the remotes is always a bonus. Love this project!
What brand and colour of spray paint did you use? I absolutely love this. Almost as much as the planters posted previously!!
It’s made by Montana Gold and is called Shrimp Pastel: https://amzn.to/42rrQJn
Thanks!
They’re really amazing.
Adorable!! Love the colors too!!
Wow this table is awesome! I love how it looks good and it’s functional.
you’re killing it (and me!) with these tapered table DIYs
Did you think about having a dowel or something for the top to spin on (but be attached to the bottom)? I love the idea but can only imagine my dog running in to it and having the top go flying.
That would be awesome! I don’t know that I’m that handy yet, but I’ll keep it in mind for future projects, thank you for your feedback! :)
Love the table, and the colour you chose for the tray!
Can I ask you what color you spray painted the cake pan? I love it!!
It’s made by Montana Gold and is called Shrimp Pastel! – http://bit.ly/1Dxdoi4
This is beyond clever. I absolutely love this side table! And the extra storage is perfect!!
Did you get your sofa legs from somewhere in particular, or just a DIY store?
I adore this! If only you had more time (ha ha, right?) to make these so anyone who fails at DIY could buy them!! I may give it a try this weekend though. xo
This came out amazing! Love it.