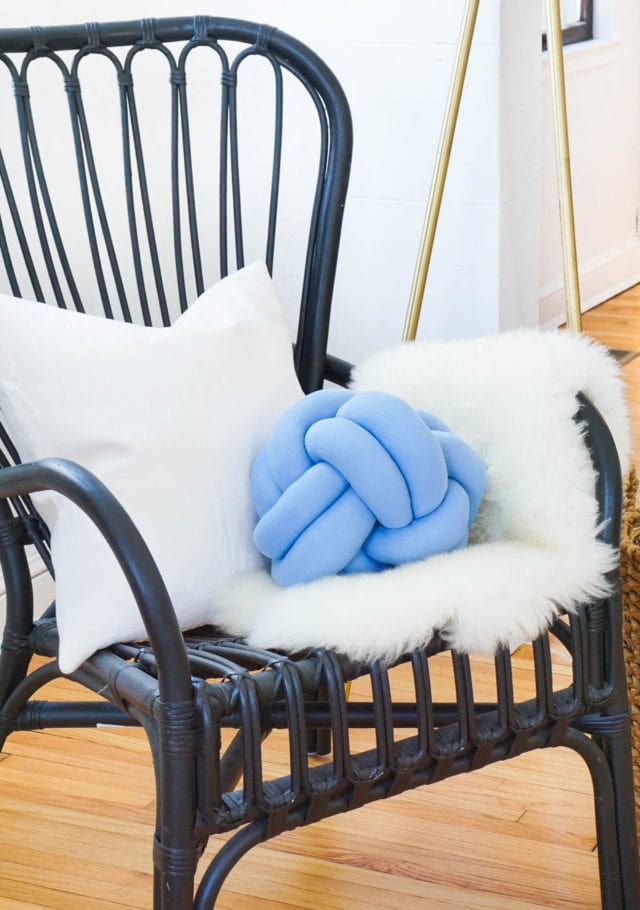
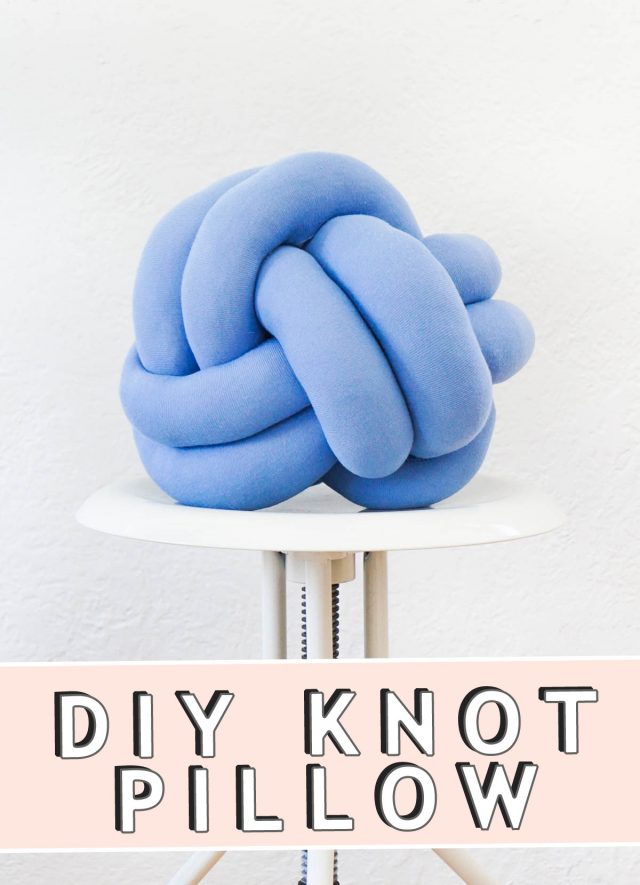
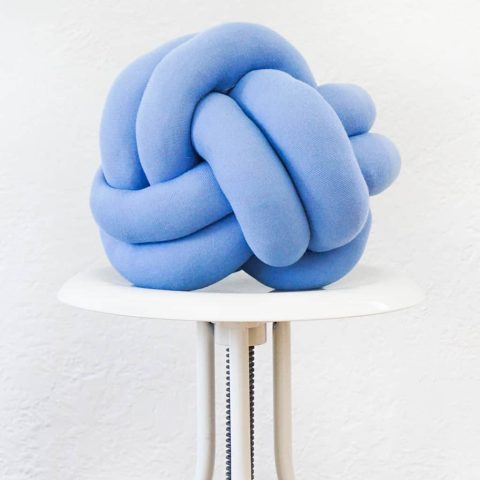
DIY Knot Pillow
Excited to be sharing our instructions for one of this season’s best trends, knotted pillows! Here’s how to make your own DIY Knot Pillow.
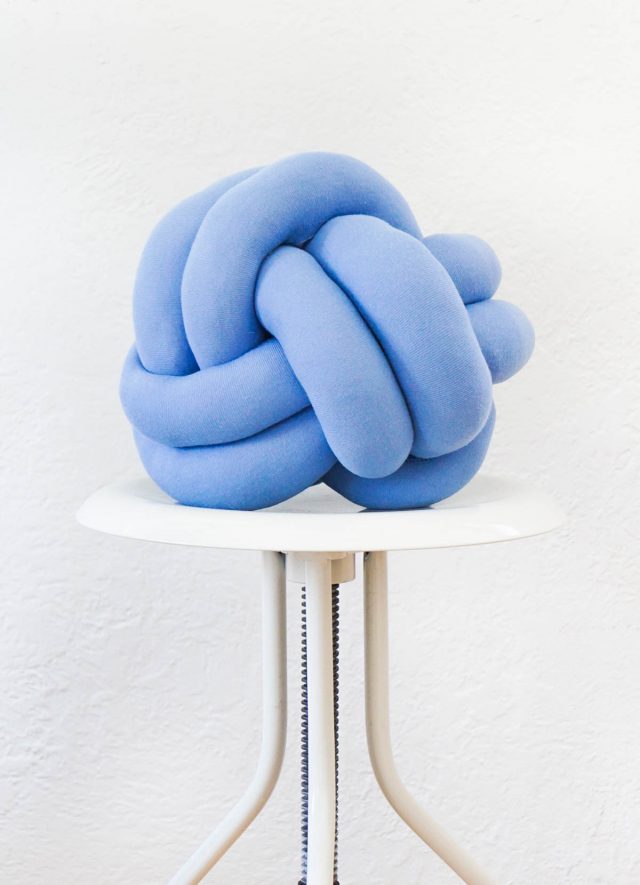
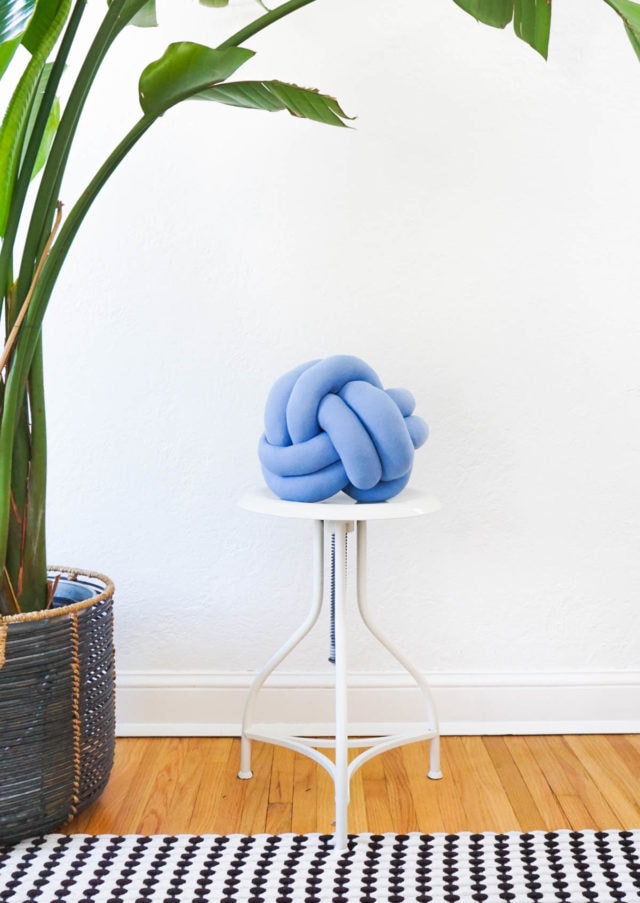
It’s around this time of year that I, Erin, am looking for a little something new to liven up my place for spring! And these maritime-style DIY knot pillows are just the ticket!!!
They’re soft sculptural bundles of goodness that are playful in design. But sophisticated enough for the living room sofa. Not to mention, knotted pillows are a major trend right about now. Which is why this particular accessory is one of our favorite creative DIY pillow ideas.
If you’re wanting a little home décor refresher, grab some stretchy knit fabric and poly stuffing. Because we’re showing you how to make a DIY knot pillow for your new home decor.
Materials and Tools Needed
- Knit (or any stretchy fabric)
- Ruler
- Sewing machine
- Sewing pins
- Scissors
- Wrapping paper cardboard tube
- Dry polyester fiber fill – We like the course dry fill that’s traditionally used in doll-making. It packs firmer and stays in place.
How to Make a DIY Knot Pillow
1 — Cut two 7” wide by a minimum of 54″ inch long strips or as long as the full width of your fabric will allow. The longer the strips, the larger your knotted pillow will be.
2 — Form a sleeve of fabric by folding each strip in half. Make sure that the long way with the right sides are facing one another.
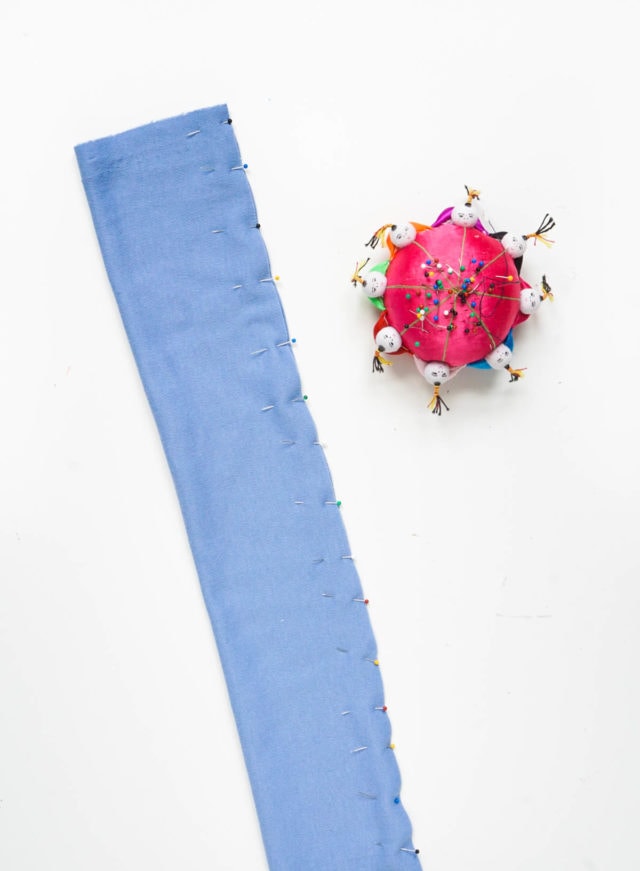
3 — Then, pin both layers together.
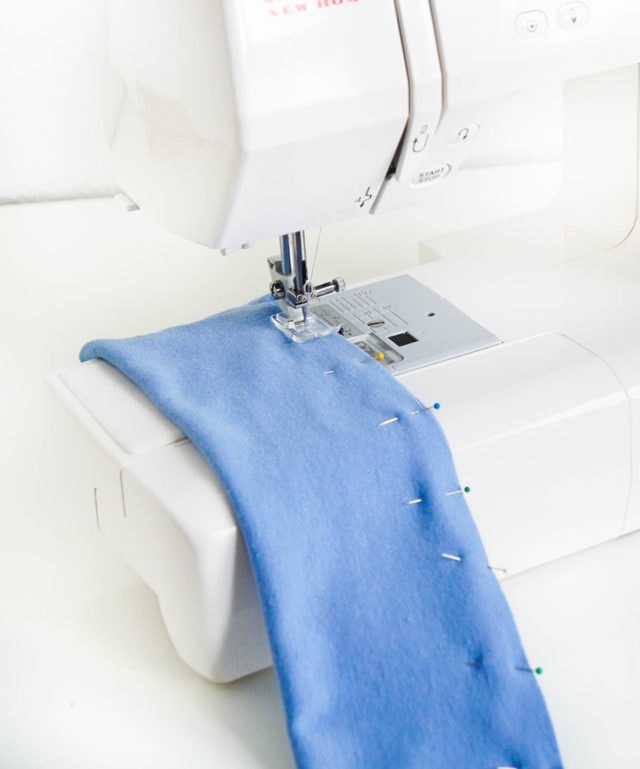
4 — Sew the length of the fabric at 3/8” seam allowance using a zigzag or knit stitch. Sew along one of the short sides as well to close up the sleeve at one end. It’s important to use a zig-zag stitch so that the stitches stretch along with the fabric when stuffing the sleeves.
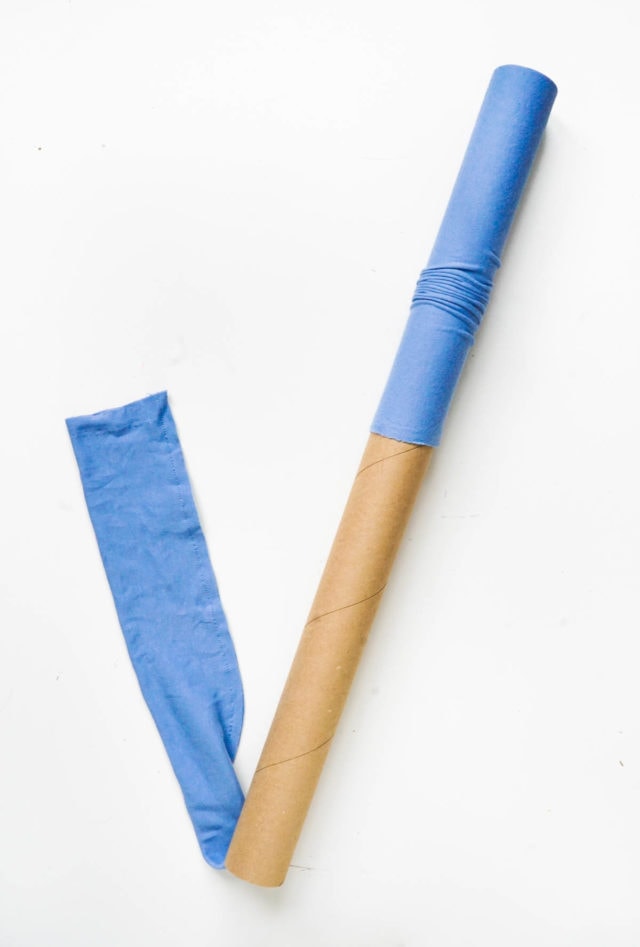
5 — Feed the fabric sleeve into one end of the cardboard tube.
6 — Pull it out the other end.
7 —And fold it back onto the cardboard tube turning the fabric sleeve right side out.
8 — Shirr the fabric sleeve completely onto one end of the cardboard tube.
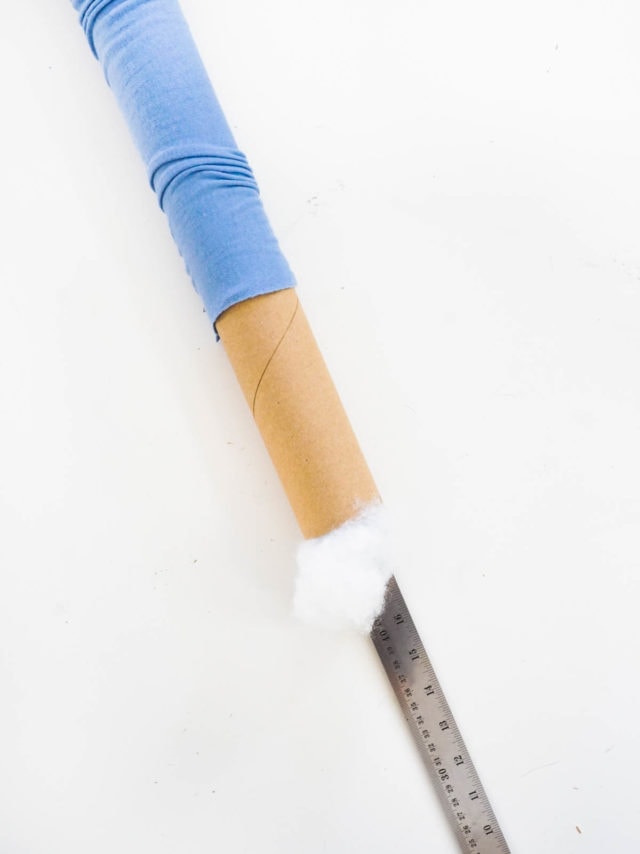
9 — From the other end of the cardboard tube, stuff in small pieces of fill.
10 — Push it all the way to the far end of the tube using a ruler or wood dowel until it reaches the fabric sleeve. Try to keep the density of fill uniform throughout the fabric sleeve as you stuff.
11 — Once the entire sleeve is stuffed, either tie off with a knot or sew up the open end of the sleeve with your sewing machine. Don’t worry, both ends will be hidden once the knot is tied!
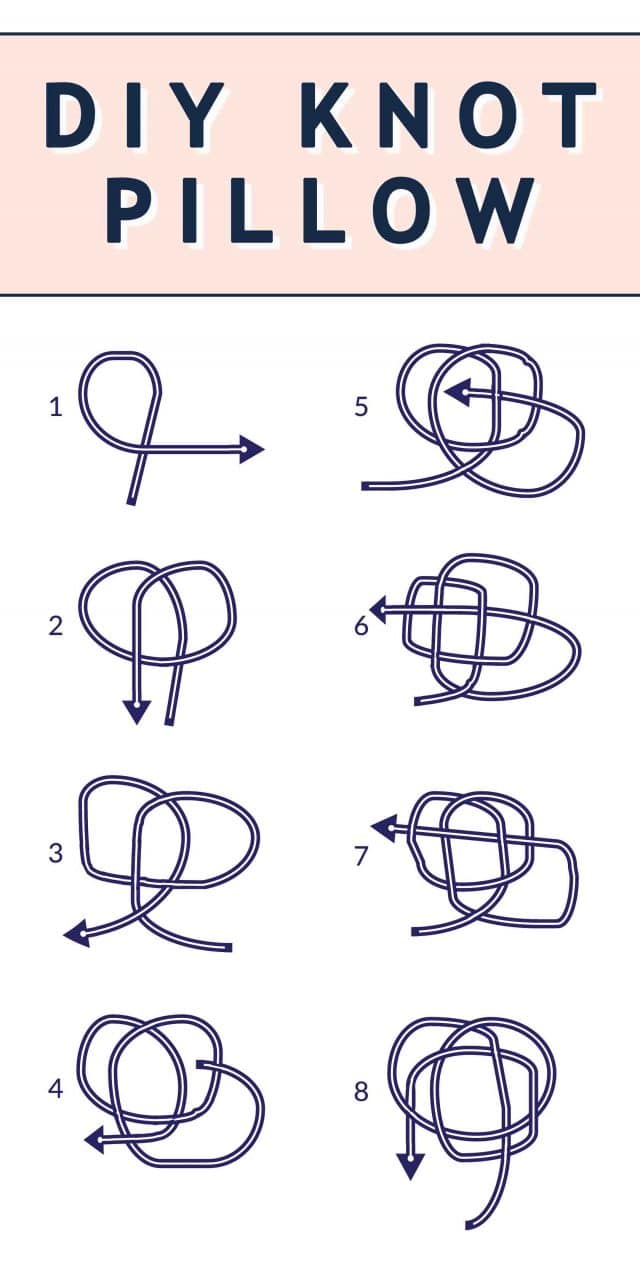
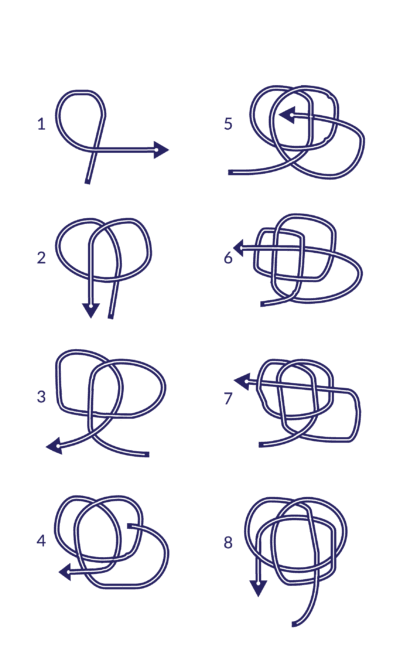
How to Tie the Pillow Into a Knot
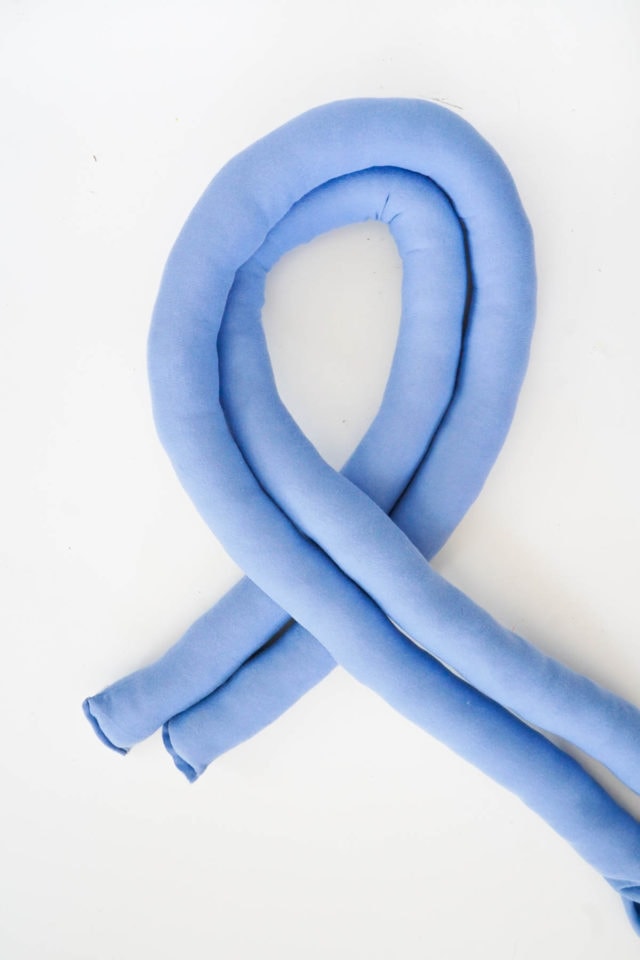
1 — Starting with just one fabric sleeve, tie the knot as illustrated above.
2 — Once the first sleeve is tied, “trace” the knot that you just tied with the 2nd sleeve. To do so, tuck it under and over as needed to make the two sleeves run parallel to one another.
3 — After the 2nd sleeve is in, adjust the sleeves so they form a tight knot. And tuck the 4 loose ends back into the pillow so they’re concealed.
Tutorial Notes and Tips
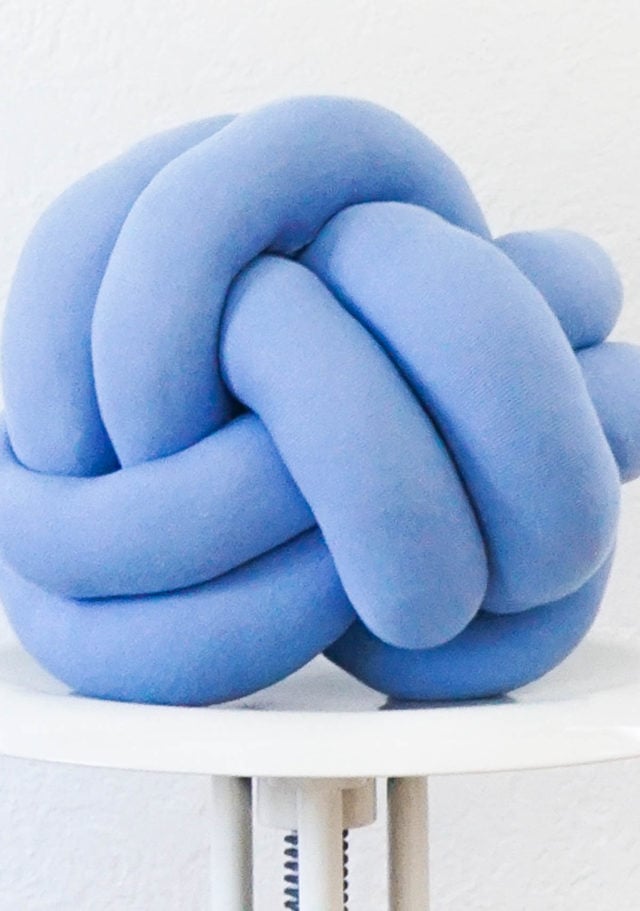
- What’s the final size of this DIY knotted pillow? If you’re following our minimum measurements, this DIY knot pillow will be about 8 inches in diameter. The longer you make your knot pillow strips, the larger the know pillow will be so that you can adjust the size accordingly.
- What type of fabric did you use for this knot pillow tutorial? We used thick stretchy cotton. But you’re welcome to use any stretchy material you’d like. Keep in mind that the more durable the fabric, the more durable your finished pillow will be.
- How much does this DIY knot pillow cost? You can easily make several knot pillows is custom sizes and colors for less than or as much as a single store bought pillow version! The exact cost depends on what type of fabric you choose.
More Quick and Easy DIY Projects for Your Home
While the finished DIY knot pillow is no doubt a fun way to switch things up in the home décor department, we think my favorite part about this project is that it seamlessly doubles as a volleyball for impromptu living room matches at game night! For more DIY projects for your home, check out some of our favorites in our archives —
- Dressing Table Ikea Hack
- Basket Pendant Light
- Fluffy Pom Pom Bin
- Geometric Metal Wall Hang
- Watercolor Printable Wall Art
DIY Knot Pillow
Equipment
- Sewing machine
- Sewing pins
- Ruler
- Scissors
Materials
- 1 piece knit fabric or any stretchy fabric measuring 14" wide and at least 54" long (depending on how big you want your pillow to be)
- Dry polyester fiber fill
- Wrapping paper cardboard tube
Instructions
- Cut two 7” wide by a minimum of 54″ inch long strips or as long as the full width of your fabric will allow. The longer the strips, the larger your knotted pillow will be.
- Form a sleeve of fabric by folding each strip in half. Make sure that the long way with the right sides are facing one another.
- Pin both layers together.
- Sew the length of the fabric at 3/8” seam allowance using a zigzag or knit stitch.
- Sew along one of the short sides as well to close up the sleeve at one end. It’s important to use a zig-zag stitch so that the stitches stretch along with the fabric when stuffing the sleeves.
- Feed the fabric sleeve into one end of the cardboard tube.
- Pull it out the other end.
- Fold it back onto the cardboard tube turning the fabric sleeve right side out.
- Shirr the fabric sleeve completely onto one end of the cardboard tube.
- From the other end of the cardboard tube, stuff in small pieces of fill.
- Push it all the way to the far end of the tube using a ruler or wood dowel until it reaches the fabric sleeve. Try to keep the density of fill uniform throughout the fabric sleeve as you stuff.
- Once the entire sleeve is stuffed, either tie off with a knot or sew up the open end of the sleeve with your sewing machine. Don’t worry, both ends will be hidden once the knot is tied!
- Starting with just one fabric sleeve, tie the knot as illustrated below.

- Once the first sleeve is tied, “trace” the knot that you just tied with the 2ndsleeve. To do so, tuck it under and over as needed to make the two sleeves run parallel to one another.
- After the 2nd sleeve is in, adjust the sleeves so they form a tight knot.
- Tuck the 4 loose ends back into the pillow so they’re concealed.


Please note that we may earn a commission for some of the above affiliate links. However, products featured are independently selected and personally well-loved by us!
Good post
Thanks a lot
It was so easy
That’s adorable! and i really love the colour you chose for this one
Buenas noches, tengo entendido que en varios piases vende el cordón elástico relleno, para hacer las almudadas en bricolaje, ustedes me podrían indicar en donde?. Gracias
Hello! Sorry, we are having trouble translating. What item are you looking for? XOXO
ok, just found it. love it! cant wait to try it! thank yu for this amazing tuto, from Argentina <3
Hi Mariella! That’s so exciting that you found us all the way from Argentina! Let us know how the pillow turns out! XOXO
This is so cute! I love how yours turned out! I would love one of these in my home!
Paige
http://thehappyflammily.com
I am having a tough time figuring out the knot. Is there a video I could watch for this?
Hi Nell! We only have the photos in the post for instructions but check out this video: https://www.youtube.com/watch?v=n9wa6H9N_Z8
I added extra fabric incase I mess up. Please advise the length needed before knotting the fabric. Thank you
Please advise the length need after I cut and sew the fabric together. I measured incorrectly before sewing. Thanks.
How much did this DIY cost you?
I’d love to know more about the fabric, I know any stretchy fabric will do but what exactly is this type of fabric?
Love this project! Just wondering what the dimensions were once its fully made?
OMG! Why is this so cute? Thanks for that step by step and very clear guide. Adding this one up in my planner for future reference. Thanks for sharing!
Right?! Erin did such an awesome job! So glad you like, Katya! Thank you! xo
Thank you for the tutorial. I am just curious why a raw edge is left instead of surging/zigzagging? Is it not needed in this situation?
Hey Carina! You’re welcome to finish the ends if you’d like! We skipped it on account of the extra time commitment of the craft in order to finish all of the edges. xo
I love it! It seems easy to be done!
Do you sell these?
Unfortunately not!
Please sell them!!!!!!
Haha, this is only a DIY from Erin, unfortunately!
This is so cool! I’ve wanted to do something like this for a while. They look super artsy, but when they’re comfy at the same time…. it makes it even better. :)
Totally agree! Hope you give it a try! xo
Wow! What a great idea and what an amazing result. I want to try to make it and I hope to get a result as goo as yours.
Your blog is always so inspiratinal!
Thanks a lot
Thanks for the kind words! We love this project from Erin! xo
I LOVE these! Great job, Erin!
xx Hannah // http://www.HomemadeBanana.com
She’s the best!
Such a clever way to add the poly fill. And the pillow is super cute!
Erin’s a DIY genius!
That’s adorable! and i really love the colour you chose for this one
Erin always kills it – the color is one of our favorite parts too!