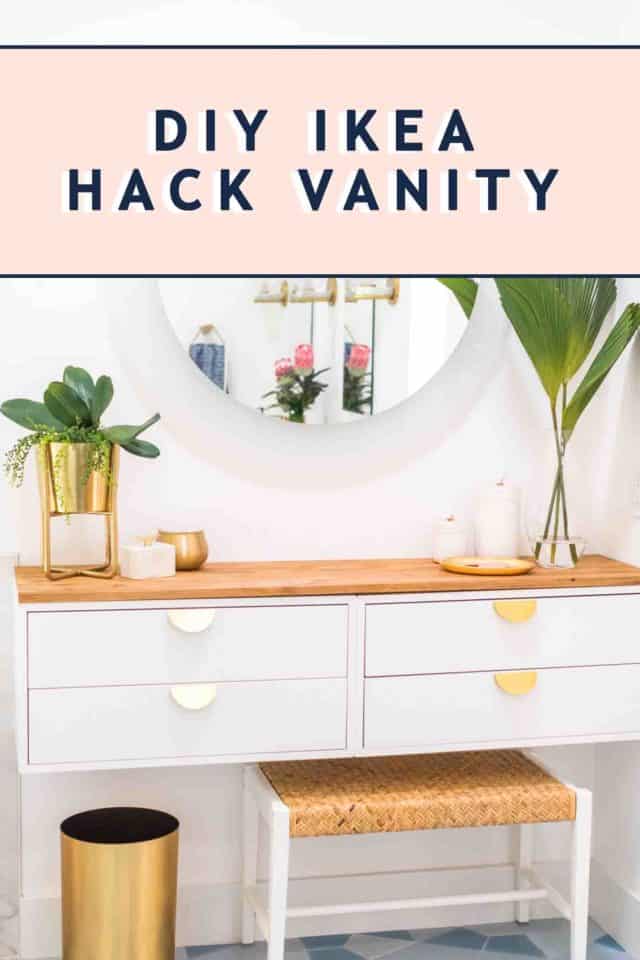
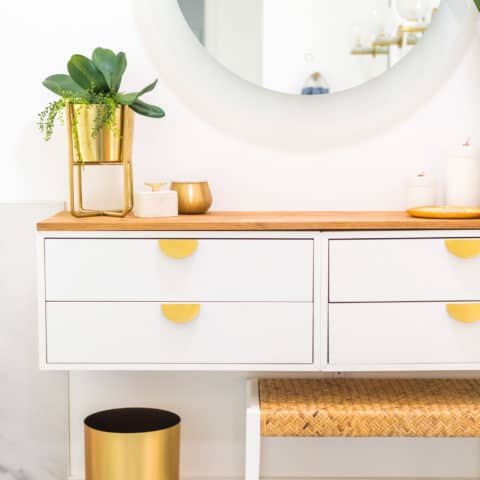
DIY Vanity Ikea Hack
When it comes to making a dressing table, this Ikea DIY Vanity hack is about as easy as it gets! It’s perfectly customizable and budget-friendly.
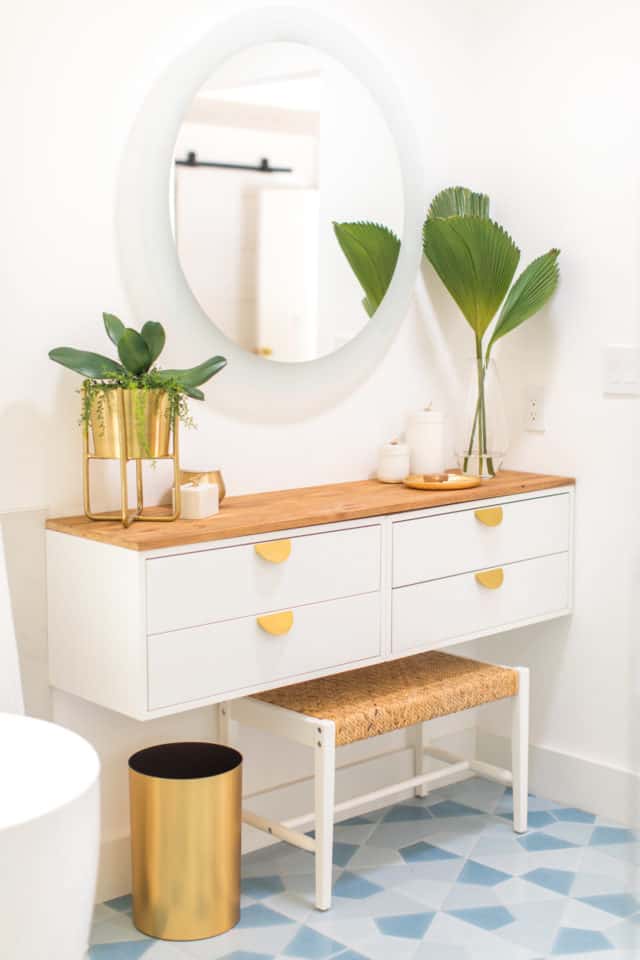
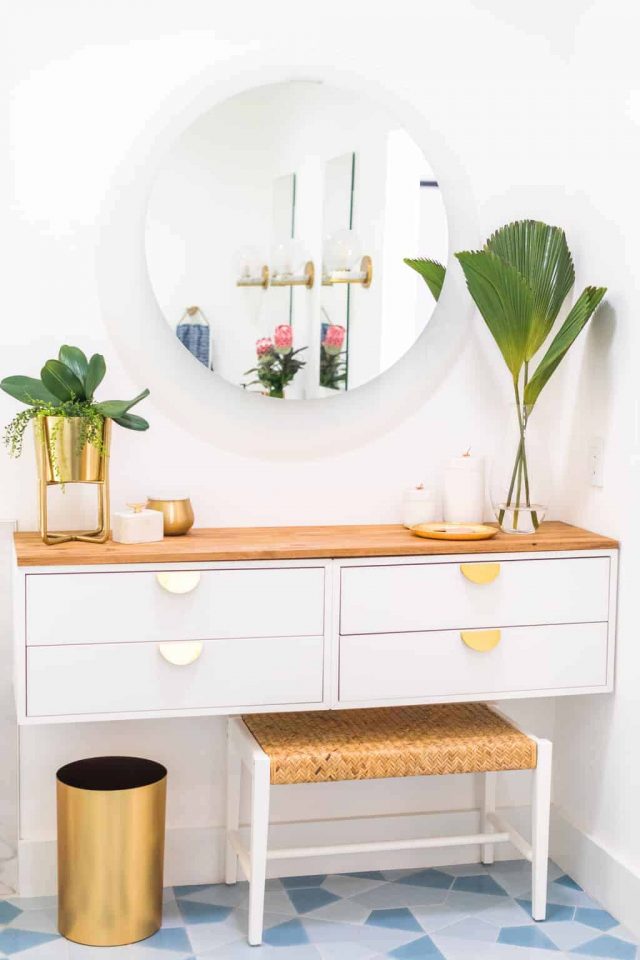
We’ve actually never had our own vanity table before. And we have to say, it’s SO convenient! When we started renovating our master bathroom in the new house, we knew that we wanted to keep the general layout of the master bathroom.
The original layout had a large corner tub and built-in cabinet vanity. Since we went the statement blue tile floor, we liked the idea of doing a floating Ikea vanity so that you could still see most of the floor pattern.
Here’s how we went about making our master bathroom DIY dressing table…
Materials and Tools Needed to Make a DIY Dressing Table
- Ikea Eket cabinet drawers — We used Ikea Eket cabinets for this floating vanity. But keep in mind that you can always repurpose or use alternate style cabinets for the same general tutorial. Essentially this is as simple as mounting cabinets or drawers to the wall, adding a tabletop, and finishing it with pretty cabinet pulls.
- Ikea Eket wall mounts
- Half moon cabinet pulls — Or cabinet pulls of your choice
- Liquid nails and clamps — For securing the glue while it dries
- Wood stain in the color of your choice — We used Golden Oak.
- Piece of solid wood — Cut down to the size of the vanity top. Most home improvement stores will cut this to size for you!
- Fine sandpaper — For the wood top
- Matte polyurethane finish — For the tabletop
- Drill and screwdriver
- Measuring tape
- Pencil

How to Make an Ikea Vanity Dressing Table
The steps for making your own Ikea vanity table are surprisingly simple! The hardest part is actually assembling the Ikea cabinets and mounting them to the wall securely.
Regardless of what cabinets you choose to use, you’ll need to make sure those are assembled according to the manufacturer’s instructions.
Mounting your dressing table:
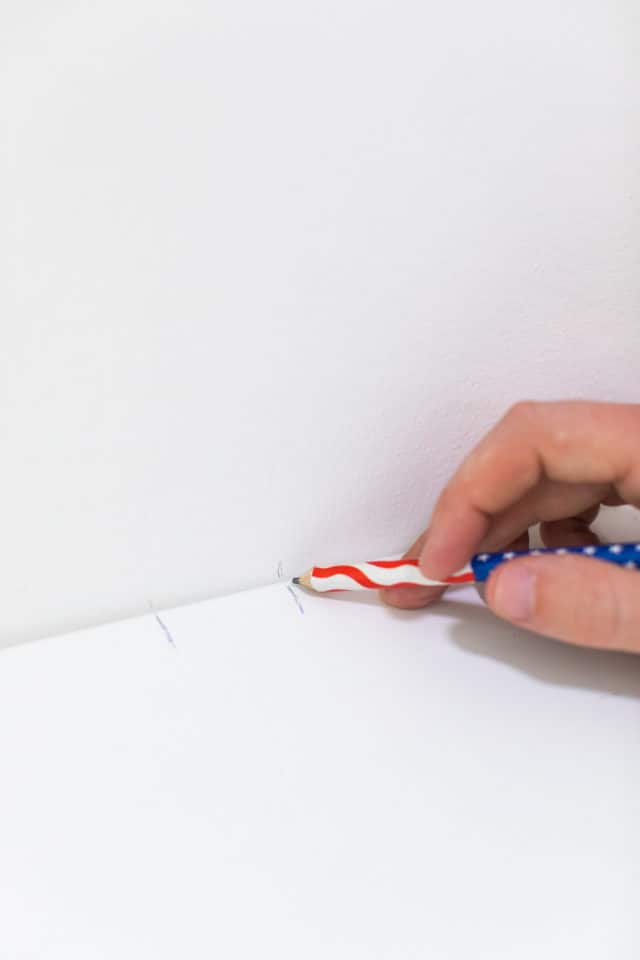
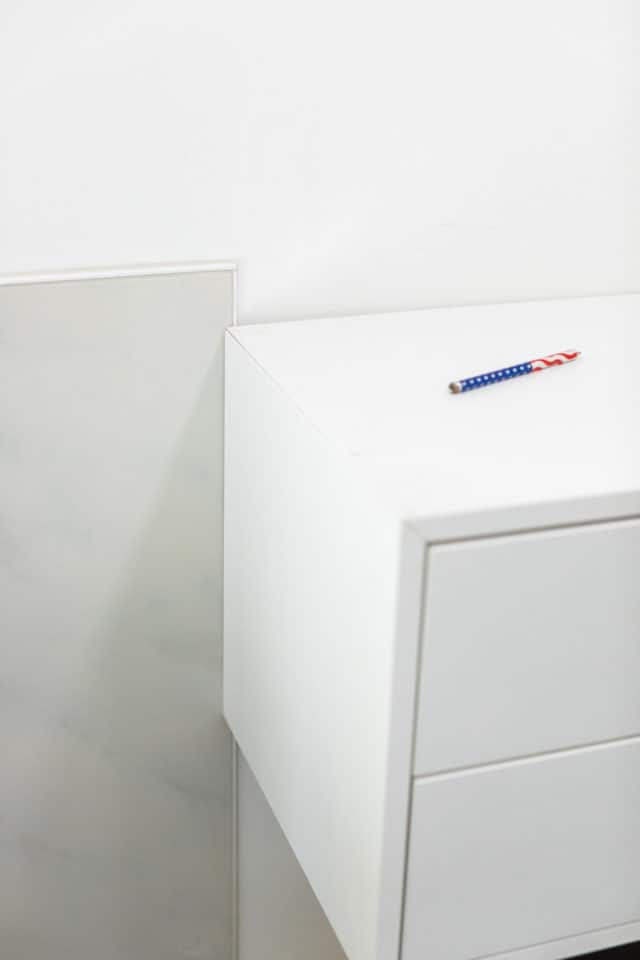
Once your cabinets are assembled, measure and mark the placement for mounting them to the wall. You’ll want to make sure that you mount them at the correct height for whatever bench or chair you’ll be using for the completed vanity. The standard height of desks and most sitting chairs is a minimum of 29 inches.
We didn’t plan to actually sit at our dressing table since we always stand when putting on our makeup. Also, we used a tall dresser so it would be impossible to sit.
So when it came to mounting ours, we placed the top of the vanity at 36 inches so it could still fit a bench underneath for general use.
For the Ikea Eket cabinets, you’ll follow the suspension rail mounting hardware instructions to attach them to the wall.
Steps to Place the Tabletop:
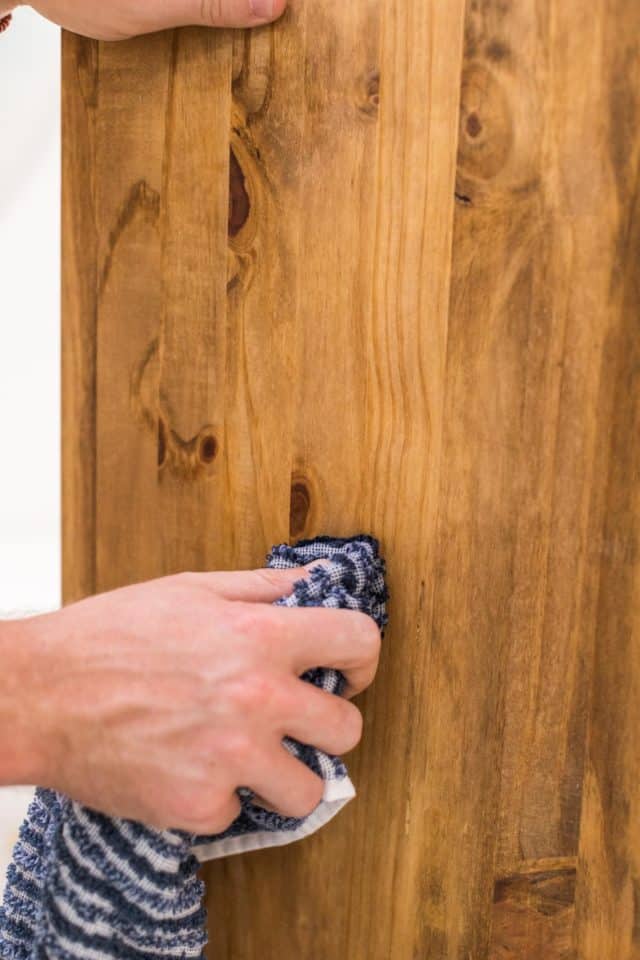
1 — Using fine sandpaper, make sure the top and edges of the cut wood are smooth to the touch.
2 — For the tabletop, stain it with the wood stain color of your choice by wiping it onto the surface with a soft cloth. Be sure to stain the edges that will be shown on the sides as well. If you’re using the IKEA Eket Cabinets like us, your tabletop needs to be 55″ x 27.5″. (This is the measurements of the two cabinets side by side).
3 — Once the stain is dry, you can apply the matte polyurethane to the top for a wipable protective coating.
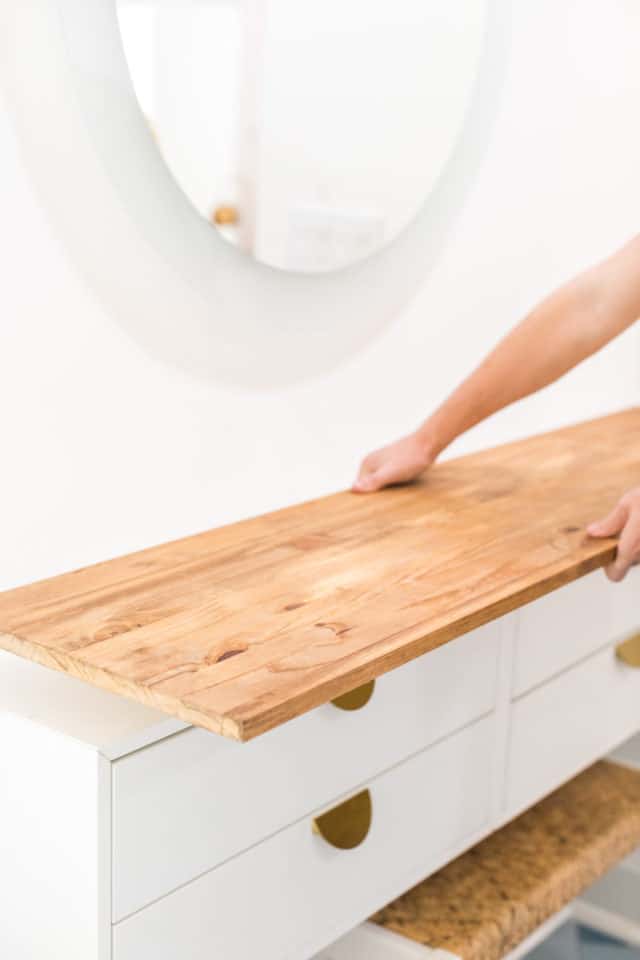
4 — Once the staining is complete, place the wood top on the vanity to ensure it fits size.
5 — Then, use liquid nails on the underneath of the wood top to glue it to the cabinets. Liquid nail adhesive expands when it’s curing. So be sure to use clamps or something heavy sitting on top of the surface until it’s fully set.
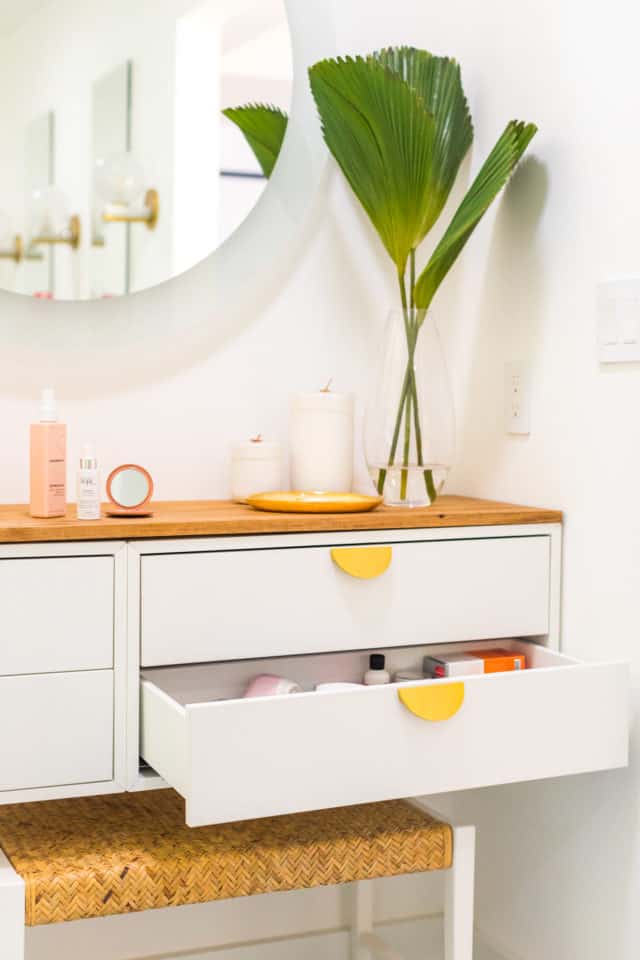
Adding custom drawer pulls for an easy Ikea hack:
Next, you’ll install your cabinet pulls for the Ikea vanity using a drill and screwdriver.

Styling Your Dressing Table
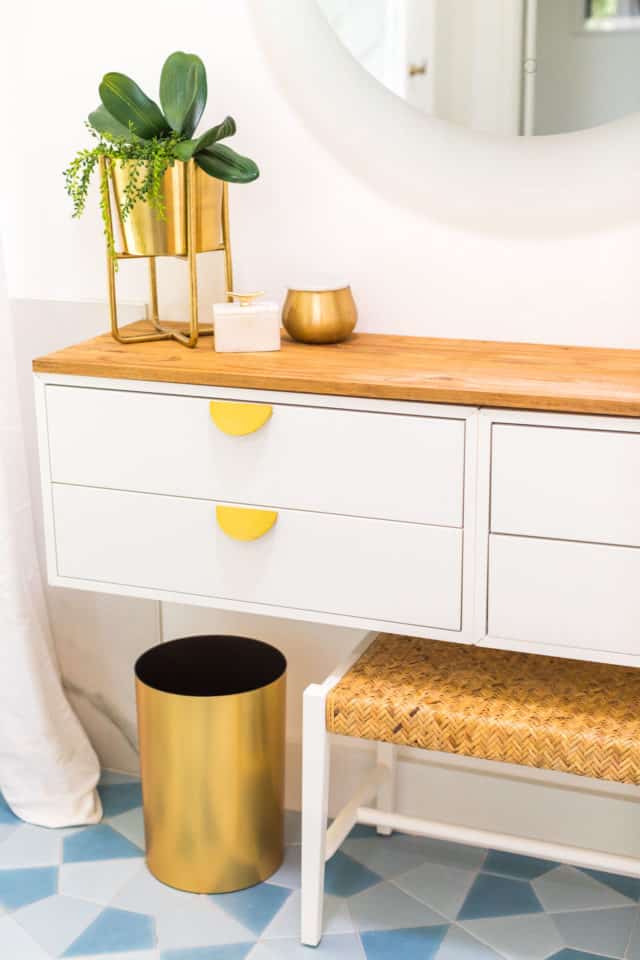
Now it’s time for the fun part, styling the tabletop! We inserted simple Ikea bathroom organizers inside the dressing table drawers as we did in our guest bathroom.
For the top of the vanity, we kept the space simple with a candle, jars for jewelry, cotton balls, and a candle.
More Ikea Hack Projects To Try
What do you think of how it turned out?! All in all this project costs about $175 which is pretty darn inexpensive for a custom vanity! You can see more of our Ikea hack projects for the home right here —
- Ikea hack bar cart
- DIY Ikea hack ice cream cart
- How to make a DIY Ikea hack floating credenza
- Prepping for guests with an Ikea hack dresser
- Ikea bed hack: DIY wooden headboard
DIY Dressing Table Ikea Vanity
Equipment
- Drill
- Screwdriver
- Measuring tape
- Pencil
Materials
- 2 Ikea Eket cabinet drawers
- 2 Ikea Eket wall mounts
- 4 cabinet pull
- Liquid nails and clamps for securing the glue while it dries
- Wood stain
- Matte polyurethane finish for the table top
- Fine sandpaper for the wood top
- 1 piece solid wood cut down to the size of the vanity top
Instructions
- Assemble the drawers according to the manufacturer's instructions.
- Measure and mark on the wall the placement of the drawers so you know where to mount them to the wall. You'll want to make sure that you mount them at the correct height for whatever bench or chair you'll be using for the completed vanity.
- For the Ikea Eket cabinets, follow the instruction for the suspension rail mounting hardware to attach it to the wall.
- Using the fine sandpaper, make sure the top and edges of the cut wood are smooth to the touch.
- For the table top, stain it with the wood stain color of your choice by wiping it onto the surface with a soft cloth. Be sure to stain the edges that will be shown on the sides as well.
- Once the stain is dry, apply the matte polyurethane to the top for a wipable protective coating.
- Once the staining is complete, place the wood top on the vanity to ensure it fits to size.Then, use liquid nails on the underneath of the wood top to glue it to the cabinets. Liquid nails adhesive expands when it's curing. So be sure to use clamps or something heavy sitting on top of the surface until it's fully set.
- Install your cabinet pulls for the Ikea vanity using a drill and screwdriver.

Don’t forget to share your DIY Dressing table with us on Instagram using the hashtag #sugarandclothloves. We always love seeing all of your creations!
Easy IKEA Billy Hacks Anyone Can DIY at Home
Get inspired by clever IKEA Billy hacks for living rooms,…
Continue Reading Easy IKEA Billy Hacks Anyone Can DIY at Home
DIY Ikea Play Kitchen Hacks to Make it One-of-a-Kind
Take your child’s pretend play to the next level with…
Continue Reading DIY Ikea Play Kitchen Hacks to Make it One-of-a-Kind
16 Genius Ikea Desk Hacks You Need In Your Life
Discover the ultimate IKEA desk hack guide for a stylish…
Continue Reading 16 Genius Ikea Desk Hacks You Need In Your Life
22 Home Office Ideas that Promote Productivity & Creativity
Tired of the same ol’ 9-5 grind? These home office…
Continue Reading 22 Home Office Ideas that Promote Productivity & Creativity
Please note that we may earn a commission for some of the above affiliate links. However, products featured are independently selected and personally well-loved by us!
What a great hack! And it feels so doable. I’m about to move my vanity to the bedroom and this is perfect. Just to verify, isn’t this 13 3/4″ deep? Two 27 1/2″w x 13 3/4″d units side by side?
Hi Susan! Yes, it’s totally doable! Yes, the Ikea cabinets that we are used are each 27 1/2″ x 13 3/4″ x 13 3/4″. So it would be 13 3/4″ deep if you’re wondering to calculate the tabletop measurements. Good luck! We’d love to see how yours turns out!
may I ask where this bench is from? Its gorgeous!
Hi Caroline! Thank you! It’s an old bench from Target. XOXO
Aren’t these drawers push-open? Are the pulls just for aesthetics? Looks lovely.
Hi Gillian! Yes, the drawers are push-open, but we find the pulls are helpful when jugging the kids, especially during bath time… and also yes, this was a functional and aesthetic choice!
Your post is good and very effective in reading
What is the measurement for the wood topper?
Hi Paris! If you’re wanting to use the Ikea Eket Cabinets like the ones we used, the wood topper should be 55″ x 27.5″. It’s really up to your preference on how you thick you want it to be though! This is the measurement of two Eket Cabinets combined. Hope this helps!
This is so gorgeous! It’s so great what you can do with IKEA furniture. It’s actually so easy to make things look amazing with just a little extra somethin’!
Thanks, Ashley! Yes, IKEA hacks are so fun cause it’s amazing how much you can change up their pieces!
Highly suggest you use a level when installing your cabinets so you don’t get the gap under your wood top in the center :)
Very great recommendation, Amanda!
The way you share is very good and effective. I appreciate your doing.
vex 3
Love this vanity hack!
Thank you!
I have never thought I need an floating vanity table before! Thank you for sharing this cool idea!
https://192-168-l-l-login.com
Thanks, Violet! XOXO
That looks so good! I love the drawer pulls in particular. And that wood top really elevated it. I have a bit of a love/hate relationship with IKEA. The nearest one to me (Albuquerque) is a good 6.5 hr drive away, and whenever I manage to get to one they are always out of what I wanted. At least I get a long weekend in either Denver or Phoenix, but It’s so frustrating!
Thanks, Meredith! Oh man! That is a loonnggggg drive! Have you tried their Pick Up option? They charge you $5 but when you pick up your order, they issue the $5 back on a gift card and you can use it on food. We like doing that because it’s so hard shopping with a toddler. We actually now ship everything. Their pricing is really reasonable now… especially for the little things.
I LOVE this! That wood on top looks great and love the cabinet pulls!
We had a lot of fun customizing it. Thanks, Taylor!
This is amazing and so easy! I’m obsessed.
Very easy! Thanks, Katie!
I love this idea and I happen to have the perfect spot in my bathroom to do this! So cool!
Let us know how it turns out, Wilhelmina! XOXO
The vanity came out great! I love the way placing the wood on top totally changed the look.
Thank you, Valeria! Yes, the wood really does make a huge difference!
I practically live in Ikea! It’s such an amazing store! Love this vanity hack!
Thanks, Beth! We love Ikea also. It’s so affordable yet their design is always on point.