DIY Ikea Headboard Hack Using Stikwood
Learn how to personalize your bed frame with this genius DIY headboard idea, featuring a simple yet stylish solution using IKEA furniture and Stikwood panels.
Are you tired of your boring and plain bedroom decor? Looking for a way to add a touch of style and personality to your space without breaking the bank?
When it comes to affordable yet stylish furniture, Ikea is always a great option. And you know we are always down for a good Ikea hack, like this DIY Wooden Headboard that involves adhesive wood and no drywall screws!
With just a few simple materials and some creativity, you can transform your ordinary bed into a rustic polished centerpiece. This is seriously one of our favorite and easiest DIY headboard ideas.
So let’s dive in and discover how you can create a one-of-a-kind headboard that will leave everyone impressed!
What is Stikwood? How Much is Stikwood?
Now let us introduce you to the glory that is Stikwood. It’s real reclaimed wood that’s already finished and features an adhesive backing. Basically, this makes it perfect for those of us that aren’t exactly woodworkers but still want the rustic look.
Keep in mind that the panels are still real reclaimed weathered wood that are sustainably harvested in the US. So it is pricier than MDF boards and will run about $9-$15 per square feet. But you are truly getting wood headboard at a fraction of the cost.
Our mind is pretty much swimming with things to stick this genius invention on. We also used it in a bedroom to create a DIY reclaimed wood accent wall and even for a DIY folding table.
Materials and Tools Needed to Ikea Hack a DIY Wooden Headboard
- Ikea Malm bed frame
- Stikwood Reclaimed Peel & Stick Wood Planks — We purchased just over 10 square feet of the Reclaimed Barrel Oak planks for the DIY Malm bed. There was a lot leftover for other DIY projects for other rooms in the house. If you’re not using the Malm bed, measure the width and height of the current headboard to ensure that you order enough Stikwood to cover the surface.
- Rotary saw — To trim the wood panels.
- Measuring tape
- Clear matte polyurethane finish or spray — Since this is for a bed, an interior sealant works fine.
- Fine sandpaper — Optional
- Black permanent marker — Optional for style
How to Make a Ikea Headboard Hack for a Stikwood Headboard
1 — Measure the individual Stikwood panels to be the same width as the headboard. The width and length of the Stikwood panels vary depending on the finish that you choose.
If you’re using the IKEA Malm queen bed with the Reclaimed Barrel Oak panels like us, then the rows should measure 66 1/8″ across. Mark your measurements with a pen on the back of the wood panels.
We left 2 pieces of Stikwood panel at its original full length for every row, and then cut 1 smaller piece 4 1/4″ across.
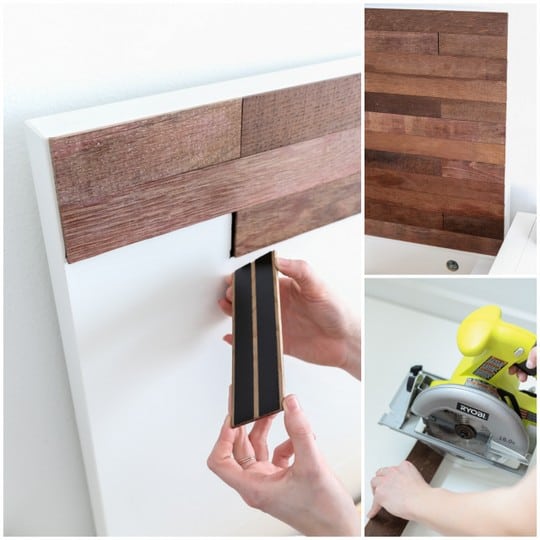
2 — Using a saw, trim the marked panels to match the headboard’s width. Cutting Stikwood planks is very easy since it’s lightweight and thin.
3 — Peel the backing off and carefully and firmly press the wood panels firmly on the face of the headboard.
We alternated the placement of the small piece to vary every row. It’s also easiest to start from one edge and work your way across. Because the Stikwood is made from real reclaimed wood, not all of the pieces fit quite the same. The best way to make sure everything lines up correctly is to test each row before peeling the adhesive backing off of the wood and placing it.
4 — Optional: For a smooth finish, lightly sand any rough parts of the wood. This ensures that your pillows won’t snag the surface.
5 — Optional: The permanent marker comes in handy if you’d like to have a more dimensional look by not having every single piece fit flush against each other. Use the marker to color in a little line (as seen in the large tutorial photo). And then, leave a small gap in between the two pieces.
6 — Once the entire headboard is covered, spray or paint the entire surface with the polyurethane wood finish. Allow to dry. This will keep the color of the wood from rubbing off onto pillows.
And then, you’ve got a beautifully customized DIY wood headboard!
Will This Tutorial Work for Any Bed?
Even though we used an Ikea bed in this tutorial, this headboard hack can work on any bed that already has a non-fabric cloth headboard. If your bed doesn’t have a headboard, you could create a freestanding wood headboard with the panels. Simply mount them against a wall behind your bed.
Do I Need Additional Nails or Adhesive Glue?
No! The beauty of this Ikea bed hack is that Stikwood adhesive meant over 10 years. There’s also no need to pre-sand the surface.
More Easy Ikea Hacks
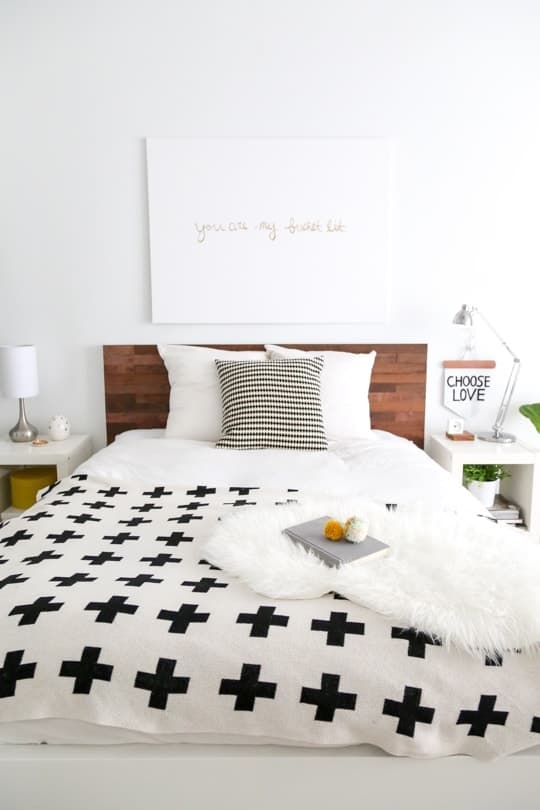
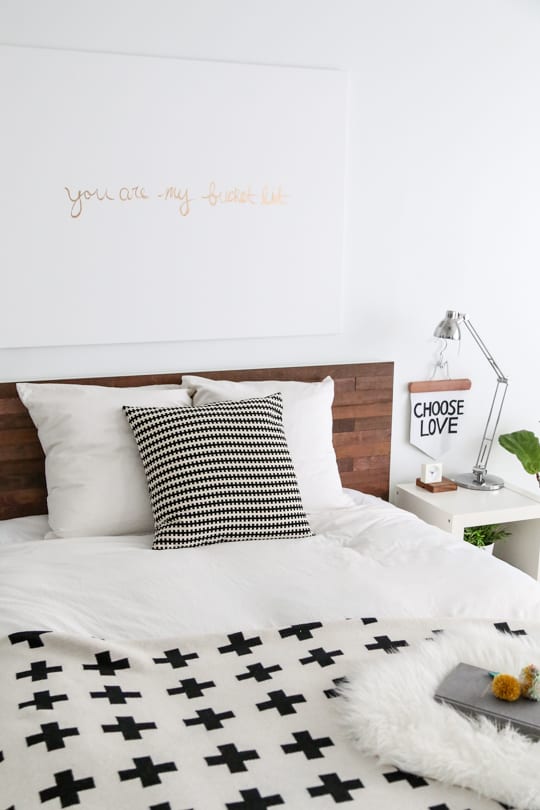
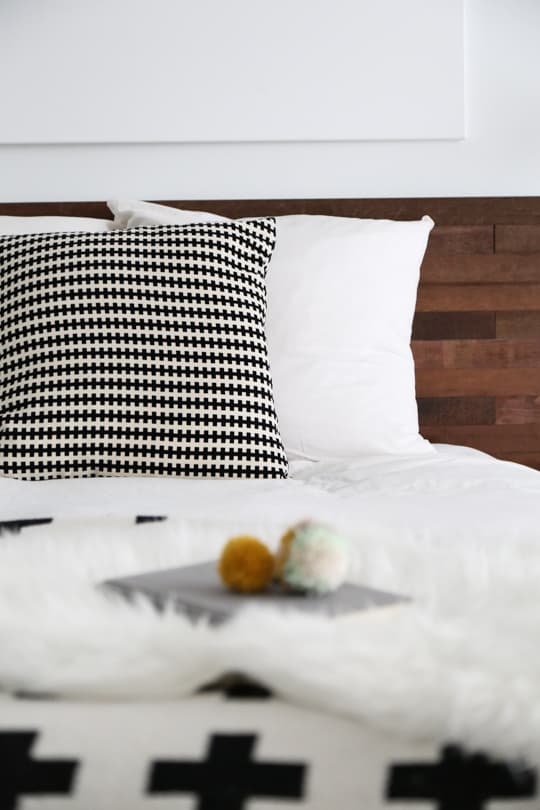
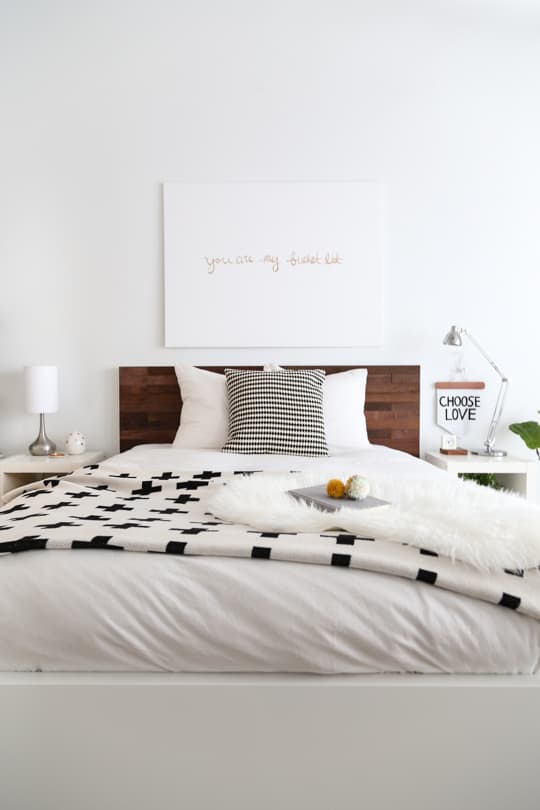
We thought that we might miss the all-white bed frame. But we love how the wood headboard really makes the room feel much cozier, especially when we add in our white shag and favorite blanket. For more Ikea hacks, check out our other home decor DIY projects below —
DIY Wooden Headboard with Stikwood
Equipment
- Rotary saw
- Measuring tape
- Black permanent marker
- Fine sandpaper
Materials
- 1 box Stikwood
- 1 Ikea Malm bed frame or any bed frame of your choice
- 1 clear matte polyurethane
Notes
- Estimated cost is based on an estimated cost of a box of Stikwood. You will not to use the entire box (we used half) for this particular DIY.
Instructions
- Measure the individual Stikwood panels to be the same width as the headboard. The width and length of the Stikwood panels vary depending on the finish that you choose.If you're using the IKEA Malm queen bed with the Reclaimed Barrel Oak panels like us, then the rows should measure 66 1/8" across. Mark your measurements with a pen on the back of the wood panels.We left 2 pieces of Stikwood panel at its original full length for every row, and then cut 1 smaller piece 4 1/4" across.
- Using a saw, trim the marked panels to match the headboard's width. Cutting Stikwood planks is very easy since it's lightweight and thin.
- Peel the backing off and carefully and firmly press the wood panels firmly on the face of the headboard.We alternated the placement of the small piece to vary every row. It's also easiest to start from one edge and work your way across.Because the Stikwood is made from real reclaimed wood, not all of the pieces fit quite the same. The best way to make sure everything lines up correctly is to test each row before peeling the adhesive backing off of the wood and placing it.
- Optional: For a smooth finish, lightly sand any rough parts of the wood. This ensures that your pillows won't snag the surface.
- Optional: The permanent marker comes in handy if you'd like to have a more dimensional look by not having every single piece fit flush against each other. Use the marker to color in a little line (as seen in the large tutorial photo). And then, leave a small gap in between the two pieces.
- Once the entire headboard is covered, spray or paint the entire surface with the polyurethane wood finish. Allow to dry. This will keep the color of the wood from rubbing off onto pillows.

19 Unique & Easy Houseplants that We’re Loving
Looking for unique house plants? Dive into our guide to…
Continue Reading 19 Unique & Easy Houseplants that We’re Loving
60 Amazon Bedroom Decor Picks to Revamp Your Room
Discover the best Amazon bedroom decor items to create a…
Continue Reading 60 Amazon Bedroom Decor Picks to Revamp Your Room
Marbled Clay DIY Incense Holder
Learn how to create a beautiful and functional DIY Incense…
DIY Flip Photo Album
This DIY Flip Photo Album tutorial shows you how to…
Please note that we may earn a commission for some of the above affiliate links. However, products featured are independently selected and personally well-loved by us!
Very informative
What did you do for the strip at the top and sides of the headboard? It isn’t called out in the instructions however I am going to guess you added a strip there?
Hi Jeff! We left the top and sides alone. You can kinda tell in the photos, but it’s not too clear since it blends in with the white wall. However, you can definitely apply the Stikwood to all the edges! It will definitely look more like a wood headboard. A box of Stikwood has more than enough to allow you do so so also! We had a lot of leftover strips and just did another DIY with the remaining pieces.
Wow amazing! Very impressive! Will definitely give this a go!
Compares to some of headboard, that is so nice. This one would be great in my bedroom. http://newbedfordhomeremodeling.com/
Thank you! Glad you found us! XOXO
Nice
Thank you, RK!
http://www.diyncrafty.com/diy-headboard-ideas-you-can-make-in-a-weekend/
The headboard is a piece of furniture that attaches to the head of a bed that makes the bed more gorgeous and gives a cute look at the bedroom.
Could you post a link to the Ikea bed? I’m trying to recreate this project 🥰
Hi Kimberly. The IKEA Malm bed is one of their staples that is in stock every season. You can find it in store and online here! https://www.ikea.com/us/en/catalog/products/S39931162/#/S69931603 Hope this helps!
Where can I get that image, “You are my Bucket List”?
It’s something we custom made a long time ago!
Awesome!! I’ve included a part of your post in my article: https://www.stackedstonetile.com/8-incredible-furniture-makeovers-you-need-to-pin/
Thanks for sharing!
.I’ve an IKEA near my town : can’t wait to own my own home.
Yay! That’s great that you have one nearby. They really should open more but we know that they’re planning on upgrading their online store so that almost everything in-store will be online.
I’m assuming you are creating this headboard from part of a Malm bed-frame, because your current bed-frame does not have one (this is the reason I am searching for DIY headboards). Thank you!
What part of the Malm bed-frame are you sticking the stick wood to?
awesome idea!
Sweet dreams…i want to do this on the wall, do they stick on well?
Hi Ashley, did you make that bucket list canvas yourself? or do you have a link? thanks!
can you tell me if you have a box spring under your mattress? i love the height of this bed?
Thanks!
Hi Jessica, no we don’t! It’s just a platform bed.
hi, i was wondering where the art above the bed is from? i love it!
Where is stikWood purchased?
cool hack! Where is the blanket from?
Love this! Blanket is cool too – could you share your Source? Thx
Where is the cool black and white blanket from?
I love the cross blanket – where can I get it?
What is the white base used to put stick wood onto ?
An old Ikea bedframe
Nobody can do a better job than you.
cabal2 http://cabal2.tumblr.com/
Take my word .
EQNMALL http://imgur.com/CiPs3xX
i can discover numerous great answers basically have any difficulty!
R4PG http://r4pg.wordpress.com
I was so excited to find this hack, it looks absolutely beautiful. And then I was BEYOND disappointed to find out that the Stikwood costs $280. I think a lot of readers would have been interested to know that the panels cost just as much as the bed itself. Very disappointing.
Hi Melanei! yes, it’s definitely not cheap, but it’s still much cheaper than buying a custom reclaimed wood bed frame. plus you’ll have extra stikwood leftover to use on additional things :)
This is a brilliant idea! I love the look of the headboard and the instructions seem easy to follow. Thanks for sharing!
Hi there, well done on this it looks great! I’ve been looking into Stikwood and the pieces look a lot thicker. Did you trim these to the thickness that they are, or can you order them at this thickness? Many thanks, D
That’s not an affordable DIY for some of us. $300.00 for the wood? You could have used pallets for a lot less and recycled with bare wood, not a new product. You could have a also gotten a thrift store headboard. Kind of disappointing, a over-priced DIY project…
I was wondering what white paint color you used on your walls, I love it!
Where is the black cross blanket from? I love this whole look together!
I would like to know how much Stickwood you used and what is the size of your bed ? I would like to do the same but I want to make sure I order enough.
Would you be willing to let me know where you got that white blanket with the plus signs?
What color are your walls? I’ve been dying for white walls, but not sure if the inspiration, your bedroom included, is pure white, or a different shade of white. I love your walls and bed. I recently made a headboard out of left over pallet wood I had on hand, and stained it. I love the contrast of the wood and your walls.
how far down did you apply the wood to the headboard? i’m wondering if it still looks ok if the “legs” are white in the back. can you post a picture of the headboard down to the floor? thx!! really excited to try out stikwood!!
We have it going all the way down to where the legs meet
Here is a similar one on Amazon but a little more rustic.
http://www.amazon.com/gp/aw/d/B00ULNG73K?vs=1
Where can I find the Stikwood product in Australia?
Where did you get that amazing black and white cross blanket?? Or what brand is it?
I’m obsessed!
Hi Pepper, the blanket is from Spearmint Love
Ashley, this absolutely beautiful! Infact I loved it so much we bought the bed frame ($360 on sale but with 2 storage drawers, also on sale). The problem I am having now is the wood! I had not read down to the comments where others had mentioned the price and in Canada it’s even more, about $300 a box! That would bring the total cost to almost $700 which is way too much for a hack for me. I was wondering if you have other, more attainable solutions? I was going to buy some would and stain it, my boyfriend suggested buying a box of wood flooring that’s already stained. Any ideas?
Hey, I saw your comment and thought I would offer some advice. I hope you don’t mind. :) I absolutely loved this look, but could not afford the price. I tried some old pallet wood that I had on hand. My sister just finished hers, but she purchased paint sticks on amazon (I think it was 200 for about $30) she sawed off the akward shaped handle, and stained the sticks, and attached them with wood glue. It came out fabulous!!! Of course the paint sticks are small, so you’ll have to use a bunch, but its another option. Hope that helps.
Loving this ikea hack, just wondering if there is a cheaper alternative to the sticky wood.
Im probably a little late to the comments for this post(!), but where can i get a throw rug like the one that is pictured in this post? Love it!
This is incredible — I am going to tackle doing it this summer! Do you know if it’s possible to use the Malm headboard and attach it to a regular bed frame? I’ve searchd high and low, and can’t turn up an answer yet. Thanks so much!!
Hi Caroline, for this project I had purchased the entire frame. Sorry that I couldn’t be of more help!
Great idea…it came gorgeous!
But– maybe skip the polyurethane since it is toxic?! The proximity and hours spent in bed make it a bad idea. What would linseed oil do as alternative since it is safer? Haven’t you seen all the news about flooring that is treated? Otherwise this is a neat project!
At first glance I’ve read the phrase like ‘You ate my breakfast’ and was like okaaaay. I need glasses asap :) Great post!
were did u get ur pillow and the cross blanket on ur bed and the white furry lay over!? Love them:)
Where do I get Stikwood from?
I see an ugly bathroom mirror getting framed out with this! ☺️
I may have missed it in all the comments but what adhesive did you use and how well has it stayed up?
hello! Just curious, what bed frame is shown in the photo if you just got the malm head board and not the malm bed frame?
Thank you!
Wow, that’s just amazing! I never even knew stickwood existed, but it’s beautyfull and it seems like very easy to work with!
I’m moving out next year when I’m going to college and I’m definitely keeping this in mind when I’m decorating my room!
need some bedside nightstands like that! Where’d you get those?
Could you put the stikwood directly on your wall? That would eliminate the need for the white bedframe and you could just use a metal one (that doesn’t show) and the headboard would be on the wall.
looking good
Love this!
What size is the canvas over the bed its perfect
I actually can’t remember the exact size, it’s just a large 40×60″ ish one from Michaels!
Hi, absolutely love this project! I’m sorry if you have already answered this, but am wondering. What size frame is this particular project? Queen, King?
Thanks in advance!
Amber
hi! where did you get the black/white throw?
Love this! I also love the “you are my bucket list” wall decor. Where did you find this? Or did you make this yourself?
Where did you get the duvet cover/pillows?
Looks awesome but Wow! that stuff is expensive!
Hi Ashley, absolutely love this project and am about to try it for myself! I am having trouble finding the clear matte polyurethane. (I tried Lowes and Home Depot). Do you know where I could get it? Thanks!!! :)
Hey Jen, glad you love the project! If you’re having trouble finding the spray matte polyurethane, satin will do just fine! Otherwise you can always buy the kind in a quart and brush it on :) xoxox
Hello! Could you share the deets of the canvas?!
Hi, I’m new to your page but look forward to checking it out :) Loving this bedhead. I was wondering about the ‘choose love’ wall hanging, is that diy? If not where did you find it please?
Thanks
Cassy
Hi Ashley,
Did you use the high or low Malm bed frame?
Thanks!
Michelle
I used the high!
I’ve been looking for a blanket like that! Where did you get it? Love the room!
Hi Hannah! It’s from Spearmint Love! It’s their eco cross blanket :)
I love the saying above your bed. Did you make that? Just a gold marker in cursive on canvas? Thanks!
Yes! Just gold foil paint on canvas
Where is the bedding from?
It’s from Spearmint Love! It’s their eco cross blanket :)
Ok this is gorgeous! I love the “You are my bucket list” hanging over the bed – was that a DIY?
Yes! it’s just gold foil paint on canvas!
Love it, but makes me angry the prices we pay in Australia. $299 (AUD) for a Malm bedframe here! Ouch!
That’s a major ouch!
I LOVE this – and I love the art and the blanket too… it’s the bedroom of my dreams :)
could you share – where is the crosses blanket from?
thanks!
About how many square feet of stikwood did you end up using for this project?
About 10 square feet. 20 came in the box in total, and I still have half left for another project :)
Can you tell me where you got that checkered pillow? Really awesome.
I was going to ask the same!
Hi ladies! It’s actually from Ikea too, only $20! :)
Great project but how much did it cost in total? The ikea bed is about $300, the stikwood runs about $200. Seems like a lot for a DIY project. You could get a solid piece of reclaimed wood for around that price…
I actually got the bed frame in the Ikea as-is section for $90! I was pumped! And you get enough Stikwood for at least two projects, so it actually only ends up being $300 altogether for a custom bed! :)
Blooming beautiful. Now if only Japan had these wonderful wooden pieces, Im off to investigate.
Hi Ashley, I’ve only been reading your blog for a short while, but I love it and I LOVE this project! It looks so fun and beautiful. I just wanted to let you know I loved it so much that I’ve featured it in my Friday round-up! If you’d like to see the post, you can check it out here: http://thecommoncreative.blogspot.ca/2014/03/curated-by-jenni.html. Have a lovely Friday!
LOVE this hack!! That Stikwood stuff isn’t cheap – $200 a case! I might be tempted to do a similar hack, but glue wood strip. But you can’t argue with the ease of the Stikwood. Plus, your bed looks amazing.
You’ll also have plenty of leftover pieces to use for other projects too! Plus it’s real reclaimed wood, can’t be that ;) xo
This is so cool! Thanks for sharing!
A Styled Life
thanks Laura!
I love this project – it looks super professional. I am going to have to get my hands on some of this Stikwood stuff.
Britt, you NEED it!
This is fantastic! Thank you for sharing!
Brilliant!
Thanks Chelsea!
How did I not know about Stikwood!? This stuff looks like magic!
I know, right?!
Ah-maze-ing! So simple, so warm, and very dramatic. Nicely done!
thanks Carolina!
I’m lookin’ and I’m liking! :) Really a fab idea!
haha! ;)
This is a brilliant idea!!! With your permission, I’d love to share and link to this on my website: http://www.diyfunideas. It’s a new hub for fun, creative diy ideas and inspirations. Thanks, Jenise
Hi Jenise! I don’t allow full tutorials to be shared, but I’m so glad you love the project! xo
$200 JUST for the stikwood?? I would just buy a new headboard.
You’ll still have quite a bit left over for more projects ;)
I thought the same thing! :X
Gorgeous! I bet you could update picture frames and create poster/art frames with it too!
oh definitely!
It looks awesome! I love it! Great job!
Iquo
http://www.keaishop.com
http://www.iquoismusic.com
Loving this! Thanks for putting stikwood on that map for me :)
haha, totally!
This is a beautiful stikwood project. You did a great job!
thank you so much Laura!
Great Idea!!
thanks Wendy!
well holy crap, stikwood may have just changed my life! Gorgeous tutorial, thanks for sharing x
haha, it changed mine too!
Really cool. Where did you get your cross blanket?
Ooh! Fab question. I was going to ask the same thing. :)
It’s the Eco Cross blanket from Spearmint Love! :) – http://www.spearmintlove.com/blankets/
Thanks for the info – I collect things with the cross on it; I find the graphic so powerful.
awesome!! where are your bedside tables from?
They actually another DIY! You can see them here: http://sugarandcloth.com/2013/08/diy-ikea-hack-sidetable/
I was just going to ask the exact same thing! I’ve been having a terrible time finding side-tables. We already have an amazing headboard but I think I’m going to put stinkwood on your ikea-hack sidetables :) Amazing!!!
love that idea! ;)
Very cool! I’d like to line the backs of a shelving unit or some cabinets.
that would be such a cute DIY!
This is such an ingenious idea! I’d never heard of stikwood before, but now I’m looking at our old Ikea desk and thinking how much better it would look covered in wood. Thanks for sharing!
Oh, love that idea!
I love this! Such a great idea!
Thanks Alivia, love how you spell your name!
THIS IS SO GOOD!!!! I love it!!!
thanks Allyson!
this is so lovely, what a fantastic idea!
thanks Kelly :)
Love the wood! I’m looking for ways to incorporate more wood into my space, so I’ll have to keep with in mind!
it’s such an easy option!
whaaat? I would never had guessed…I actually like the wood frame better than white
me too!
Never in my life would I have guessed this was an Ikea hack – SO AMAZING
ah, best compliment ever! ;)
That looks amazing! Really nice idea. I’ll keep this project in mind :)
alright!
I love this idea and your bedding/linens! Where did you find your duvet cover/comforter? I’ve been trying to find simple, white bedding like that but have had no luck…
If you’re still looking for the bedding there is a version available on societysix.com in either white/black or black/white. Good luck!: https://society6.com/product/black-cross-on-white_duvet-cover#46=342
This looks great! What a pretty update!
XOXO
Becca | Ladyface Blog
thanks Becca!
Where did u get the sticky wood from