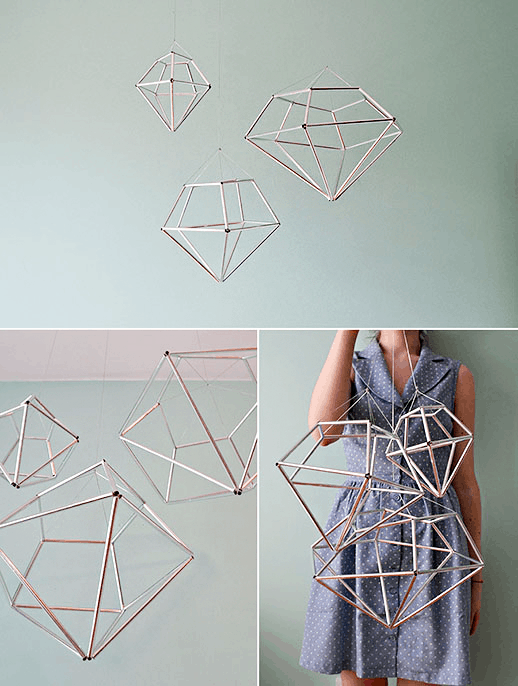
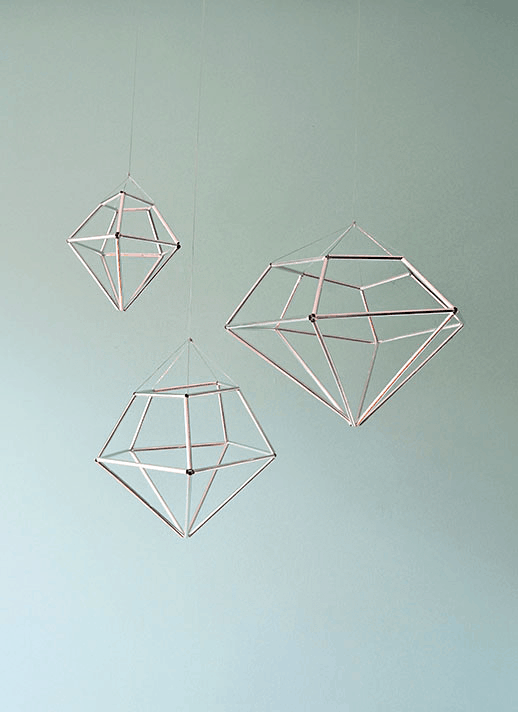
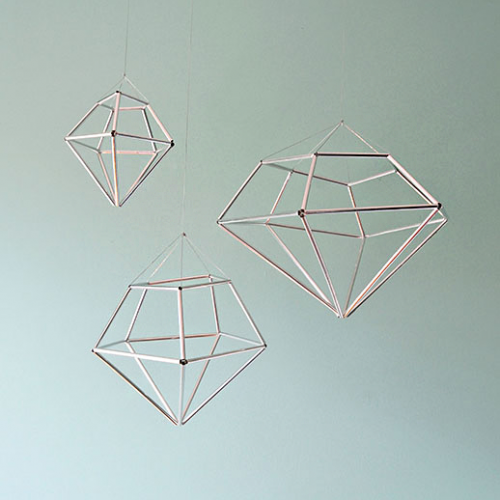
Diamond DIY Hanging Mobile
Whether it’s for a nursery, New Year’s party, bridal shower, or engagement celebration, this DIY Diamond Decor Mobile is a fun metallic accent to any room and event!
Now that June is upon us, it’s beginning to really feel like summer.
This DIY Hanging Diamond Decor Mobile tutorial is a great way to offset that summer heat. Don’t they remind you of ice cubes floating mid-air?
Plus, with all the diamond-shaped products out there these days wouldn’t it be a blast to throw an icy cool diamond party this summer?
I hope you won’t forget to send Sugar & Cloth an invitation!
These DIY metallic diamond mobiles are fun to hang as an overhead table centerpiece or for photo backdrops, but you could easily leave off the string for modern tabletop décor.
Materials and Tools Needed to Make a Hanging DIY Diamond Decor Pendant
Silver muffler tape — You can purchase it online, but it’s also available at hardware stores and some dollar stores.
Additional string/thread if desired — For hanging completed diamonds
How To Make A Hanging DIY Diamond Decor
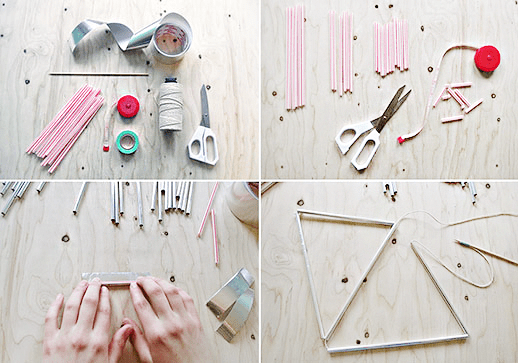
Step 1 — Prep your straws.
Cut your straws to the desired lengths.
The step-by-step photos for this tutorial show the largest of the three diamonds pictured. The lengths of the straws used are: six — 7 1/2″ straws (long), six — 5 3/4″ straws (medium), twelve — 3 3/4″ straws (short).
If you want to replicate the other diamonds in the photo, the medium five-sided diamond used: five — 6 1/4″ straws, five — 5 1/2″ straws, ten — 3 1/2″ straws.
And the smallest five-sided diamond used: five — 4 1/2″ straws, five — 3 1/4″ straws, five — 2 1/2″ straws, five — 1 3/4″ straws. You can always play around with straw lengths and make whatever size best suits your space.
Step 2 — Cut your muffler tape.
Cut pieces of muffler tape in corresponding lengths to the straws.
Because the tape is so wide, cut each piece length-wise; therefore one 6″ piece of muffler tape will cover two 6″ straws.
It isn’t a bad idea to cut the tape a tiny bit longer than your straws – you can trim the excess later.
To cover the straws, the best way to ensure a wrinkle-free covering is to carefully peel off the tape backing, lay the tape flat on your work surface, place the straw along one edge of the tape, and then roll forward smoothing the tape as you go.
If you have excess tape extending past the end of the straw, trim it off.
Step 3 — Connect your straws.
Time to connect the straws!
Tape the end of your string close to the pointy end of your wooden skewer. This will be used as a needle to make threading the straws easier.
Slide two long and one medium straw onto the string.
Pull the string taut so that the straws form a triangle and tie a double knot where the two straws meet. Cut off excess thread.
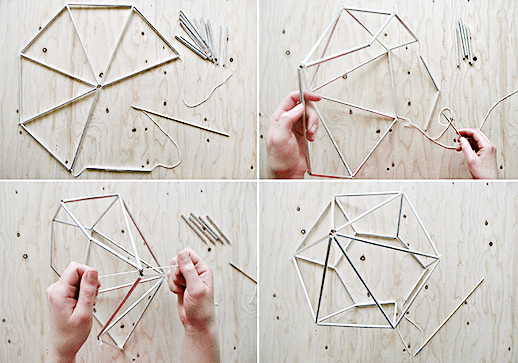
Step 4 — Rethread your straws.
“Rethread” your needle if necessary.
To create the next five sides, simply slide the needle through one of the long straws on the existing triangle (leaving a few inches of thread to tie off with) and add another long and medium straw; tie off as before.
Repeat rethreading as needed.
For the sixth side, slide the skewer through the two long straws and add the final medium straw tie off.
You should now have a six-sided pyramid.
Step 5 — Construct your upper trapezoidal facets.
To add the upper trapezoidal facets, slide the needle through one of the medium straws on the pyramid and add three short straws.
Pull tight and tie off. Slide the skewer through the next medium straw, the adjacent short straw, and add two short straws; tie off.
Continue to add facets in this way, two short straws at a time, tying off after each new facet.
For the last facet, slide through the short, medium, and short straws, and then add the final short straw. Tie off.
Step 6 — Hiding your knots.
To tidy up the diamonds, use the skewer to push any knots visible at the intersections into the length of the straw.
How to Hang Your DIY Diamond Decor Mobile
If you want to use the diamonds as tabletop decor, then you’re done!
If you would prefer to hang them, use string (like the silver cord pictured).
However, you can use clear thread (or whatever you like) and tie 6″ pieces to the exposed strings at the top intersections of the diamond.
Tie these six strings together, and then tie a long piece of string onto this knot. Tape the string to your ceiling and trim any excess string.
If hung in direct sunlight the diamonds reflect onto nearby walls, disco ball style.
In lower light, they can make gorgeous shadows if hung near a wall!
In case you’re looking for more home decor projects, you can see more of our favorites right here!
And if you’re a fan of statement DIY pieces that “float”, then, you’ll love our DIY Hanging Flower Installation.
DIY Hanging Diamond Decor Mobile
Equipment
- Scissors
- Measuring tape
- Wooden skewer
Materials
Instructions
- Cut your straws to the desired lengths: The step-by-step photos for this tutorial show the largest of the three diamonds pictured. The lengths of the straws used are: six — 7 1/2″ straws (long), six — 5 3/4″ straws (medium), twelve — 3 3/4″ straws (short).
- Cut your muffler tape: Cut pieces of muffler tape in corresponding lengths to the straws. Because the tape is so wide, cut each piece length-wise; therefore one 6″ piece of muffler tape will cover two 6″ straws.
- Connect your straws: Time to connect the straws! Tape the end of your string close to the pointy end of your wooden skewer – this will be used as a needle to make threading the straws easier. Slide two long and one medium straw onto the string. Pull the string taut so that the straws form a triangle and tie a double knot where the two straws meet. Cut off excess thread.
- Rethread your straws: Rethread your needle if necessary. To create the next five sides, simply slide the needle through one of the long straws on the existing triangle (leaving a few inches of thread to tie off with) and add another long and medium straw; tie off as before.
- Construct your upper trapezoidal facets: To add the upper trapezoidal facets, slide the needle through one of the medium straws on the pyramid and add three short straws.
How to hide your knots:
- To tidy up the diamonds, use the skewer to push any knots visible at the intersections into the length of the straw.
Notes
- If you want to replicate the other diamonds in the photo, the medium five-sided diamond used: five — 6 1/4″ straws, five — 5 1/2″ straws, ten — 3 1/2″ straws.
- And the smallest five-sided diamond used: five — 4 1/2″ straws, five — 3 1/4″ straws, five — 2 1/2″ straws, five — 1 3/4″ straws. You can always play around with straw lengths and make whatever size best suits your space
- To cover the straws, the best way to ensure a wrinkle-free covering is to carefully peel off the tape backing, lay the tape flat on your work surface, place the straw along one edge of the tape, and then roll forward smoothing the tape as you go.
- Repeat, rethreading as needed. Slide the skewer through the two long straws for the sixth side and add the final medium straw; tie off. You should now have a six-sided pyramid.


Please note that we may earn a commission for some of the above affiliate links. However, products featured are independently selected and personally well-loved by us!
These are all so lovely and what I need right now! On point as always.
I just did this diy. I gotta say it was definitely a pain in the ass and I may have carpal tunnel syndrome from it, but it was worth it. I only made the first diamond, but I already hung it up and even by itself it looks amazing. It added so much personality into my bedroom!
I got to the last step and I’m lost! When you say, “For the last facet, slide through the short, medium, and short straws, and then add the final short straw.” I’m not sure which short straw i’m supposed to be sliding through for straw #1. the adjacent straw? how many facets should there be on the top of the triangle, 5? ahh!
Can any other tape be used other than the mufflers tape? Will silver duct tape or wash tape also do the trick?
Can also be done by rolling some old paper and spray painting them. Let’s recycle!
love at first sight. i’m trying to do it right now. and it’ s IMPOSSIBLE!!! i have my 8month old daughter helping and she loves to mess up the strings and straws..sigh ….
will continue later …. thanks for sharing!
Very cool looking! I wonder if you’ve ever seen (and thus been inspired by) finnish christmas decorations called himmeli? Same principal in the making :) http://www.savostakasin.net/uploads/images/tukkumyynti/himmeli.jpg
I did this project last night… I didn’t want to hang the diamond, just use as a table or bookshelf piece … I hadn’t thought it through and since the instructions say you can do this .. I assumed it would work.. Wrong. If you’re not going to hang these you will need to use something with more structure than string. I had an epiphany this morning and realized I had some unused silver pipe cleaner … I pushed small pieces of that through each of the top “corners” until it had enough structure to stay in shape on it’s own.. I think any kind of thin flexible wire would work, just so happened that I had pipe cleaner lying around and I didn’t want to spend any more money on this project .. Anyway, it turned out great! Just a heads up for anyone in the future :)
Quick material sub- what you want is aluminum foil tape in the heating duct section. Muffler tape has asbestos and is pricey.
This is sooo great, thanks!!
Is there a reason why you used the muffler tape rather than spray paint?
Absolutely love this idea! welldone, xx
http://www.zahranoble.com
I linked this post on my site: http://oempaloempaas.blogspot.nl/p/inspiration.html
I hope you don’t mind it (: <3
Thank you for this post. What a great idea!
Found you from Oh Happy Day, and these were perfect for my Father’s Day table decorations.
I had a little trouble getting the cotton string to behave as desired and ended up abandoning the process for hot glue. This worked well and was a fast alternative. I ended up hanging the diamonds with thin silver wire, which gave the tops of the diamonds nice structure. This may have also been a good substitute to cotton thread.
After I finished, I realized spray pain could be a fun alternative in lieu of the silver tape, should you want to try another color scheme apart from what is available in tape/straw colors. Maybe for next time :)
Had a fun time and thanks again. Great tutorial!
Instagram: @iamkest
kathleen, totally awesome! would be such fun party decor. great tutorial! ^__^
SOOOO cute! Definitely need to do this!
I was shocked to realize this was made out of straws! Looks like it takes some time to cover them, but wow what a result.
love that the metallic tape makes these look all grown up. I’ve seen this done with neon straws which gave the shapes a completely different feel. A bit more whimsical
:)
i love your diamonds!!! <3
Love these!
These are amazing!!! Adding to my “must make” list!
FABULOUS, ABSOLUTELY FABULOUS!!!
Diamonds are a girl’s best friend :)
awesome this project, thank you for the great diy and the sharing.
it’s lovely and cool ,well done!!!