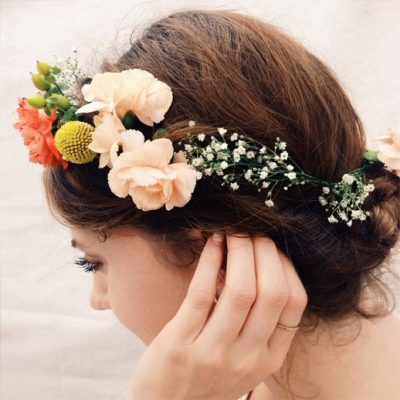
How to Make a Flower Crown
Learn how to make a flower crown with this easy DIY flower crown tutorial. Perfect for weddings, festivals, and everyday wear.

As promised, here is the full tutorial for the DIY flower crown I taught at Texas Antiques Week in Round Top! If you’ve been searching for how to make a flower crown that feels approachable, creative, and not overly fussy, this guide is for you. Flower crowns are one of those accessories that instantly elevate an outfit, whether you’re styling one for a wedding, a festival, a photoshoot, or just for fun.
I’ll be the first to admit I’m no flower genius and definitely don’t have a green thumb… which is exactly why this DIY flower crown tutorial is simple, flexible, and beginner-friendly. You don’t need professional floral skills to learn how to make a flower crown that looks beautiful and intentional. If I can do it, you absolutely can.
This DIY flower crown tutorial focuses on easy techniques, forgiving materials, and a relaxed approach that lets you customize your design as you go. While there are plenty of ways to refine or elevate the process, this method is all about making something pretty without overthinking it… and having fun along the way!
Materials and Tools Needed
- Fresh flowers of your choice: Look for blooms that are sturdy, lightweight, and slightly closed, since they last longer and are easier to work with. Smaller flowers and supportive greenery help keep the crown comfortable and balanced.
- Filler flowers or wildflowers: We opted for Baby’s breath for a minimal look. Greenery is also a common choice.
- Floral wire
- Wire cutters
- Needle nose pliers
- Wire twig: Optional for aesthetics
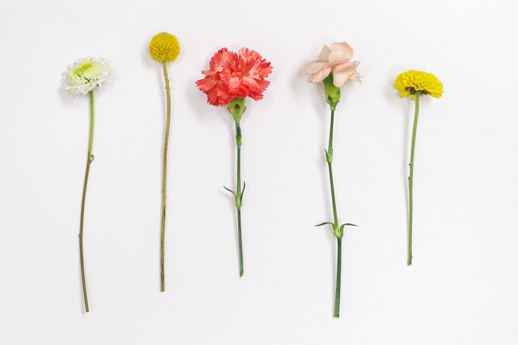
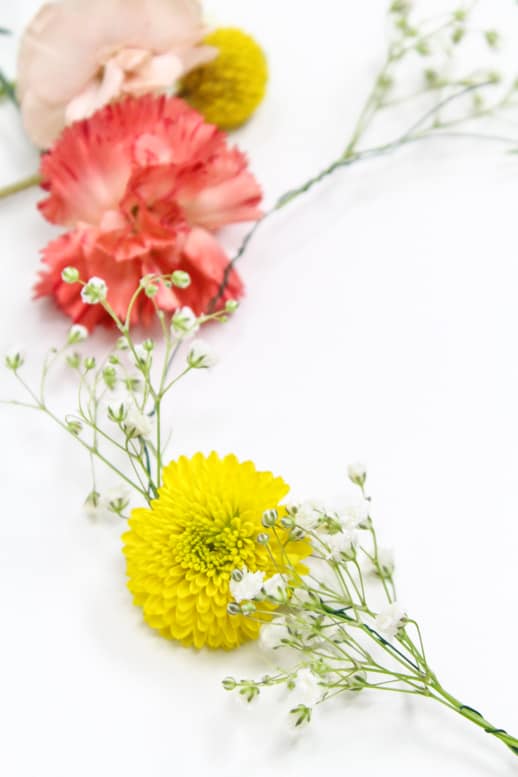
We used the following flowers for our floral headpiece:
- Scabiosa (pincushion flower): The soft, round white bloom on the left. It’s lightweight and great for adding texture.
- Craspedia (billy balls): The bright yellow ball flower. Super popular in flower crowns because it’s durable and holds its shape.
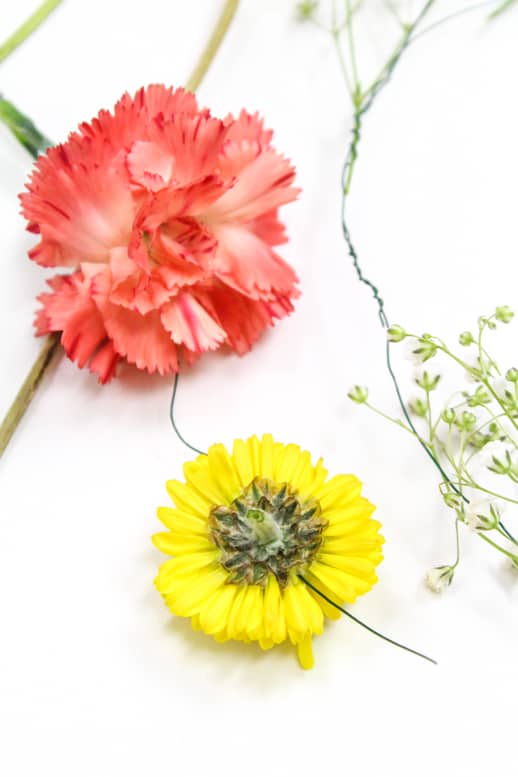
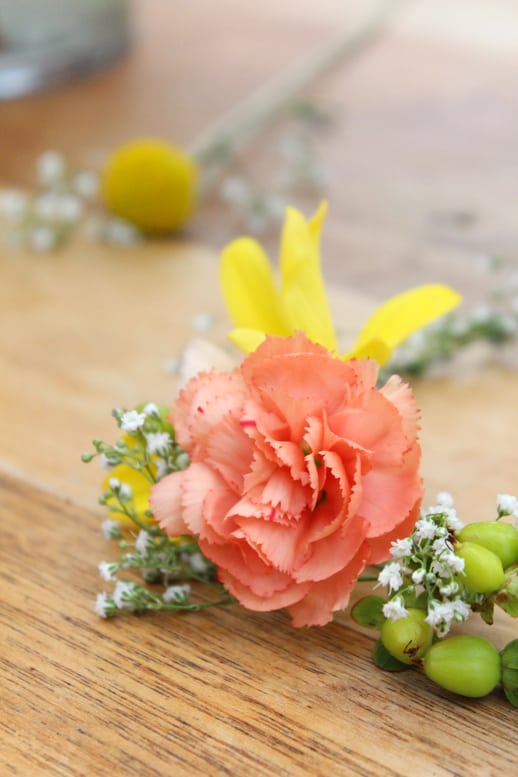
- Carnation: The larger coral/pink ruffled flower in the center. Carnations are a classic choice for a DIY flower crown since they last well and are easy to tape.
- Spray carnation: The smaller pale peach bloom. These are essentially mini carnations and work beautifully for filling gaps.
- Button mum (chrysanthemum): The yellow daisy-style flower on the right. Button mums are sturdy, long-lasting, and perfect for floral headpieces.
Step by Step: How to Make a Flower Crown
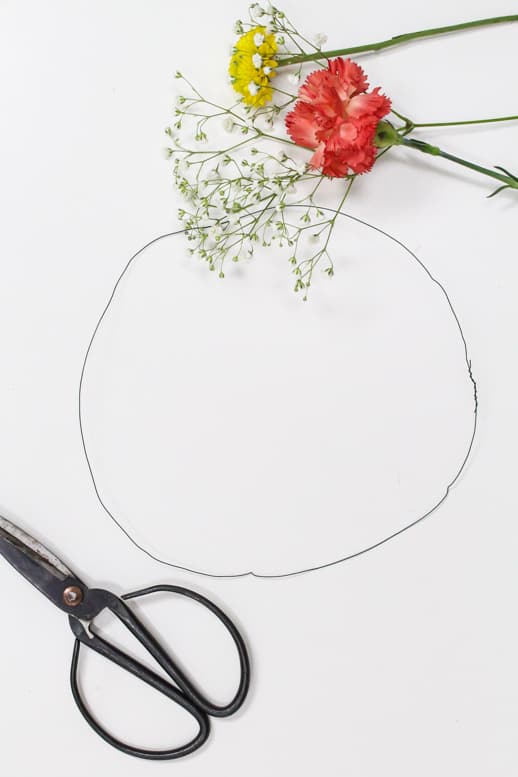
1 — Create the base:
Wrap floral wire in a circle to fit your head. This forms the base of your DIY flower crown. Twist the ends so it holds its shape.
It’s important to make your loop slightly larger than your head. It may not seem the right size, but after you start adding flowers onto the crown it will bulk up. We like wearing the crown diagonal on our head.
2 — Trim your flowers:
Cut flower stems to about 2–3 inches long. If you’re using fresh flowers, keep them in water until you’re ready to arrange to maintain freshness.
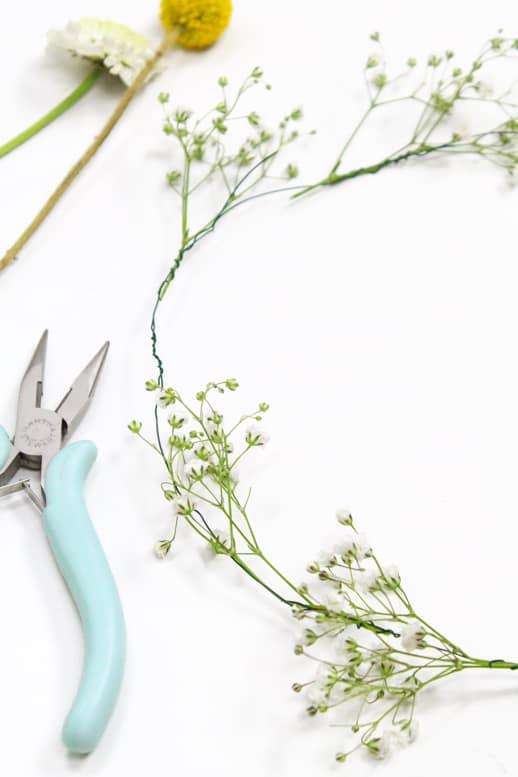
3 — Add filler flowers:
Attach filler flowers around the base. Take a 1.5-inch piece of floral wire, wrap it around the center of the stem, and use the remaining wire to attach it to the base loop. This gives your flower crown texture and a full foundation before you add blooms.
Tip: Use needle-nose pliers to push in any wire ends that might be poking out. Trust us, they don’t feel good!! Wrap floral wire downward to keep everything firmly in place.
4 — Secure your flowers:
Attach flowers one by one, placing larger flowers first and filling gaps with smaller buds. Use floral wire to secure each stem tightly.
Tip: If you have lighter hair and the floral wire is visible, wrap a wire twig around the entire base to conceal it and add a rustic finish.
Tutorial Tips & Tricks
- Mix sizes and colors: Alternate flower sizes and colors as you go to create balance and visual interest throughout the crown.
- Work in one direction: Attach flowers facing the same direction so stems lay smoothly and the crown looks cohesive rather than bulky.
- Keep it fresh: Lightly mist your finished flower crown and store it in the refrigerator (away from fruit) until you’re ready to wear it.
- Use faux flowers: For a keepsake or plan to wear your crown all day.
- Try it on as you go: Test the fit as you work to adjust placement and ensure your flower crown is comfortable and secure.
Flower Related DIY Projects & Tutorials
For more DIY inspiration like this, you might want to consider our related posts below –
- Retro DIY Floral Floppy Hat
- Tips for Cake Decorating with Edible Flowers
- DIY Fresh Flower Love Sign
- DIY Floral Chandelier Garland
DIY Flower Crown
Equipment
- Wire cutters
- Needle nose pliers
Materials
- Flowers of your choice
- Floral wire
Instructions
- Create the base: Wrap floral wire in a circle to fit your head. This forms the base of your DIY flower crown. Twist the ends so it holds its shape. It’s important to make your loop slightly larger than your head.
- Trim your flowers: Cut flower stems to about 2–3 inches long.
- Add filler flowers: Attach filler flowers around the base. Take a 1.5-inch piece of floral wire, wrap it around the center of the stem, and use the remaining wire to attach it to the base loop. Use needle-nose pliers to push in any wire ends that might be poking out.
- Secure your flowers: Attach flowers one by one, placing larger flowers first and filling gaps with smaller buds. Use floral wire to secure each stem tightly.

Don’t forget to share your DIY Flower Crown with us on Instagram using the hashtag #sugarandclothloves. We always love seeing all of your creations! Looking for more interior design inspiration? You can find all of our home decor tutorials and ideas right here!

Please note that we may earn a commission for some of the above affiliate links. However, products featured are independently selected and personally well-loved by us!
This post explains this amazing thing well enough for someone to understand it, and I’m sure everyone will like it
Gorgeous! There’s just something so whimsical about flower crowns.
Gorgeous tute; this is so lovely and dreamy~
http://cafecraftea.blogspot.com
these are so gorgeous. now i just wish i had a place to wear it, you know, besides my usual craft store and post office runs ;)
Those are absolutely beautiful! I have been looking for some billy buttons for forever and I can’t find any in my area! I am so sad!
Leah Faye
a clover and a bee
BREATHTAKING….History repeats itself because we see the beauty in earlier times and fashion/accessories
So pretty! I love the way it turned out Ash!
Great color choices! Having worked in a flower shop for several years, I’m usually not a fan of carnations — but you made them look beautiful. Plus, they truly do hold up well!
xo, Lily on Fillmore
One of my favorite things to do is make floral headbands, really great tutorial.