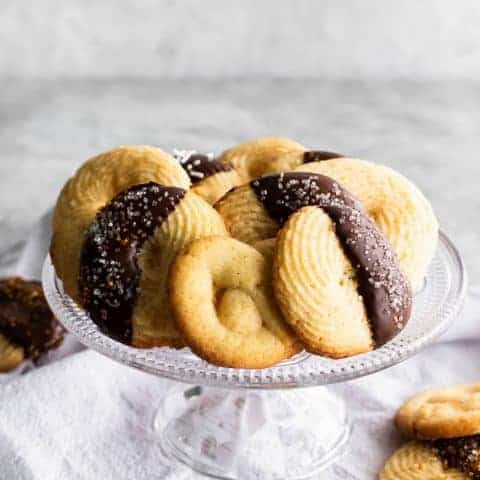
Butter Cookies Recipe
Upgrade classic Butter Cookies with a chocolate-dipped finish and sprinkles! This easy recipe delivers crisp, buttery cookies with a fun twist.
You know those giant blue tins of Danish butter cookies that seem to show up at every holiday gathering or on every grandparent’s coffee table? They’re nostalgic and delicious. But let’s be honest, they’re not exactly the freshest cookies on the tray. And somehow, they always seem to be the last ones left.
But homemade butter cookies? I, Rebecca, guarantee they’ll disappear instantly. With this easy, traditional Butter Cookie recipe, you can whip up fresh, melt-in-your-mouth cookies that taste a thousand times better than the store-bought tin. They make the perfect holiday treat, edible gift, or quick dessert to enjoy with coffee. And yes, absolutely feel free to keep them all for yourself.
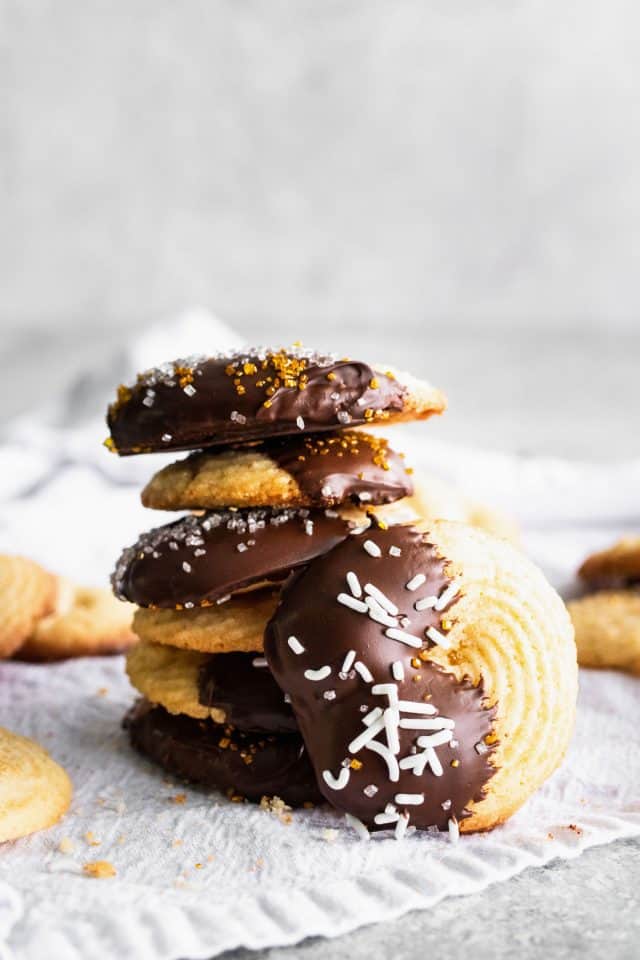
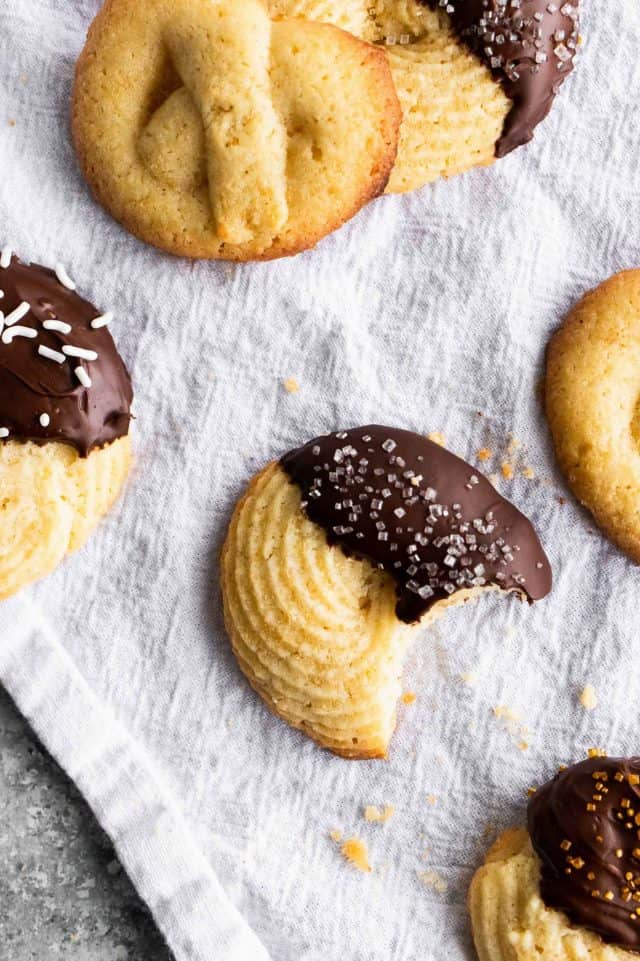
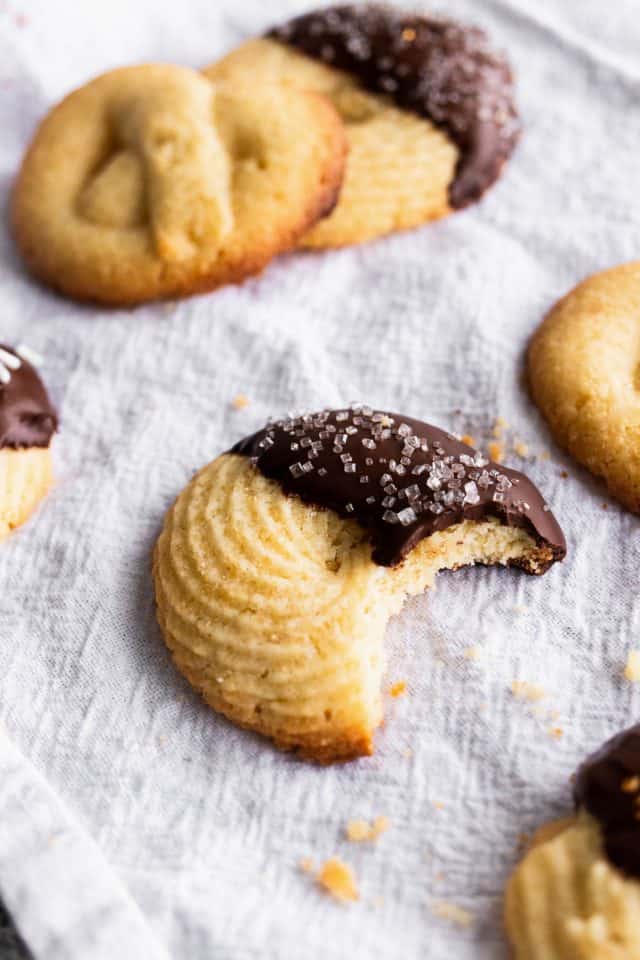
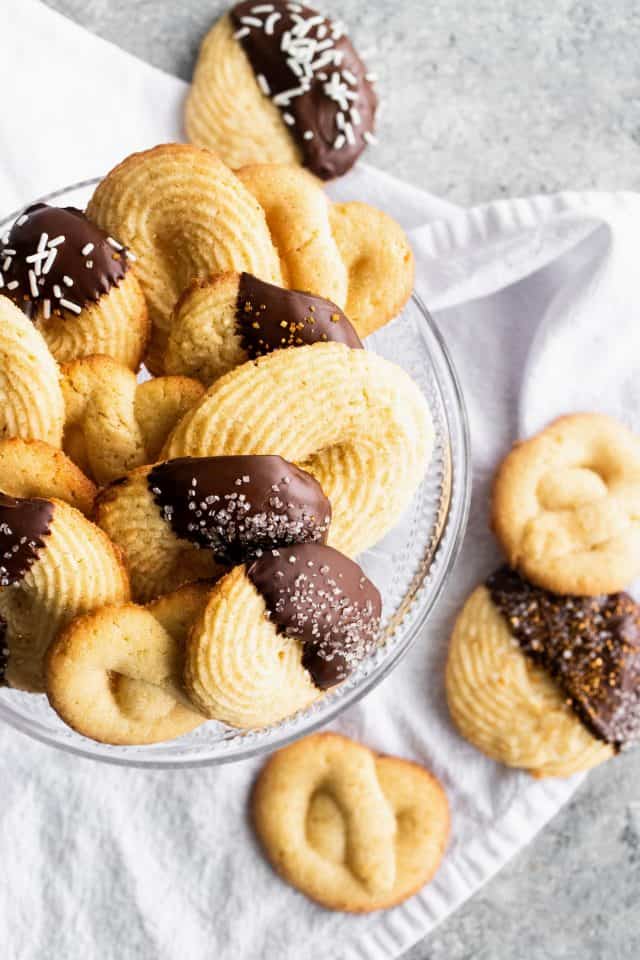
Most classic butter cookies are simply sprinkled with coarse sugar (like turbinado) before baking. But if you want something a little more festive, we dressed some of these up with a dip in melted chocolate and a sprinkle of colorful sugar for extra holiday sparkle.
Ingredients You’ll Need
- All-purpose flour
- Softened unsalted butter: Because you pipe these cookies, the dough needs to be soft enough to squeeze through the bag and tip. The temperature and consistency of your dough will determine how easy (or difficult!) that job is. Cold butter creates dense cookies.
- White granulated sugar
- Room temperature egg: The egg will combine with the other ingredients and not harden the butter at all if it’s at room temperature. So we recommend pulling the egg out of the refrigerator about 20 minutes before you start baking to give it time to warm up a little bit.
- Vanilla extract
- Salt
- Turbinado sugar (or any other large-grain sugar): Or any other large-grain sugar
- Chopped chocolate: Optional
- Colored sugar sprinkles: Optional for decorating

How to Make Easy Butter Cookies
1 — Cream the butter and sugar: With a hand mixer on medium speed, beat softened butter and sugar together for about 2-3 minutes, or until light, fluffy, and pale in color. You want the sugar to be dissolved into the butter so that you don’t have gritty cookies. This step creates the signature tender, buttery texture of classic butter cookies.
2 — Add egg and flavoring: Mix in the egg and vanilla extract until fully combined and smooth.
3 — Add the dry ingredients: Stir in the flour and salt until a soft dough forms. You can do this step by hand. But if you prefer to use the mixer with a paddle attachment. Be sure to start it off on the lowest speed until most of the flour is incorporated. If you turn the mixer on too quickly, you’ll have a cloud of flour covering you and your kitchen.
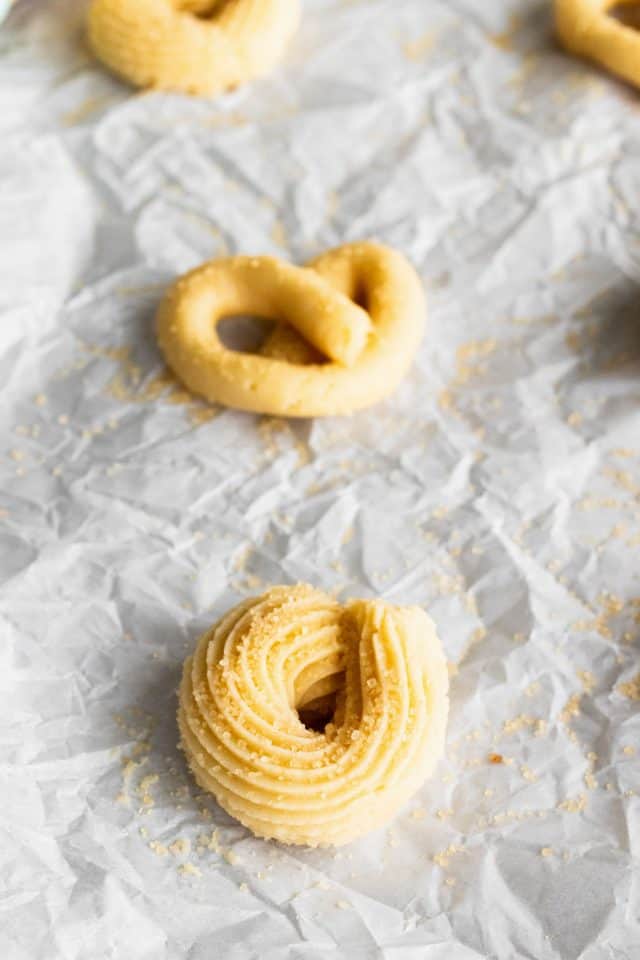
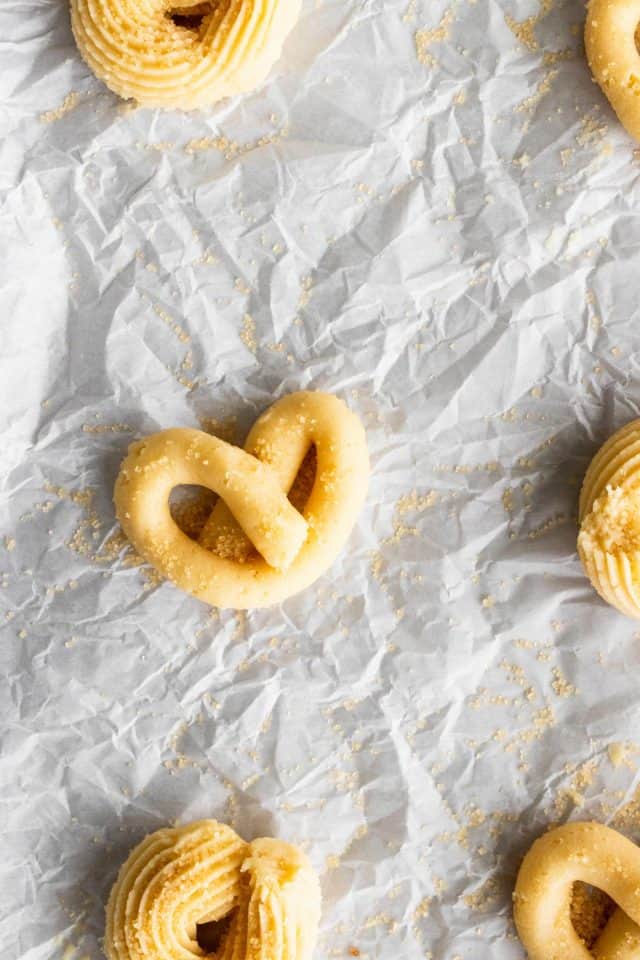
4 — Pipe the dough: Transfer the dough to a piping bag with a wide coupler and tip. Pipe the cookies 1-2” apart onto 2 parchment lined baking sheets. Create pretzel-like shapes, classic rosettes, or shape into balls or a slice-and-bake log.
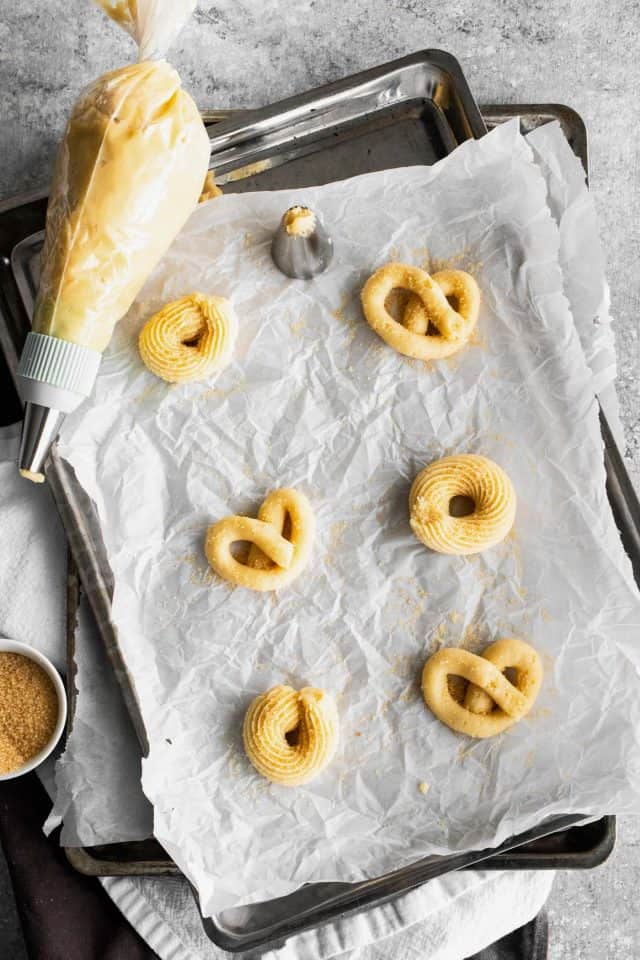
5 — Sprinkle with coarse sugar: Sprinkle the piped dough generously with a coarse sugar like turbinado for classic butter cookie texture and sparkle.
6 — Chill the cookies: If the dough feels too soft, chill for 20-30 minutes to help the cookies hold their shape. You can preheat the oven while the cookies are in the fridge.
5 — Bake: Bake at 350°F (175°C) for about 12-14 minutes, or until the edges are just turning golden. Since butter cookies are traditionally fairly crisp, you want to make sure that they’re pretty well baked without burning them. Most ovens have a hot spot, or one side tends to bake faster than the other. So it’s a good idea to rotate your baking sheets halfway through the bake time.
6 — Cool: Allow cookies to cool for 15-20 minutes before transferring to a wire rack to cool completely to decorate.
7 — Optional: Dip in chocolate and add sprinkles:
For festive butter cookies, dip the cooled cookies in melted chocolate and add decorative sprinkles or colored sugar.
Optional: How to Dip Butter Cookies in Chocolate
If you want to give your butter cookies a festive finish, dipping them in chocolate is an easy upgrade. Here’s how to do it:
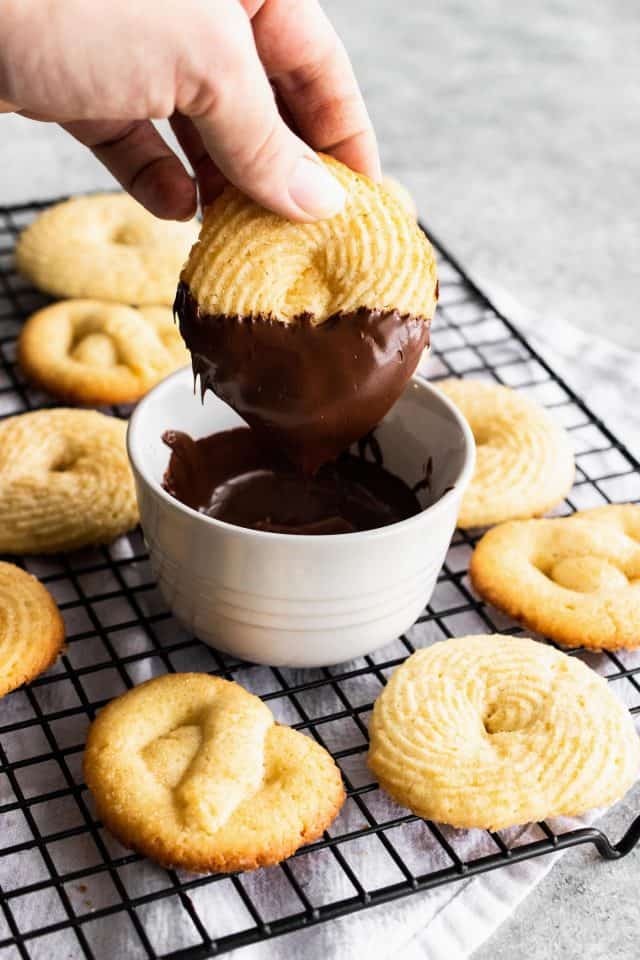
1 — Melt the chocolate: Place chopped chocolate or chocolate chips in a microwave-safe bowl. Microwave in 10–15 second intervals, stirring between each burst until the chocolate is completely melted and smooth.
2 — Dip the cookies: Once the cookies are fully cooled, dip one half of each cookie into the melted chocolate. Let the excess chocolate drip back into the bowl so the coating stays neat and even.
3 — Add decorations: Transfer the dipped cookie to a parchment-lined baking sheet. While the chocolate is still wet, sprinkle on decorations.
4 — Let the chocolate set: Allow the cookies to sit at room temperature until the chocolate hardens. For a faster set, place the cookie sheet in the refrigerator for 10–15 minutes.
How to Pipe Cookies
These butter cookies are piped, which simply means the dough is squeezed through a pastry bag fitted with a large decorative tip to create those classic rosette and swirl shapes.
It’s an easy technique once you get the hang of it, and it makes the cookies look bakery-level beautiful. If you’re new to piping cookie dough, here are some helpful tips to make the process much smoother.
Tips to make piping cookies easier:
- Dough consistency matters: Make sure your butter is very soft before mixing the dough. If the butter is too cold, the dough will be stiff and nearly impossible to pipe. If it’s too warm, the dough will be overly soft and lose its shape while baking.
- If the dough feels too warm while piping: Roll the piping bag between your hands or give it a minute to rest. Your body heat naturally softens it as you work.
- Chill piped cookies to prevent spreading: Soft dough can cause the cookies to spread too much in the oven. To avoid this, place your piped cookies in the refrigerator for about 15 minutes, or until the dough feels firm. Make sure you sprinkle the sugar on before chilling, so it sticks to the dough.
How to prepare a piping bag:
- Start with a large piping bag, a coupler, and a large star tip. Cut off the narrow end of the piping bag just enough so the coupler sits snugly inside without blocking the flow of dough.
- Unscrew the coupler, place the larger base inside the bag, then set your piping tip over the opening. Screw the ring on to secure the tip in place. Your bag is now fully assembled and ready for the dough.
- Preferred tools: We used a Wilton 8B star tip with a standard coupler for these butter cookies. Any similar large star tip will work well.
How to fill a piping bag:
- Fold the top of the bag over your hand or over a glass to keep it open. Use a large spoon or spatula to transfer the dough into the bag.
- Once filled, twist the top of the bag tightly to keep the dough from squeezing out the wrong end.
- Hold the bag between your thumb and first finger, wrap the rest of your hand around the bag, and squeeze gently until dough begins to come through the tip. Start piping onto your prepared baking sheet.
- Pro tip: Only fill the bag halfway. It’s much easier to control and requires less hand strength.
Recipe Notes & Tips
- Creaming is everything: Beat the butter and sugar until it’s pale and fluffy—this incorporates air and gives butter cookies their signature lightness. Under-creaming leads to dense cookies.
- Don’t overmix the dough: Mix only until combined. Overmixing develops gluten and makes the cookies tough instead of tender.
- Don’t over-bake: Butter cookies should stay pale with lightly golden edges. They burn easily due to their high butter content. Remove them when the edges just start to turn golden.
- Storage: Store in an airtight container or bag for up to a week. They’ll keep in the refrigerator for 2 weeks or in the freezer for 2 months.
- Flavor variations: Try almond extract, lemon zest, or even a chocolate drizzle after baking.
- Decorating variations: You can completely customize the colors and decorations (such as crushed nuts or peppermint pieces) to match whatever celebration you’re baking for.
- Make-ahead friendly: Chill dough for up to 48 hours or freeze shaped cookies for holiday prep. Store in a bag for up to 3 months. If baking directly from frozen, just add a minute or two.
- Pair it with: Hot cocoa, mulled cider, or place them on a tray with fruit platter for a festive spread.
More Cookie Recipes You’ll Love
But will you honestly have any leftovers with this buttery flavor goodness?!? And if you’re looking for other easy cookie recipes, here are our favorite —
- Snickerdoodle Cookies
- Chocolate Peanut Butter Stuffed Cookies
- Pumpkin chocolate chip cookies
- Chocolate Kissed Snickerdoodle cookies
- Shamrock matcha cookies
- Mocha Meringue Cookies
- No-Bake Chocolate Almond Cookies
- Brown Butter Toffee Cookies
Equipment
- Baking sheet
- Parchment paper
- Mixing bowl
- Mixer
- Pipping bag with large tip coupler
Ingredients
- 2 cup all-purpose flour
- 1 cup butter 2 sticks, softened
- ⅔ cup white granulated sugar
- 1 egg room temperature
- 2 tsp vanilla extract
- ¼ tsp salt
- turbinado sugar or any other large-grain sugar
- ½ cup chocolate chopped and melted (optional)
- Color sugar sprinkles (optional)
Instructions
- Beat softened butter and sugar together on medium speed for about 2-3 minutes, or until light, fluffy, and pale in color. You want the sugar to be dissolved into the butter so that you don’t have gritty cookies.
- Mix in the egg and vanilla extract until fully combined and smooth.
- Stir in the flour and salt on low speed or my hand until a soft dough forms. Or you can do this step by hand.
- Transfer the dough to a piping bag with a wide coupler and tip. Pipe the cookies 1-2” apart onto 2 parchment lined baking sheets.
- Sprinkle the piped dough generously with a coarse sugar like turbinado sugar.
- Chill for 20-30 minutes to help the cookies hold their shape.
- Bake at 350°F (175°C) for about 12-14 minutes, or until the edges are just turning golden.
- Allow cookies to cool for 15-20 minutes before transferring to a wire rack to cool completely to decorate..
Optional: To dip in chocolate and add sprinkles:
- Place chopped chocolate or chocolate chips in a microwave-safe bowl. Microwave in 10–15 second intervals, stirring between each burst until the chocolate is completely melted and smooth.
- Once the cookies are fully cooled, dip one half of each cookie into the melted chocolate. Let the excess chocolate drip back into the bowl so the coating stays neat and even.
- Transfer the dipped cookie to a parchment-lined baking sheet. While the chocolate is still wet, sprinkle on decorations, such as sprinkles, colored sugar, crushed nuts, or peppermint pieces.
- Allow the cookies to sit at room temperature until the chocolate hardens. For a faster set, place the cookie sheet in the refrigerator for 10–15 minutes.
Nutrition
Notes
- Yield: 18-24 piped cookies (depending on how big you want the cookies)
- Bake Time: 12-14 minutes baking per sheet

Tried this recipe? Share your Butter Cookies with us on Instagram, using the hashtag #sugarandclothloves. We always love seeing all of your creations! Looking for more quick and delicious recipes? Find them all right here!


Please note that we may earn a commission for some of the above affiliate links. However, products featured are independently selected and personally well-loved by us!
Very nice recipe
I will learn to make cakes from the recipe you share.
These are the best! They melt in your mouth and having them dipped in chocolate makes them that much better! Delicious!
Thanks, Rachael! XOXO
These are seriously addicting but in all the BEST ways!! So delicious!!
Yay! Glad to hear, Jen!
I love this version of homemade butter cookies, I’ve never tried doing it with coatings before so I really enjoyed making this one. Thanks for your recipe, my kids now have a new favorite!
The coatings are the best part! Thanks, Natasha!
Perfect, looking at it makes me hungry. I will definitely make this dish according to the recipe you shared, thank you.