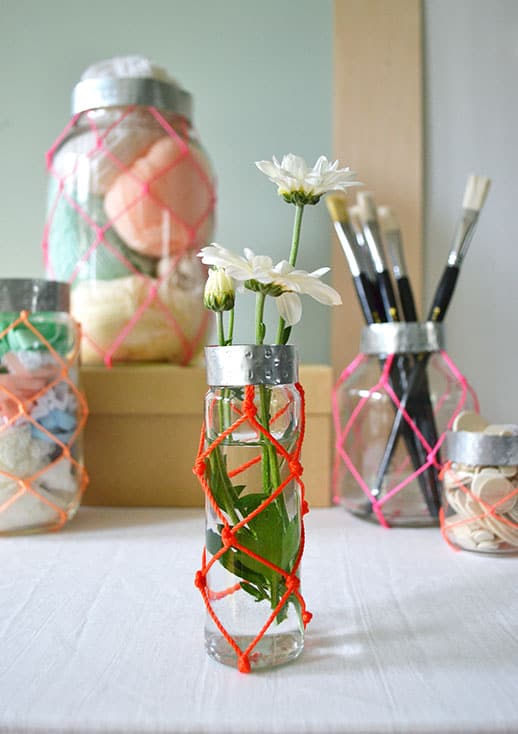
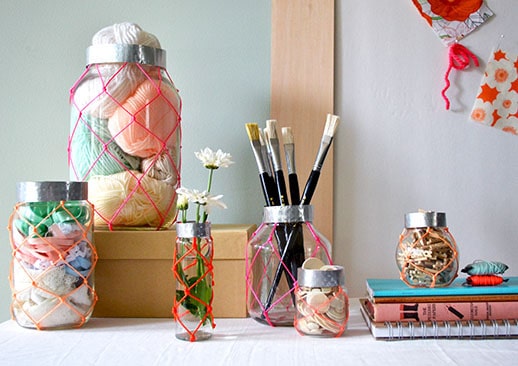
How To Make Cute DIY Neon Macramé Jars
These easy neon macramé jars are the perfect way to add a pop of color to any room. Learn how to make them with this simple tutorial!
I, Kathleen, have a confession to make. I am a glass jar hoarder. Once I empty a jar, I can’t help but add it to my stash.
Not only that, but I’ve been known to buy food simply because I want the empty jar afterward.
If you’re anything like me, today’s DIY Neon Macramé Jars is a great way to put some of those jars to use.
A fun and nautical way to spice up your craft storage, neon cord adds a summery splash that makes even organization something to look forward to.
Adding neon colors to any ordinary jar will surely make it stand out, like this DIY faux boxwood wall with neon signs.
And speaking of cute storage, these DIY Cork Storage Boxes are also great for storing office supplies inside and pinning pretty notes on the outside!
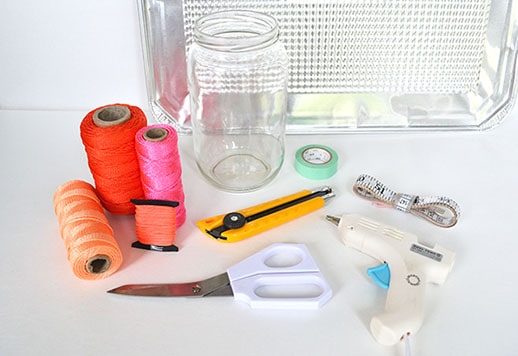
Materials Needed To Make DIY Neon Macramé Jars
Empty jars
Aluminum foil pan
Measuring tape
How To Make DIY Neon Macramé Jars
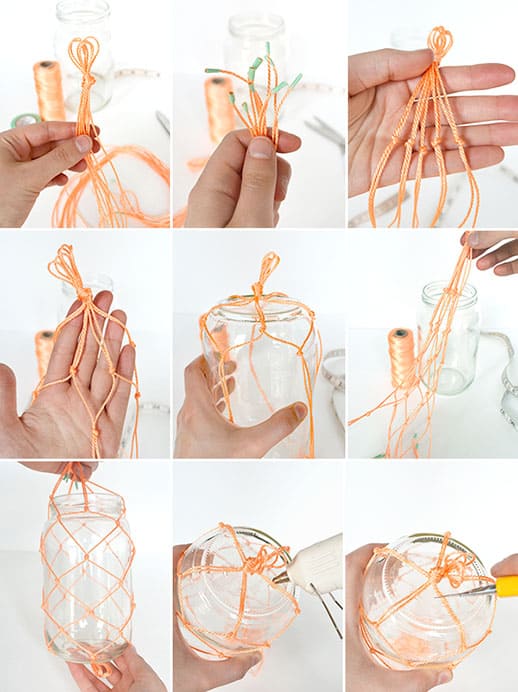
Step 1 — Cut five strands of cord, each about 6’. Fold them at the center and tie an overhand knot; you should now have ten 3’ strands of cord. This should be more than enough for a pickle jar – if your jar is smaller/bigger, adjust these lengths accordingly. You can also experiment using fewer strands for smaller jars and more strands for bigger jars.
Step 2 — If your cord tends to fray once cut, use tape or a lighter to prevent further fraying.
Step 3 — Using your measuring tape, tie two strands together about 2” from the original big knot. Repeat for the other strands.
Step 4 — Repeat step 3, but separate the joined strands and tie strands from neighboring knots together, also about 2” apart, creating a net as seen in the image.
Step 5 — Every once in a while, it’s a good idea to check how your macramé net is fitting over the jar. If you want to change the way the net looks, untie the knots you’re unhappy with and retie at a different measurement.
Step 6 — Continue tying knots and checking that it fits your jar.
Step 7 — Stop once your macramé net reaches the mouth of the jar.
Step 8 — On the bottom of the jar, hot glue the double strands of cord onto the jar. It’s best to do this in a concave area that won’t touch the table – this allows the jar to stand flat.
Step 9 — Using the Exacto knife, cut off the big original knot.
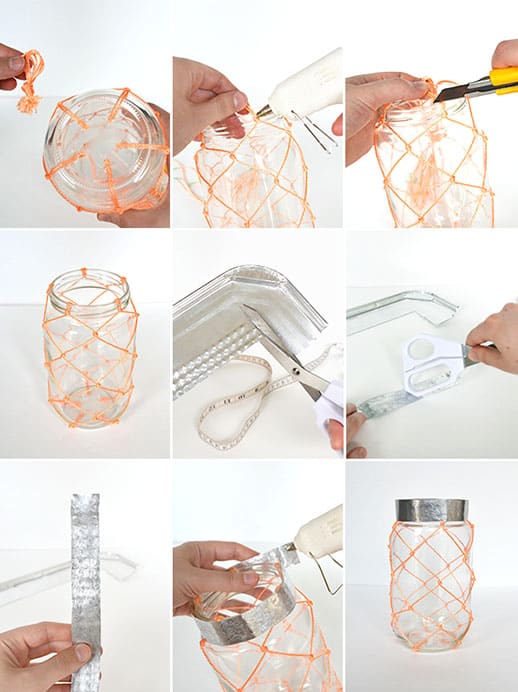
Step 10 — Once the big original knot is cut off, the jar should stand flat on the table. If your cord frays a lot, use additional hot glue to seal the raw edges you just cut.
Step 11 — At the mouth of the jar, hot glue the cord into the threads of the jar.
Step 12 — Use the Exacto knife to cut off any excess cord.
Step 13 — As before, hot glue any raw edges to prevent fraying.
Step 14 — Measure the circumference of the mouth of the jar and cut a strip of aluminum ½” longer; the width should at least cover the threads of the jar.
Step 15 — If your aluminum strip has raised bumps on it, flatten them by rubbing the handle of your scissors on it back and forth until smooth.
Step 16 — There may still be some texture when you’re done, but this adds interest to the rim!
Step 17 — Use hot glue to secure the aluminum strip to the mouth of the jar.
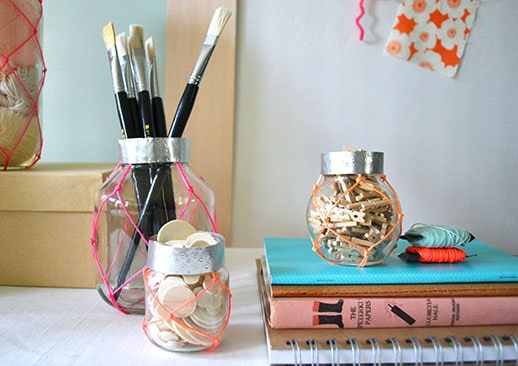
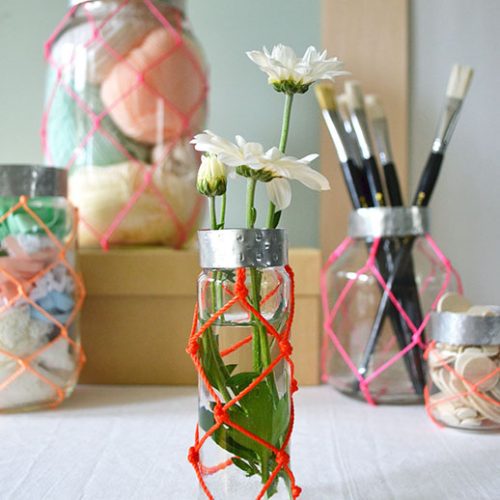
There you have it – repeat on as many types of jars as you, please!
With this tutorial, you can make your own Neon Macramé Jars to add a pop of color to any room. These jars are perfect for storing craft supplies or as decoration.
You can even use them as planters for small succulents.
So get creative and have fun with this easy DIY project!
Check out also our favorite list of Handmade Gifts for Your Family and Friends.

Project and photos contributed by Kathleen of Snowdrop & Co.
More Easy DIY Projects
- How to Make DIY Wooden Polaroid Displays (+ Video Tutorial)
- How to Make a DIY Watercolor Wall Art – Watercolor Prints
- How To Make A DIY Color Block Ornament Garland
- DIY Woven Stool For Your Home Decor
DIY Neon Macramé Jars
Equipment
- Scissors
- X-Acto knife
- Hot glue gun and glue sticks
- Measuring tape
Materials
- Neon cord
- Empty jars
- Aluminum foil pan
- Washi tape
Instructions
- Cut five strands of cord, each about 6’. Fold them at the center and tie an overhand knot; you should now have ten 3’ strands of cord. This should be more than enough for a pickle jar – if your jar is smaller/bigger, adjust these lengths accordingly. You can also experiment using fewer strands for smaller jars and more strands for bigger jars.
- If your cord tends to fray once cut, use tape or a lighter to prevent further fraying.
- Using your measuring tape, tie two strands together about 2” from the original big knot. Repeat for the other strands.
- Repeat step 3, but separate the joined strands and tie strands from neighboring knots together, also about 2” apart, creating a net as seen in the image.
- Every once in a while, it’s a good idea to check how your macramé net is fitting over the jar. If you want to change the way the net looks, untie the knots you’re unhappy with and retie at a different measurement.
- Continue tying knots and checking that it fits your jar.
- Stop once your macramé net reaches the mouth of the jar.
- n the bottom of the jar, hot glue the double strands of cord onto the jar. It’s best to do this in a concave area that won’t touch the table – this allows the jar to stand flat.
- Using the Exacto knife, cut off the big original knot.
- Once the big original knot is cut off, the jar should stand flat on the table. If your cord frays a lot, use additional hot glue to seal the raw edges you just cut.
- At the mouth of the jar, hot glue the cord into the threads of the jar.
- Use the Exacto knife to cut off any excess cord.
- As before, hot glue any raw edges to prevent fraying.
- Measure the circumference of the mouth of the jar and cut a strip of aluminum ½” longer; the width should at least cover the threads of the jar.
- If your aluminum strip has raised bumps on it, flatten them by rubbing the handle of your scissors on it back and forth until smooth.
- There may still be some texture when you’re done, but this adds interest to the rim!
- Use hot glue to secure the aluminum strip to the mouth of the jar.There you have it – repeat on as many types of jars as you, please!

Don’t forget to share your DIY macrame jars with us on Instagram using the hashtag #sugarandclothloves. We always love seeing all of your creations! Looking for more interior design inspiration? You can find them all of our home decor tutorials and ideas right here!


Please note that we may earn a commission for some of the above affiliate links. However, products featured are independently selected and personally well-loved by us!
Looking for a new job with good salary seems to
be a hard task nowadays. However, when a blogger does enjoy what he writes about, he’ll probably stick to it
for some time time. This is a gesture of fine will confident that other bloggers
will perform a similar.
The form is accessible on the web and needs to be with a
college transcript, recommendations from several people along with a personal statement.
No one’s life has ever gone based on plan, so you’ve got to make the best using this in time your life.
That just isn’t to state that current curricula and content objectives needs to be given away the window.
Good site you’ve got here.. It’s difficult to find good quality writing like yours nowadays.
I truly appreciate individuals like you! Take care!!
He stored such those stones in a deep cave on top
of a hill, and it seemed that nobody knew about their appearance.
There will be plenty of surprising and exciting features during the game.
Give the kids time to play with their stars as they “shine their twinkle stars in the sky” and sing Twinkle,
Twinkle Little Star.
I do consider all the concepts you’ve offered in your post.
They’re really convinbcing and will certainly work.Still, the posts are very
quick for starters. Could you please prolong them a little from subsequent time?
Thanks for the post.
My web blog emoji emoticons
great, good and fabulaso!!!!!!!
LOVE these! Neon is so in right now, so it’s a perfect tutorial.
M.
You are very creative. I can just make my own vase using a jar. We have lots of empty jars here! Thank you for this idea. :)
Para evitar el nudo en el fondo puedes partir de un aro (de metal o plástico) en el cual enlazas los cinco hilos doblándolos por la mitad y pasándolos sobre sí mismos.
My horrible translation: To avoid the knot in the jar’s bottom, you can begin from a metallic or plastic ring, in which you attach the strands of cord folding them in the middle and crossing them under themselves. :-)
Oh my goodness yes please!! I have soooo many glass bottles this is going to be a fabulous way to dress them up!
As a fellow glass jar hoarder and lover of neon, I adore this project!!!!! Definitely going to try it.
awesome idee!!! <3
Those jars are adorable. What a great idea to dress up jars