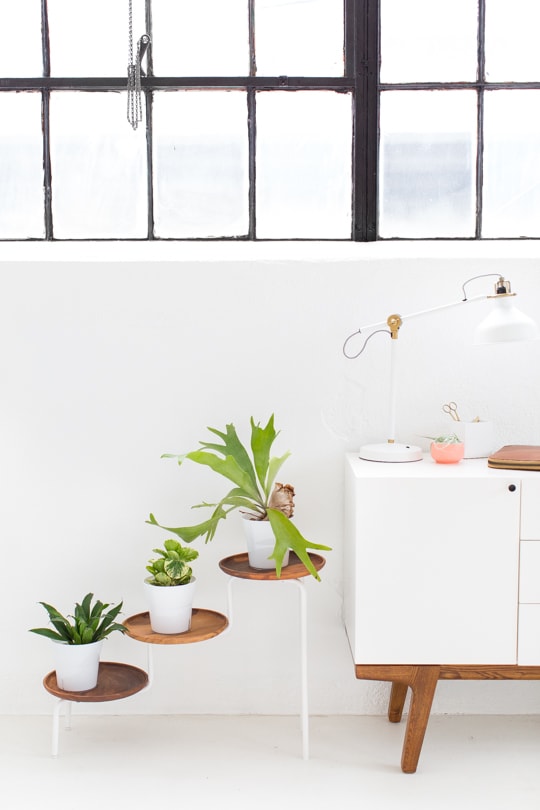
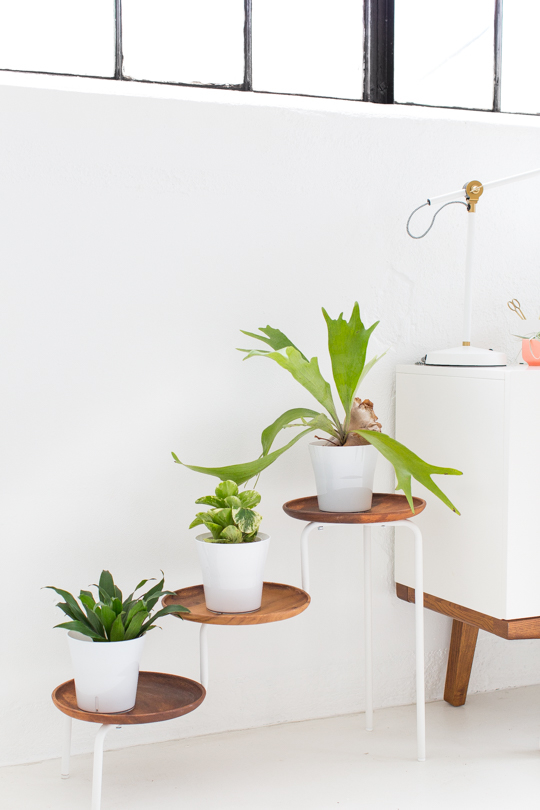
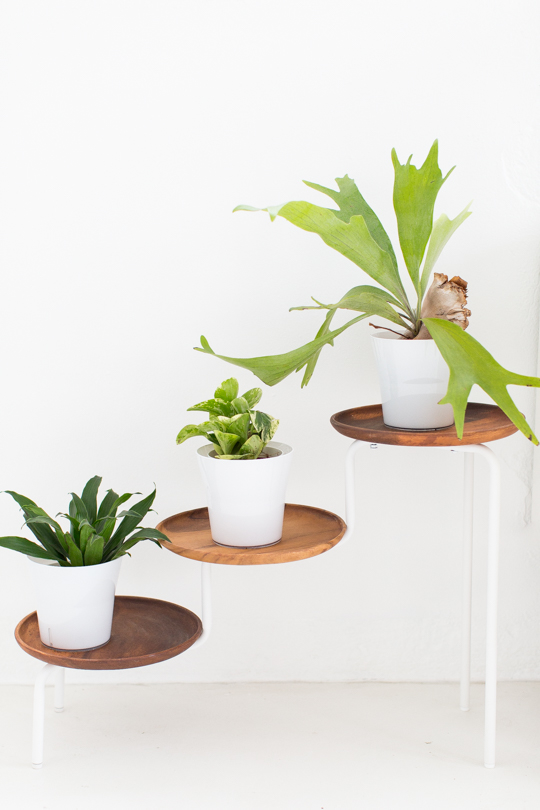
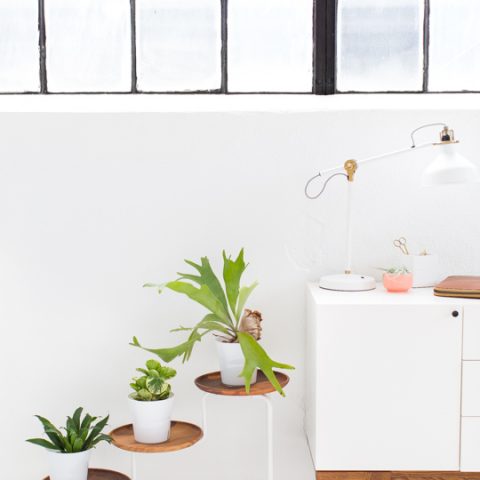
Indoor DIY Acacia Wood Plant Stand
Ring in summer with this simple and very doable Modern DIY Acacia Wood Plant Stand! When you’re a plant mom you know your plants need chic homes too!
I swear someone might actually think I have a green thumb with all of the DIY plant stands that I’ve been pulling out of my sleeve here lately.
It’s cool though. I’m totally happy with being a poser if it means I get to keep this cute DIY Acacia Wood Plant Stand around. I just love it!
This is why it made the roundup of our favorite DIY plant stand ideas.
Even better, it’s actually an Ikea hack. But I didn’t want to get too crazy on you guys all at once.
I mean. I know you only need half a reason to run laps around something with it being Friday and all.
But just promise that if you do happen to run by an Ikea on your weekend excitement high, you’ll buy up one of these guys to DIY sometime over the next few days…
Materials and Tools Needed to Make a DIY Modern Acacia Wood Plant Stand
Flat socket cap screws, connecting cap nuts, and clamps — Optional
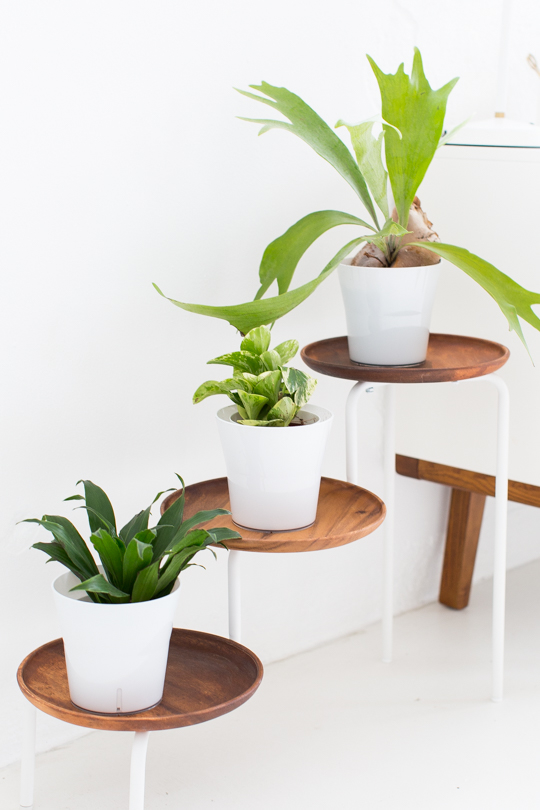
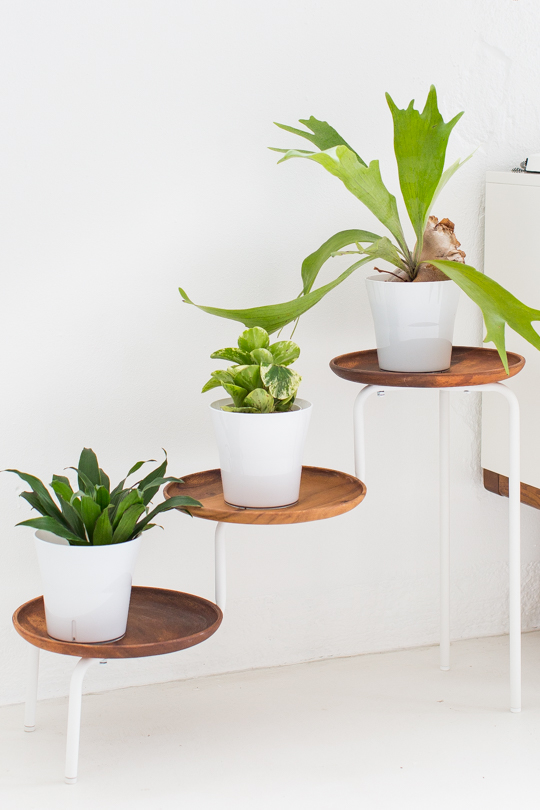
Okay, so technically I made this the hard way (i.e.- what you’re seeing in the photos below) because I thought the stand looked better without the white plates that the stand comes with originally.
HOWEVER, this project is about 20 times easier if you just install the stand as-is.
And then generously glue the wooden acacia plates onto the white metal circles with super glue.
How to Make an Indoor DIY Acacia Wood Plant Stand
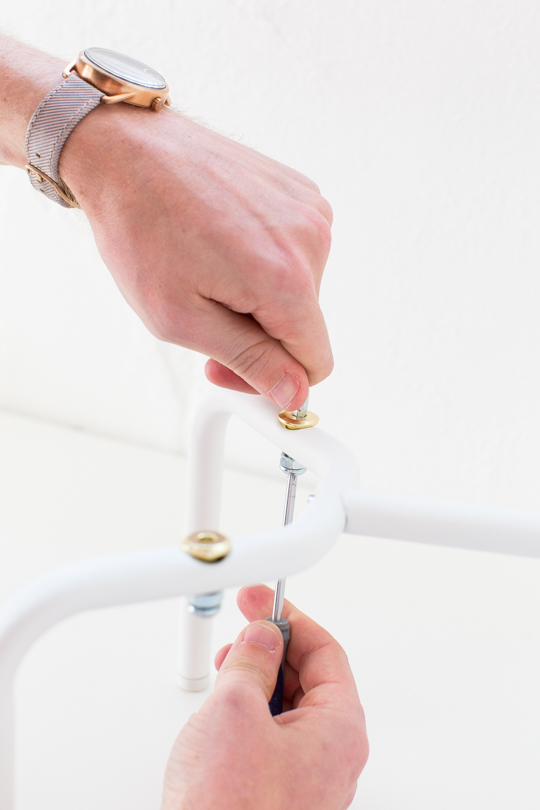
If you want to make it our way (where you don’t see any white plates underneath and it looks like the wood plates are floating/stand-alone) you install the poles of the Ikea stand as instructed.
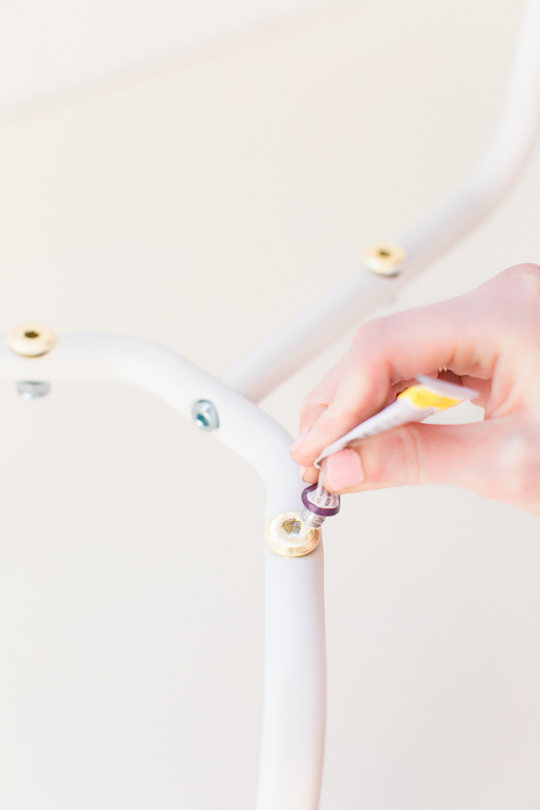
And instead of attaching the plates, you’ll use the flat socket cap screws and the 8 connecting cap nuts as shown above.
Step 1 — Cut your acacia wood log into four equal pieces.
Then, use your saw to cut a hole in the center of each piece, large enough to fit your plant pot.
Step 2 — Use E6000 to glue the wood plates to the flat brass cap nuts and use clamps to hold them in place while they seal.
Step 3 — Sand the edges of the holes you just cut, as well as the outside of each log piece. This will help prevent splinters.
Step 4 — Now it’s time to attach the legs or casters.
Drill four small holes in each log piece spaced evenly apart.
Then, screw in the legs or casters, using two screws for each.
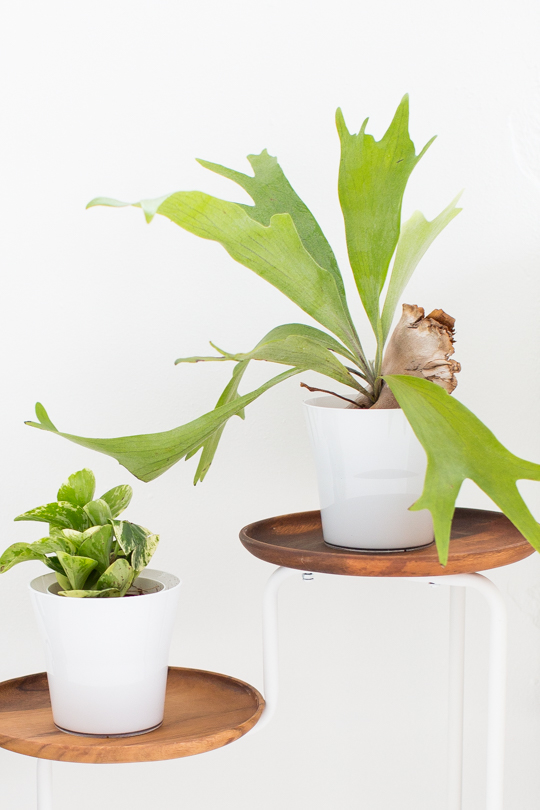
Step 5 — Finally, place your plant pots inside the holes and screw them into place with the large screws.
Be sure to use a washer between the screw head and the pot to prevent any water damage.
I regret all of that work and in hindsight would just build the stand as-is and glue the wood plates on top to save time.
If you do have a few extra minutes, we do recommend sticking to our tutorial since it is sturdier using screws instead of glue.
So there you have it!
Me making something super simple into something super complicated… and then simple again!
Anyone still with me?! Yeah, my bad. At least I’m honest, right?
Don’t forget to pick out unique houseplants to go inside!
Frequently Asked Questions
What Kind Of Wood Should I Use For A Plant Stand?
If you’re going to be using the plant stand outside, then you’ll need to choose a type of wood that can withstand the elements.
Some good choices for outdoor plant stands include cedar, teak, and eucalyptus.
If you’re looking for a more affordable option, then you can opt for pine or fir.
Just make sure that you seal the wood properly to protect it from the elements.
If you’re looking for a plant stand to use indoors, then you have a bit more freedom when it comes to choosing the type of wood.
Some good choices include maple, cherry, and oak. You can also opt for a more exotic wood like mahogany or bamboo.
Just make sure that the wood is properly sealed so that it doesn’t stain your floors.
We opted for acacia for a midcentury look.
Will Wooden Planters Rot?
If you’re thinking about adding some wooden planters to your home, you might be wondering if they’ll eventually rot.
The answer is: it depends. Here’s what you need to know about the durability of wooden planters.
Wooden planters can be made from a variety of different woods, each with its own unique properties.
Some woods are more durable than others, and some are naturally resistant to rot.
If you’re worried about your wooden planters rotting, it’s important to choose high-quality wood that will withstand the elements.
There are a few things you can do to help extend the life of your wooden planters.
First, make sure they’re properly sealed with a water-resistant sealant. This will help protect the wood from moisture and weather damage.
You should also regularly check your planters for any signs of rot or damage, and repair or replace them as necessary.
More Easy DIY Plant Projects to Try
- DIY Mini Face Planters
- DIY Mini Copper Planters and organizers
- DIY Mid Century Stand Planters
- Bundt Pan Planter
DIY Acacia Wood Plant Stand
Equipment
- Super glue or E6000 glue
Materials
- 1 Ikea PS plant stand
- 3 acacia wood plate
- 8 flat socket cap screw optional
- 8 connecting cap nut optional
- 3 clamp optional
Instructions
- Cut your acacia wood log into four equal pieces.
- Then, use your saw to cut a hole in the center of each piece, large enough to fit your plant pot.
- Use E6000 to glue the wood plates to the flat brass cap nuts and use clamps to hold them in place while they seal.
- Sand the edges of the holes you just cut, as well as the outside of each log piece. This will help prevent splinters.
- Now it’s time to attach the legs or casters.Drill four small holes in each log piece spaced evenly apart. Then, screw in the legs or casters, using two screws for each.
- Finally, place your plant pots inside the holes and screw them into place with the large screws.
Notes

Don’t forget to share your DIY Acacia Wood Plant Stand with us on Instagram using the hashtag #sugarandclothloves. We always love seeing all of your creations!
More Easy DIY's To Try

Please note that we may earn a commission for some of the above affiliate links. However, products featured are independently selected and personally well-loved by us!
This is a second question, sorry. Your pix of your finished plant stand do not look as tho’ holes were cut in the acacia wood plates to hold the planters. It looks as tho’ the planters are just sitting on top of the wood plates. Again, I feel like a dummy because I just can’t see what you’re talking about. Not complaining, just needing more info and maybe some close-up pix of where your planters are inserted into the holes you describe. Thanks.
Hi Marcia! The original Ikea PS 2014 Plant Stand that we used is no longer available in the United States but we saw that it’s still available internationally so we are so jealous cause it’s an awesome stand! It originally came with its own white plates. So instead we opted for our own wood plates. You can use the holes that were originally there or create your own holes to secure it.
I feel quite stupid. I can’t tell from your pictures how you are assembling 2 U-shaped long pieces of metal (each of which makes 2 long legs for the Marius stool if you assemble it according to directions) to create the leg configuration you show in the finished product. Can you explain what you’re doing in those pictures? This is so adorable and would be worth the extra work if I could just figure it out.
No link for plates, at least that I could find. I too love the piece next to it!
Had to do this! My newly renovated apartment was requiring more lushness! Found great plates at Target – they were thick enough that using 1 1/4″ flat head screws could be screwed directly into the wood. (Actually a couple screws came ever so slightly poking through, but not enough to notice!) I love it! Thanks for the concept!
Ahh yay! That’s so awesome to hear, Rhonda! Glad that it worked out so well! xoxo
Where did you get the acacia plates from please?
I love this idea and currently own the ikea stand!
scratch that, I just realized you embedded the link, thanks!
Glad you found it! xo
What is the plant on the right called! i have been looking for one like that. ;)
The plant on the right is a stag horn fern, as best I can tell.
How heavy can detain from this racK?
Small house plant are best! :)
Looks great. Im wondering where the side tabLe/buffet/dresser in the Photos came from. Love that as well.
Hi Nikki, it’s actually from West Elm :)
Are the plates 12 inches? Thanks!
Love this idea, will definitely be doing it :-) On a random note, I love the the sideboard that appears in the top photo, can you tell us where you got it?
This looks great! Thank you for this idea, I really have to try it!
Kirsten
Hi! Great ikea hack!! I love it!
The furniture above… is an Ikea hack too?
Thanks!
Great idea. I’m going to try it. Of course if you wanted to get really nuts, you could coat the plates with some WaterLox sealer to protect them from water.
Great hack! What’s the diameter of the plates you used?
Awesome project, so clean and simple- Looks great!
Very wonderful idea for my living room!!! Definitely shared
on my fb fan page!!
I invite you to visit my etsy shop at :
https://www.etsy.com/shop/MALUARTPERU
Blesses!!!!
I am a plant serial killer myself, but this is really cute.
super cool…
Love it!!!! I am so doing this. We currently struggle to keep plants alive inside because we have UV filters on our windows. I will find a way!
This is fantastic! I’m doing it for my patio, so thanks!!!
Dang! This looks SO good, Ash. I love all of your Ikea hacks.
In reference to your Acadia post, do you mean ‘acacia wood?’ Acadia is a vehicle from GMC.
THANK YOU!!! I literally made this typo EVERY single time… minus linking to the product. I swear my IQ is above a 10, yikes!
glad to help.