DIY Frozen Wine Chiller
Make a beautiful DIY Frozen Wine Chiller with fresh flowers. This easy ice bucket tutorial keeps wine chilled and adds an elegant touch to any party.

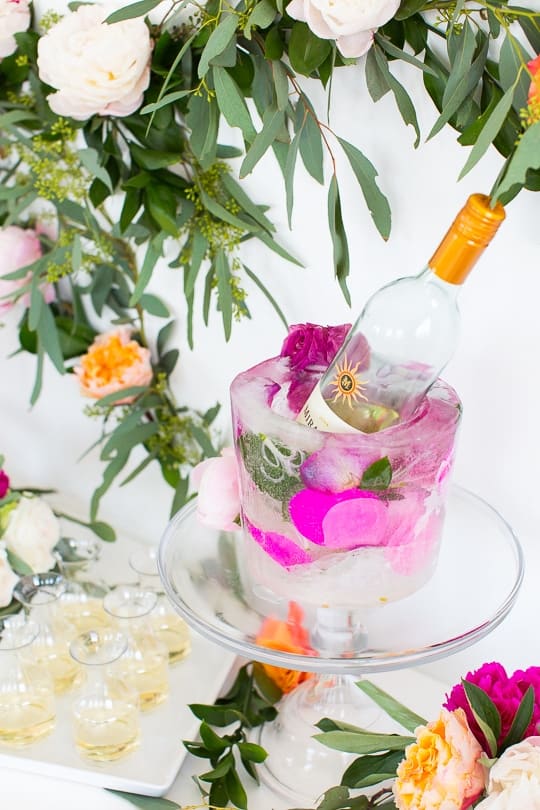
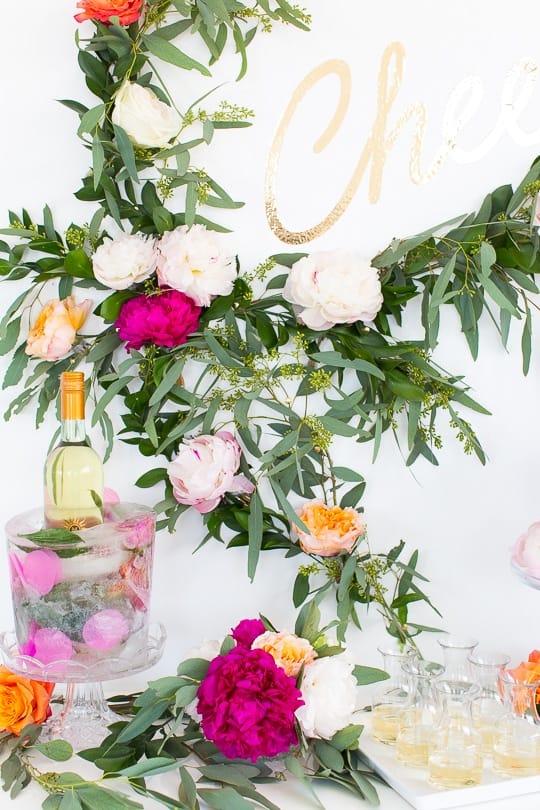
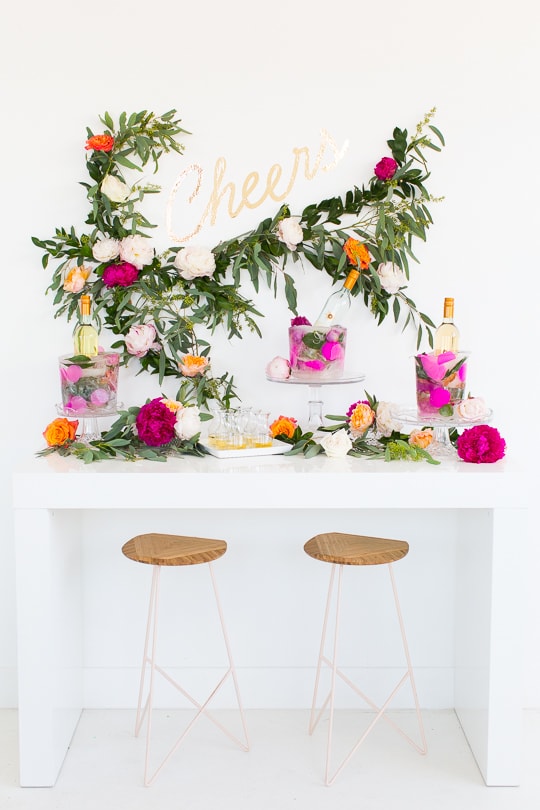
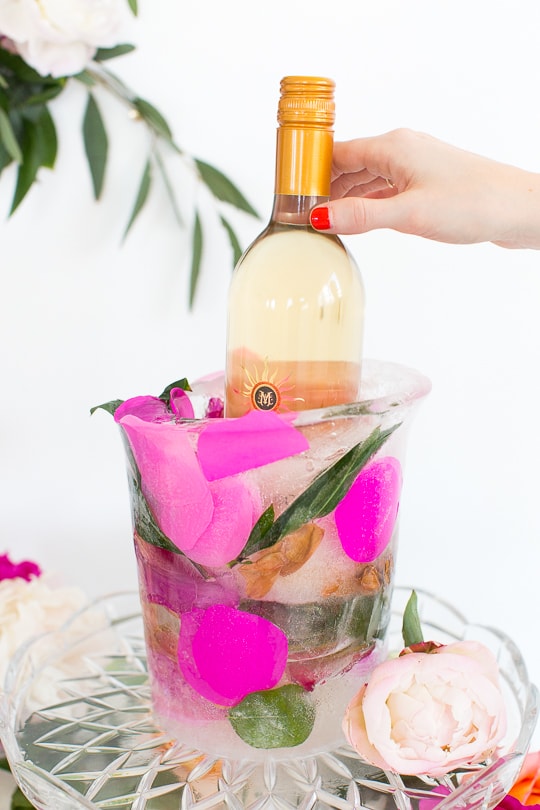
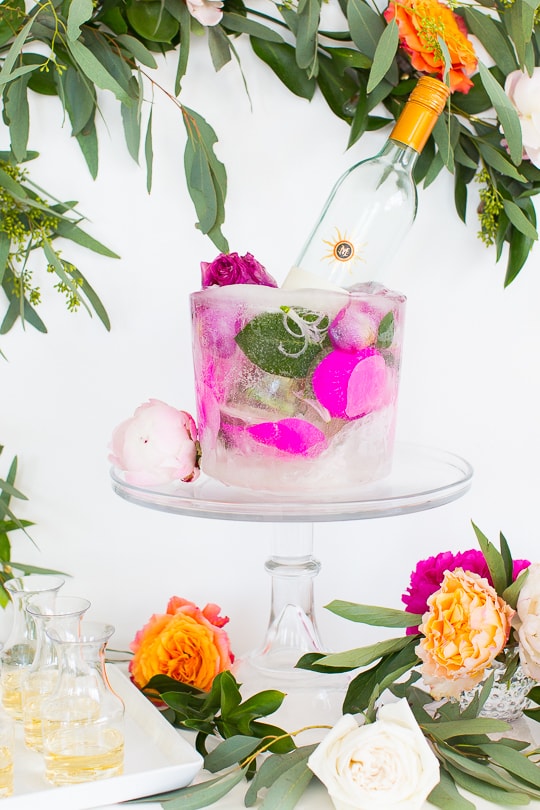
Entertaining season or not, this DIY frozen wine chiller is one of those creative projects that instantly elevates any gathering. This beautiful floral ice bucket idea uses fresh flowers frozen in ice to create a functional centerpiece. Keeps your wine perfectly chilled while doubling as stunning party decor!
Whether you’re hosting a holiday dinner, summer soirée, bridal shower, or weekend get-together, a floral frozen wine chiller adds an effortless wow factor to your table. One of the best parts about making a DIY frozen wine chiller is how customizable it is. You can dress it up with seasonal blooms, keep it minimal with greenery, or match the florals to your party color palette.
Hosting a crowd or setting up a mimosa bar? Make a larger wine chiller or create multiple ice buckets to hold several bottles at once. Planning something more intimate? A single frozen wine chiller paired with a cheese board, fruit platter or dessert tray makes an impressive yet easy display.
Ahead, we’ll walk you through exactly how to make your own DIY frozen wine chiller, plus tips for arranging fresh flowers so they freeze beautifully and stay secure. Once you see how simple it is, you’ll want to make this elegant wine chiller for every celebration.

Materials and Tools
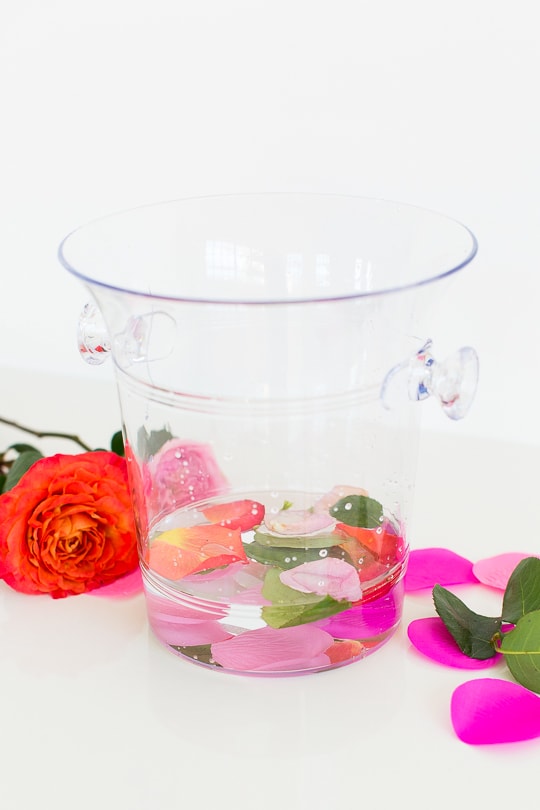
- Fresh or faux flower petals and blooms: Choose flowers that complement your event or color palette. Use small, flat flowers for best results. Pressed-style blooms, petals, and greenery freeze more evenly and stay visible in the ice. Large or bulky flowers can trap air bubbles.
- Ice bucket: This will act as the outer mold for your DIY Frozen Wine Chiller. Select a bucket or ice mold that fits the number of wine bottles you plan to chill. Larger chillers are great for parties, while a single-bottle size works perfectly for smaller gatherings.
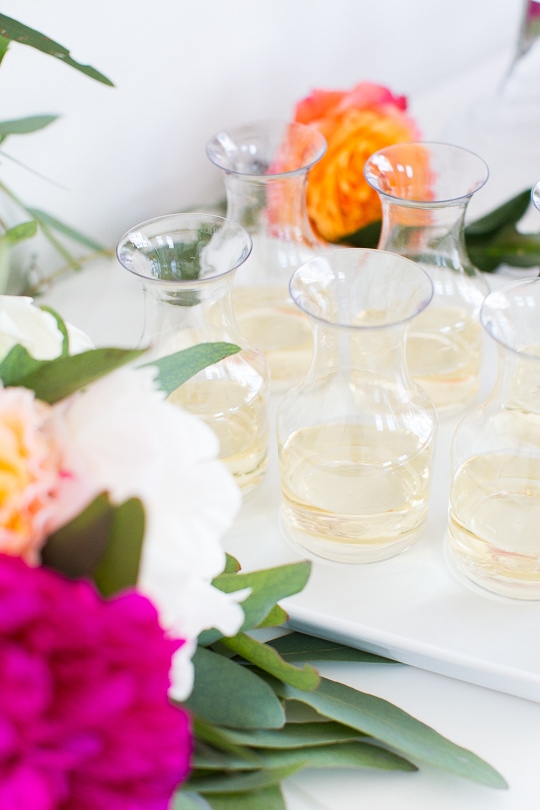
- Small container (wine bottle size): Just large enough to fit a wine bottle. We used a quart-sized container.
- Water: For filling and freezing the chiller. Distilled water (or water that’s been boiled and cooled) creates clearer ice for a more polished, glass-like look.
- Weights: To keep the inner container from floating. We used frozen ice packs, but any heavy, waterproof weights will work.
- Wax paper (optional): Helpful if you need extra stabilization for the inner container while freezing.
Tip: If you don’t already have an ice bucket, you can use a plastic ice mold instead. This all-in-one option eliminates the need for a separate bucket, inner container, and weights, making the process even easier.
How to Make a DIY Frozen Wine Chiller
1 — Create the base layer:
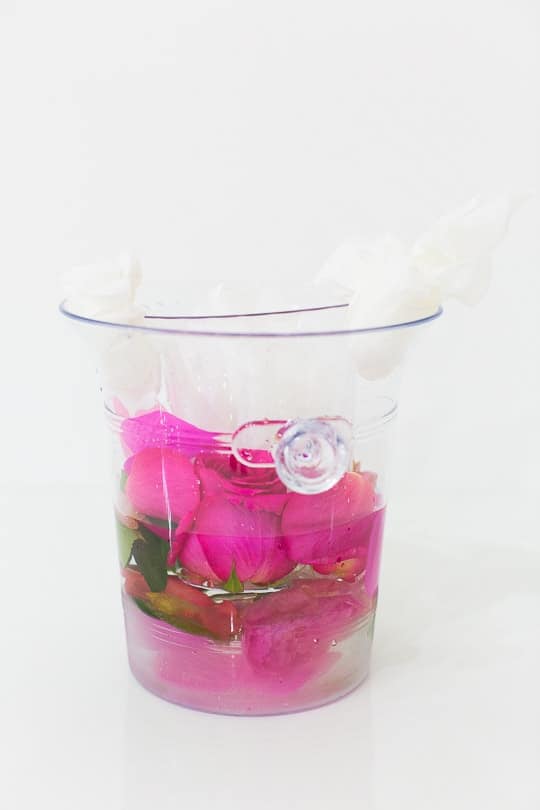
Start by adding 2–3 inches of water to the bottom of your ice bucket. Scatter in fresh or faux flower petals. Then place the bucket in the freezer and let this base freeze completely.
Tip: Pour water slowly. A slow pour reduces air bubbles and prevents petals from shifting out of place.
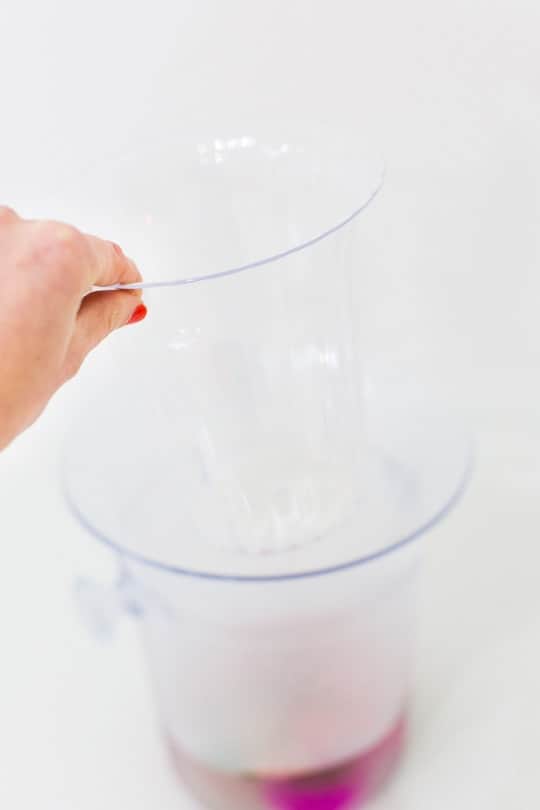
2 — Position the wine bottle mold:
Fill your smaller container with weights and carefully place it in the center of the frozen base. This container will form the opening that holds the wine bottle in your DIY frozen wine chiller.
3 — Build the floral ice walls:
Add more flower petals around the edges of the bucket. Slowly pour in water until the bucket is about one-third full. Freeze again until solid.
Tip: If the center container starts to shift, use small bundles of wax paper to hold it in place while freezing. The wax paper will peel off easily once frozen.
4 — Fill and freeze completely:
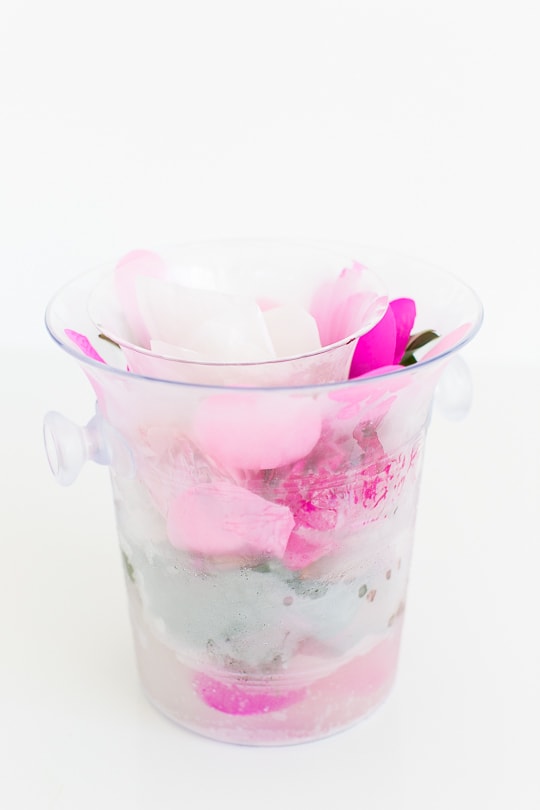
Once the previous layer is frozen, add more petals and fill the bucket the rest of the way with water. Return it to the freezer and allow the DIY Frozen Wine Chiller to freeze fully.
Tip: Press flowers against the sides. Gently place petals and blooms along the edges of the mold so they’re visible once frozen. Smaller flowers and flat petals freeze best.
5 — Unmold the frozen wine chiller:
When you’re ready to use it, remove the bucket from the freezer and run the outside under warm water. This will loosen the ice and allow the frozen wine chiller to slide out smoothly.
Important: Try to keep the inner container from touching the water while freezing. If it slips and makes contact, it may freeze in place and be harder to remove.
Tutorial Tips & Tricks
- Skip drainage holes for frozen wine chillers: Unlike traditional ice buckets, a DIY frozen wine chiller should not have holes. The solid ice structure is what keeps the wine cold and holds the flowers in place.
- Partially freeze in layers: Freezing the chiller in stages helps keep flowers suspended instead of floating to the top. This also gives you more control over placement.
- Anchor flowers to the sides: Gently press petals against the mold or bucket walls before freezing so they show clearly once unmolded.
- Freeze overnight for best results: A fully frozen wine chiller is sturdier, lasts longer, and unmolds more cleanly.
- Run warm water briefly to release: When unmolding, warm the outside just enough to loosen the ice. Don’t overdo it or the design may melt.
- Store in the freezer until serving time: Keep your DIY frozen wine chiller frozen until right before guests arrive to maximize its lifespan.
- Have a tray or towel ready: As the ice melts, a tray underneath helps catch drips and keeps your table dry.

More Entertaining Ideas
If you couldn’t already tell, we love incorporating fresh flowers to our decor in creative ways. We’ve used them to make floral and sage smudge sticks and even use them to decorate cakes. For some more stunning entertaining decor ideas, check out a few of our favorite below:
- 21 DIY Cake Stand Ideas You Can Make
- DIY Floral Embroidery Ring Backdrop
- DIY Paper Color Block Table Covering
- DIY Floral Punch Bowl Wreath


DIY Frozen Wine Chiller
Equipment
- Ice bucket
- Small container wine bottle size
- Weights like frozen ice packs
- Wax paper optional if needed
Materials
- Flowers fresh or faux
- Water distilled or boiled
Instructions
- Start by adding 2–3 inches of water to the bottom of your ice bucket.
- Scatter in fresh or faux flower petals.
- Place the bucket in the freezer and let this base freeze completely.
- Position the small container in the middle of ice bucket. Fill your small container with weights and carefully place it in the center of the frozen base. This container will form the opening that holds the wine bottle in your DIY frozen wine chiller.
- Build the floral ice walls. Add more flower petals around the edges of the bucket.
- Slowly pour in water until the bucket is about 1/3 full. Freeze again until solid.
- If the center container starts to shift, use small bundles of wax paper to hold it in place while freezing. The wax paper will peel off easily once frozen.
- Once the previous layer is frozen, add more petals and fill the bucket the rest of the way with water. Return it to the freezer and allow to freeze fully.
- When you’re ready to use it, remove the bucket from the freezer and run the outside under warm water. This will loosen the ice and allow the frozen wine chiller to slide out smoothly.

This post is sponsored Mirassou Winery. Thank you for supporting the brands we love! Love this recipe?
Be sure to share your DIY Frozen Wine Chiller with us on Instagram using the hashtag #sugarandclothloves, so we can follow along, too! We always love seeing all of your creations!

Please note that we may earn a commission for some of the above affiliate links. However, products featured are independently selected and personally well-loved by us!
I would love to win this! Would match my decor perfectly! I also love the ice bucket idea!
wow, i would love this, thanks so much for the chance
That cart is awesome!
Such a pretty whine chiller. I love the bright colors, festive, yet not wintery. The cart is classic also.
Great giveaway!!!
Love this idea! I’m using it for New Years, maybe adding some pops of gold inside, perhaps large gold or gold glitter beads? Thanks for the year of fun, entertainment, and great ideas! Looking forward to the next year of DIYs. ;)
Beautiful! Such a fun way to add a little color and texture to a fabulous NYE night!
The wine bucket looks great! And love the bar cart.
So pretty! I’ll be doing this for sure!
Love your designs!
I’ve never purchased anything from MIRASSOU WINERY but am definitely going to take a look around now!
What a great holiday DIY project!
Merry Christmas!
The ice buckets are beautiful! Thank you so much for offering such a wonderful idea and giveaway. Merry Christmas! :)
What a lovely idea— Thank you for sharing. And many thanks to you and Mirassou (heehee! that rhymes) for the chance at that gorgeous bar cart. Happy holidays.
The cart is super adorable.
I’ve been looking for a bar cart as cute as this one!
Such a cute idea
Gorgeous, can’t wait to make this!
Wow that bar cart is amazing! And this is a seriously cool DIY. I might need to throw a party now!
Beautiful, it would look great with big metallic sequins or confetti for some NYE flair, especially on top of this gorgeous bar cart that I am so in need of.
The ice buckets are really pretty! I can see trying this for an upcoming party. I love the bar cart, too!
So pretty! Will definitely try it!
That came out so pretty. I need to recreate it (or something similar).
this bar cart is amazing! thanks for the chance! Happy Holidays!
So lovely! Can’t wait to try! Think I’ll attempt for New Years!
Love the idea.
Such a creative idea & that bar cart is gorg!
This is one gorgeous bar cart!
Such a cute idea!
I love the colors in the photos!
I love this! (:
Lovely way to serve wine for a New Years Eve party
Gorgeous idea, and totally at my DIY skill level ;) Love the bar cart as well!
I just love how pretty the flowers are in the ice with the wine bottle. I also love the little wine glasses you’re serving with.
Wow, I’ve never seen such a beautiful party accessory! I can’t wait to make this for my next party. Thanks for the great idea and the giveaway :)
This is such an easy unique idea!
That table setting makes me so happy! Love the floral and gold.
This is absolutely beautiful! Great job.
Lovely!!
This looks a lot fancier than the one I have from Ikea! Thanks for hosting such a great giveaway!
Your frozen ice bucket is by far the prettiest one I’ve seen online! How quickly did it melt (aka did it make a big mess)? I’m definitely trying this for NYE!
And count me in on that incredible bar cart giveaway…
Cute idea. If you use boiling water the ice will freeze with crystal clarity!
Totally going to do the ice bucket for new year’s champagne!
Cool frozen wine bucket. Love the flowers! Thanks for the giveaway!
Loving that bar! Gorgeous set up too.
You are a GENIUS. Gorgeous and brilliant idea!!
this is so beautiful!
I just love the idea of the ice bucket!! That bar cart is too pretty too!! =)
I wonder how long those ice buckets would last??
nice.
Such a cute idea!! Definitely want to try it
Very nice cart! I love it!
This is beautiful!! Thanks for the chance to win.
Very pretty thank you
Chic, easy and colorful! This DIY is all the reasons I love Sugar and Cloth – and this bar cart!
Beautiful! But looks like it might be a mess once it starts to melt.
That wine bucket is gorgeous! You did an awesome job!
Paige
http://thehappyflammily.com
Honestly I think I would die from happiness if I won this bar cart! We are looking to buy a house in the next month and this would be my dream piece in our new home!!! I’m keeping my fingers and toes crossed. PS Your photos in this post are AMAZING! Happy Holidays!!!
So pretty! I could see doing this for a bridal shower too!
What a gorgeous idea for any season! I will definitely do this.
I love this idea. I don’t have a bar cart so this would be so awesome to win… and my husband would enjoy stocking it.
Awesome idea, perfect for new years
The bar cart is GORG! …..And the Ice wine bucket is simply genius. I need to try this!
I made something liek this for my brother in laws wedding. It did not turn out NEARLY as beautiful as yours did- i wish this was done 1.5 years ago so i could have had the inspiration then!
Great job!
So beautiful! Would love a bar cart to entertain!
This is just stunning. Love the petals!
I love this idea! Happy Holidays!
This bar cart is super adorable. I’d love this for our new apartment. : )
Holy cola! This is beautiful!
I know right where it would go. Thanks!
What a gorgeous bar cart! I have the perfect spot. I love your wonderful wine bucket idea. So cute!
Can’t wait to try this!!
This spread is breath-taking! I love every bit of it! It may be early here in Chicago at the moment but I’m craving that wine!!! ??
Sooo beautiful! What a creative idea!
What a beautiful idea! I’ve seen small votives like this, but never anything this scale with such pretty flowers!
This is brilliant! I love how colorful your wine bucket is with all of the flowers. I’ll be throwing a little housewarming brunch (once we’re all settled in, which feels like it’s years from now) – what a perfect way to display and keep our champagne chilled!
g.
Love the frozen ice bucket and love the bar cart!
gorgeous! can’t wait to try this diy
This is my favorite of the wine projects too. Its affordable and doable but it makes a big splash.
hello
very beautiful
thank you very much for this giveway
kiss
This is so gorgeous! I must make this this spring. Happy holidays Ashley!
So pretty! Merry Christmas!