DIY Paper Wall Art

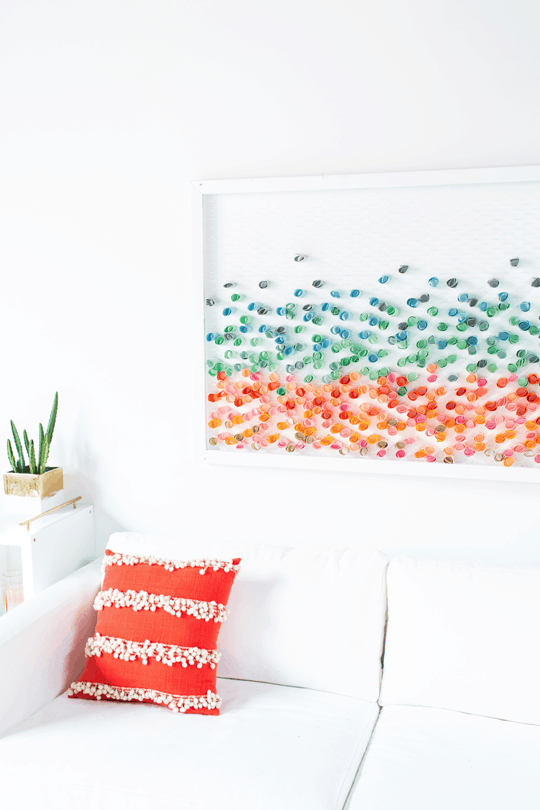
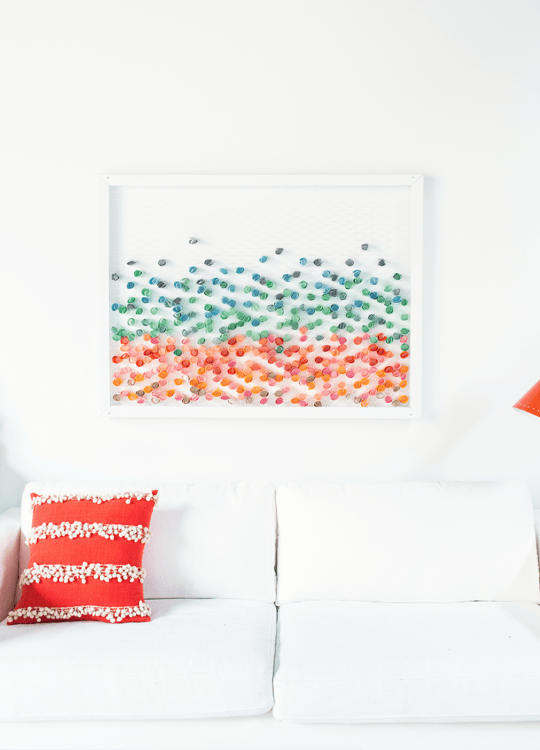
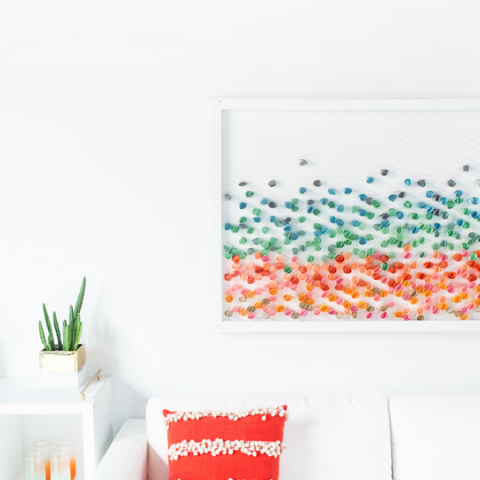
Upcycle an old frame and paper into stunning DIY Paper Wall Art! This easy project uses chicken wire for a layered paper masterpiece.

no-bake peanut butter and jelly cheesecakes | sugarandcloth.com

Tired of staring at bare walls? Craving a creative outlet but short on time or resources?

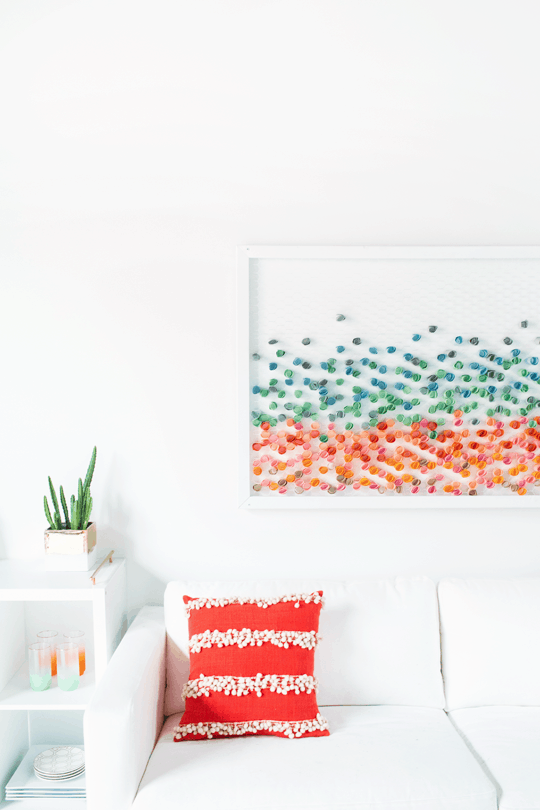
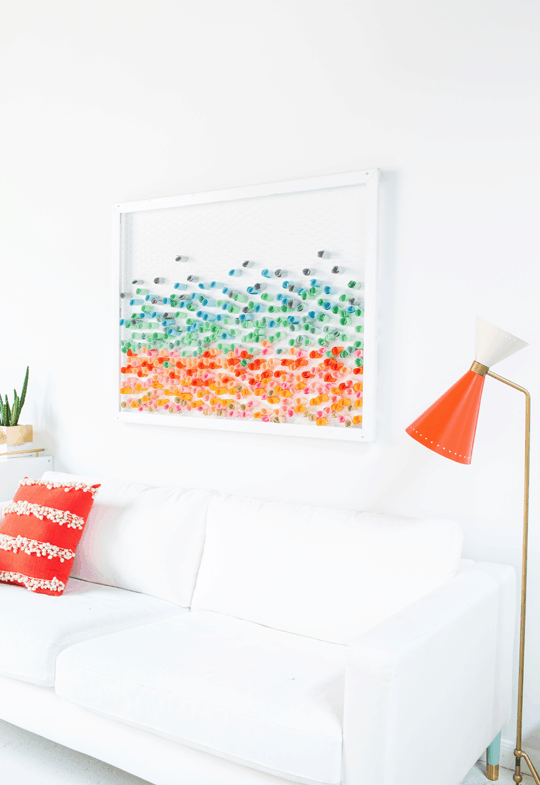
This DIY Paper Wall Art breathes new life into forgotten treasures, transforming a dusty old  frame and some paper scraps into a captivating piece of wall art.

When we attended a Smilebooth event, we met this lovely lady who created an amazingly clever photo backdrop out of chicken wire and paper. So we were inspired to make our own version of an easy paper wall hanging.

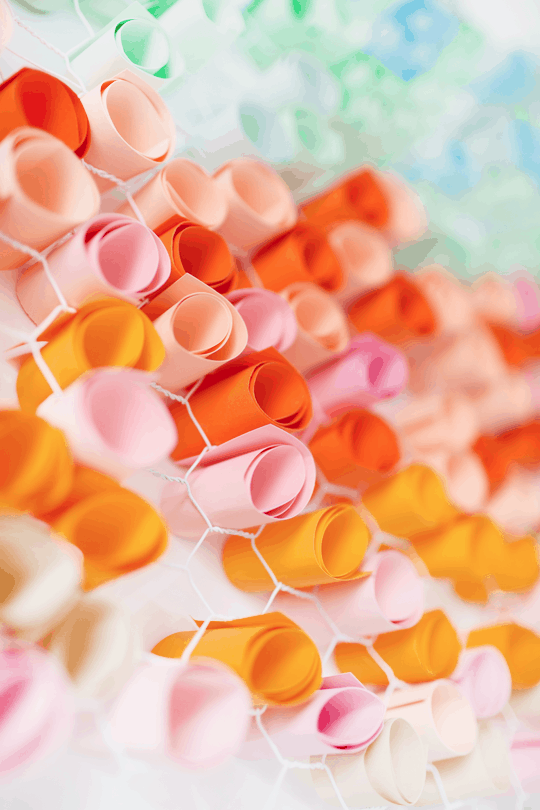
The beauty of this project lies in its accessibility. Chicken wire, readily available at most hardware stores, becomes the foundation for your artistic expression. Layered paper of any kind, from colorful construction paper to vintage book pages, adds texture and depth.

And the best part? You can repurpose an old frame that’s been collecting dust in the attic, giving it a whole new purpose and a fresh lease on life. You can hang it up anywhere in your home officeliving room or bedroom.

Whether you’re a seasoned crafter or a complete beginner, this tutorial will guide you through every step of the process. So gather your materials, unleash your inner artist, and get ready to add a touch of personalized 3d flair to your home in no time!

DIY paper wall art | sugarandcloth.com

Materials and Tools Needed

  • Wooden frame Any size or style will work
  • Chicken wire — Enough to cover the back of the frame with some overlap
  • Colored paper — Cut into 2″x8″ strips
  • Staple gun and staples
  • Wire cutters
  • Needle nose pliers
  • Spray paint — Optional to paint your frame and chicken wire
  • Wall standoff spacers and appropriate screws — Appropriate size for your frame and wall for mounting the diy paper wall decor. Ours were approximately 15/16″.
  • Drill and drill bit — If mounting with screws.
DIY paper wall art | sugarandcloth.com

Steps to Follow to Make Wall Art with Paper

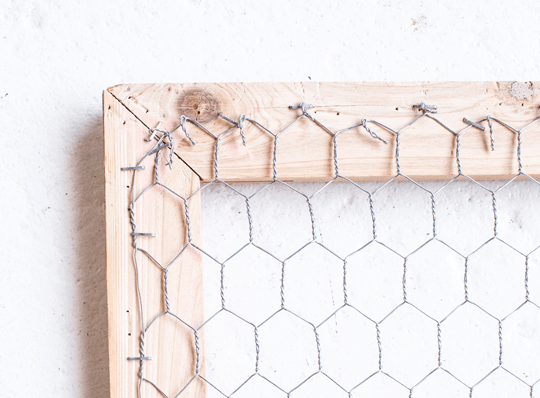
1 — Cut the chicken wire with wire cutters. Trim the wire to a size slightly larger than the back of the frame. It should overlap the edges by about an inch.

2 — Using the staple gun, secure the chicken wire to the back of the frame. Start at the center and work your way outwards, placing staples every 1-2 inches to ensure the wire is taut and secure.

Cut away the excess chicken wire with the wire cutters. Make sure to bend over the sharp edges as you go with a needle nose plier or the side of the wire cutters.

DIY paper wall art | sugarandcloth.com

3 -– Optional: Spray paint the frame and wire. Allow to dry.

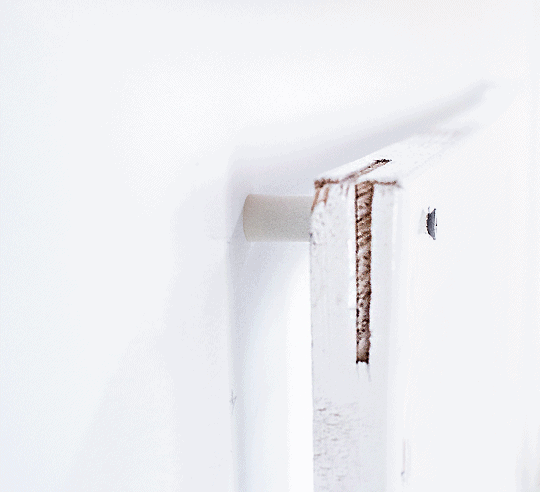
4 –- Measure and mark the placement of the wall standoffs on the back of the frame. The screw holes will be in all four corners when attaching it to the wall.

Then, use a drill bit the corresponds with the size screws you’ll be using to hang the frame to create pre-made holes for the screws and spacers

5 –- Follow the directions on installing the wall standoffs according to the packaging. and screw the frame to the wall.

Line up the wall standoffs with the marked positions and screw them into the frame using a screwdriver. Ensure they are secure but not overtightened.

Depending on your wall material (drywall, brick, etc.), you might want to pre-drill pilot holes to ensure easier screw insertion and prevent damage. Use a drill bit size slightly smaller than the screw diameter.

DIY paper wall art | sugarandcloth.com

3 –- Measure and mark where the screw holes will be in all four corners when attaching it to the wall.

Then, use a drill bit the corresponds with the size screws you’ll be using to hang the frame to create pre-made holes for the screws and spacers

4 –- Follow the directions on installing wall spacers according the packaging, and screw the frame to the wall.

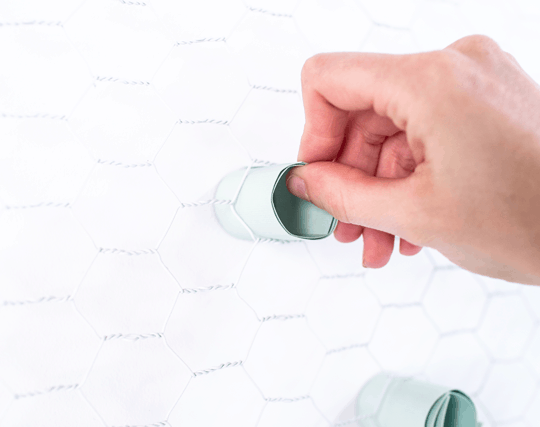
6 — Now comes the fun part! Roll up the 2″ x 8″ strips of colored paper, and insert them into the hexagon openings of the chicken wire.

Fill up the frame as much or as little as you’d like with the paper strips. Once you’re happy with your paper arrangement, step back and take a look. You can add additional paper pieces, rearrange them, or trim any that seem out of place. 

DIY paper wall art | sugarandcloth.com

Tutorial Tips and Notes

  • Experiment with different paper types and textures to achieve the desired look and feel. Some other ideas besides construction paper include tissue paper, patterned papers, old book pages, etc.
  • You can secure them with small dabs of spray adhesive (optional) if needed, but the chicken wire will hold most pieces in place.
  • This project is easily customizable. You can adjust the size of the frame, the paper types, and the overall design to match your style and decor preferences.
  • Use any leftover scraps of paper to construct a DIY Paper Shapes Artwork.
no-bake peanut butter and jelly cheesecakes | sugarandcloth.com

More Easy DIY’s

For more ways to uniquely decorate your space, check out a few of our other DIYs in our archives below —

DIY paper wall art | sugarandcloth.com
no-bake peanut butter and jelly cheesecakes | sugarandcloth.com

DIY Paper Wall Art

Print
5 from 1 vote
This easy DIY Paper Wall Art made from paper, chicken wire, and an old wood frame makes quite the statement piece for your home decor!
Prep Time1 hour
Total Time1 hour
Course DIY
Category Wall Art

Equipment

  • Wire cutters
  • Staple gun and staples
  • Needle nose pliers
  • Drill and drill bit

Materials

  • Wood frame
  • Chicken wire
  • Spray paint optional in color of your choice
  • Colored paper cut into 2"x8" strips
  • Standoff wall mounts & screws optional for mounting for your wall type

Instructions

  • Cut the chicken wire with wire cutters. Trim the wire to a size slightly larger than the back of the frame. It should overlap the edges by about an inch.
  • Using the staple gun, secure the chicken wire to the back of the frame. Start at the center and work your way outwards, placing staples every 1-2 inches to ensure the wire is taut and secure. Cut away the excess chicken wire with the wire cutters.
  • Optional: Spray paint the frame and wire. Allow to dry.
  • Measure and mark the placement of the wall standoffs on the back of the frame. Then, use a drill bit the corresponds with the size screws you'll be using to hang the frame to create pre-made holes for the screws and spacers
  • Follow the directions on installing the wall standoffs according to the packaging. and screw the frame to the wall.
  • Roll up the 2" x 8" strips of colored paper, and insert them into the hexagon openings of the chicken wire. Fill up the frame as much or as little as you'd like with the paper strips.
Cost: $50
KEYWORD: diy paper wall art, paper wall art

Please note that we may earn a commission for some of the above affiliate links. However, products featured are independently selected and personally well-loved by us!

Leave a Reply

Your email address will not be published. Required fields are marked *

Leave a Rating:


75 Comments

  1. Pingback: 5 Must Try Wall Art DIYs
  2. Pingback: 24 Unique Paper Decor Crafts You Can Make in an Afternoon
  3. Pingback: The 2018 Farm Chicks Art Installation - The Farm Chicks
  4. Pingback: 40+ Paper Crafts for Home Decoration-Best & Unique Ideas
  5. Pingback: DIY Paper Shapes Wall Art - Sugar & Cloth DIY Home Decor
  6. Pingback: DIY Hanging Flower Installation - Sugar & Cloth
  7. Pingback: Remodelaholic | 60 Easy Art Ideas for Kids Wall Decor ⋆ News: Art, Travel, Design, Technology
  8. Pingback: 60 Easy Art Ideas for Kids Wall Decor – DIY-Geschenke
  9. Pingback: 60 Easy Art Ideas for Kids Wall Decor - Home Feature
  10. Pingback: 60 Easy Art Ideas for Kids Wall Decor - Colorfull Home
  11. Pingback: How To Make DIY Watercolor Wall Art - Sugar & Cloth
  12. Pingback: 60 Easy Art Ideas for Kids Wall Decor – DIY
  13. Pingback: 40 Creative Paper Crafts Ideas
  14. Pingback: 25 DIY Paper craft ideas to decorate your home - Saudos
  15. Pingback: Friday Links - The Crafted Life
  16. Hello everyone :) I’m pretty new to 3d printing and I have quite a few questions on the subject, so I hope you will not get mad at me for asking here at least a few of them. I think before I’ll get seriously into sculpting I should focus on the software itself, and that’s what I’d like to ask you about. Mainly, should I look for the most simple and crudest program there is or would it be better to look for something more complicated? I’m worried that I’ll get some unwanted quirks while working with simpler software. Right now I’m using some online software called SelfCAD (I didn’t have to download anything). I’ve read some good opinions about it, but maybe you could share yours as well? Second question is about the software as well: should I look for software that would allow me design and slice it in it, or should I use a different program for each of them? The one I’m suing allows me to do both i it. Does it even make a difference? Surprisingly, I couldn’t find the answer to that, as it seems like most articles want to focus on the very basics (like what is 3d printing and so on), and while the answers to those questions are fine, it seems like no one wants to go into the details (it looks like some of them even steal from each other! I swear I’ve found the same answers to the same questions on at least 3 different sites) but I’m getting off-topic… The last question is about 3d pens. Would it be possible to somehow convert whatever I draw with a 3d pen to a 3d model in a software? For example, if I’ll draw a horse with 3d pen, would it be possible to get its outline in a software? I’m not sure how that would even work, but the very idea sounds interesting to me. Anyway, I think I’ll stop here just in case no one will ever answer me and all of this writing will go to waste. I apologise that I’m using your content to ask questions, but I hope you can relate and help a rookie like me. Anyway, thank you for posting. I did learn something from this and that’s always appreciated. Thank you, and I hope to hear back from you very soon :)

  17. “… color everywhere. Story of my life.”

    That is the story of MY life, too, and I’m LOVING IT!

    Thanks for sharing this GOOD-LOOKING project.

    Ohh, the colors I will use….

  18. Pingback: 7 Easy & Cute Diy Wall Art Decor Ideas | DIY & How To
  19. Pingback: 55+ Easy Wall Art Ideas for the Home
  20. Pingback: 25+ Creative DIY Wall Art Ideas for Your Home
  21. Pingback: 5 Must Try Wall Art DIYsMaritza Lisa
  22. I love this and am going to attempt to recreate it for our wedding! Question:

    Where did you find the frame?

    Thank you!

  23. Pingback: 20 Easy & Creative DIY Wall Art Projects - Little Red Window
  24. Pingback: 30+ Beautiful DIY Wall Art Projects - Wife in Progress
  25. Pingback: 25 Stylish DIYs for a Beautiful Bedroom on a Budget – Pioneers Discovers
  26. Pingback: Diy Wooden Accent Wall - Woodworking Ideas 4 You
  27. What a great idea! I love how different it looks from different areas in the room. Great idea to add some texture to a room! Thank you for sharing!

  28. Love this idea. I knew I’d find one I would love but would also be easy to do, lol. Great ideas given above in the comments too. My first thought was making the emblem of your favorite sports team. We’re Charger fans and our son’s bedroom is decorated as such, blue ceiling and doors to boot but the one item he doesn’t have is a HUGE lighting bolt. Thanks to your blog, he will now! Bonus: this is a craft we can do together!! I can’t wait to get started on this. Thanks again….

  29. If I was a teacher, I’d use it in my classroom to pass on weekly notes to children. Won’t it be great to see their anticipation as they troop in Monday morning, wondering what note to expect, and in their little corner (can be done by painting in different colours), you pass them a bit of appreciation, a little leg up…

  30. Great Idea!. Thanks I have a picture frame…I would love to try this with. What else could you use beside the chicken wire?

  31. This is amazing!!! I have been searching for the perfect art to hang above our fireplace for 5 years and 8 months… and this is it. Bonus, I can brag that I did it myself (hopefully mine turns out as beautiful as yours). I’ll send a pic when I’m done. Thanks for sharing!

  32. I am so excited to try this! My husband and I are going to do it together as a new weekend family craft project tradition! Do you think the paper should be acid free like when scrap booking? Also where did you get the large wooden frame?

    Thanks!

  33. I love the idea, it is beautiful and I’m ready to tey it myself. But whst prevents fromdust getting in all those paper rolls? It seems if you go to dust it, the paper would either bend, possibly tear or call out.

    1. that’s a great Q! Maybe one of the aerosol dusting cans for electronics and keyboards would be best? Also, you’re a cruise planner?! We should be best friends, haha ;)

      1. Ashley, do you cruise a lot? Friend me, would love to help you out with hiur next vacation. Linda Haber Hilson

  34. This is fantastic! Great idea and you could really customize it to any decor depending on your color palate.

    xo Rachel

  35. I love this idea, Ash! Such a fun, affordable way to bring color into a room.

    I was thinking it would be cool to write notes and messages on the inside of the paper before it’s rolled up…happy moments and memories, accomplishments, etc…and then pull some out once time has gone by to read and kind of relive those memories. Too cheesy? Probably.

    Anyway, great project!

  36. Who doesn’t like stories when they start out “once upon a time”? And your stories always start my day with a laugh because of your sense of humor :)

    As for the wall art, MAGNIFICENT! OOOZING LOVE OVER THE COUCH TOO!