Gingerbread Camper House Recipe with Template
Looking for a unique twist on traditional gingerbread houses? Our gingerbread camper house recipe comes with a free template to help you craft a whimsical, delicious creation

Are you in need of a festive and delicious treat that will bring the holiday spirit to your home? We got this crazy idea to construct a gingerbread camper. This delightful twist on the classic gingerbread house is perfect for those who love all things camping and want to add a touch of adventure to their holiday celebrations.
Luckily, our friend Monica of Paper Flour Ink is literally a detail-oriented genius and swooped in to help save the day to help us execute the idea. She was also the brains behind the magnificent Eiffel Tower gingerbread house.
So with our free template, creating this adorable edible masterpiece has never been easier. Gather your ingredients, roll up your sleeves, and get ready for a fun-filled baking experience that will leave everyone amazed by your culinary skills!

Ingredients Needed to Make a Gingerbread House
There are several different type of gingerbread house recipes out there for gingerbread houses. Having a solid construction grade gingerbread recipe is really important to make sure that the cookie isn’t too soft to hold it’s shape. This particular recipe is very durable and meant more for building than eating, but it’s totally still edible!
- All-purpose flour (and more for flouring surface)
- Honey
- Granulated sugar
- Eggs
- Cinnamon
- Ground cloves
- Nutmeg
- Ground ginger
How to Make a Construction Grade Gingerbread House
1 — Cream eggs and sugar together in a stand mixer with a dough hook rather than the paddle attachment.
2 — Then, add the honey and spices.
3 — Mix in flour, 1 cup at a time until mixed. Note that the dough will be very stiff.
4 — Wrap in plastic wrap and chill for one hour.
5 — Lightly wipe down the counter with a wet paper towel and place a large piece of foil on top (the water helps it stay put). Flour your working surface and roll out the dough with a rolling pin to 1/8” thick on the foil or parchment paper.
6 — Place your printed template on the gingerbread dough and cut with a pizza cutter. Be sure to cut out all the windows and doors too!
7 — Transfer the foil to a baking sheet and bake the sides of the house pieces first and let them cool. Bake at 325ºF for 15 – 20 minutes for side pieces (until golden brown).
8 — For the edge pieces that you will curve, bake for 8-9 minutes until they’re just starting to darken. For the edge pieces, you’ll need to work quickly while the pieces are still warm and bend to create the curve of the camper before fully cooled.
9 — Let all pieces cool to room temperature before gluing them together with royal icing. Let the royal icing harden for 4-5 hours before decorating.


Downloadable and Printable Camper Gingerbread Camper Template
When it comes to cutting out the shapes from your construction grade gingerbread recipe, you’ll want to make sure you have the templates. Below are the free printables for the gingerbread house template, but be sure to print them to scale.
When assembling the pieces, make sure to ice the sides of your gingerbread camper BEFORE you assemble them for flooding the icing on an easier flat surface.
How to Assemble the DIY Camper Gingerbread House Windows
The trickiest part of this gingerbread house is assembling the edible candy windows. To create edible gingerbread house windows, you’ll need crushed butterscotch hard candy.
1 — When you’re using the gingerbread house template, cut out windows and doors before baking gingerbread dough. Then, bake the pieces per the instructions above.
2 — Once cooled, place the pieces needing “glass” on foil on a baking sheet. Fill with crushed butterscotch candy and bake at 350ºF for about 5 minutes, until candy has melted.
3 — Let them cool thoroughly, overnight is best, before removing from baking sheet/foil. Voila, you have edible windows!
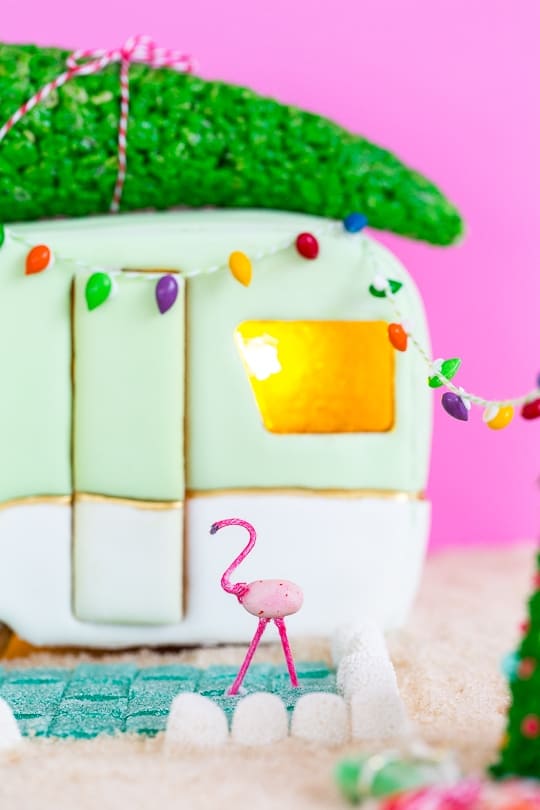
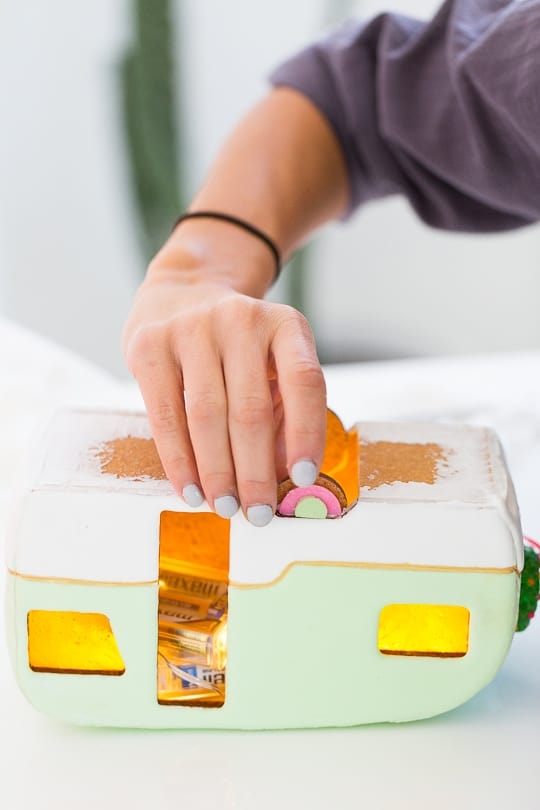
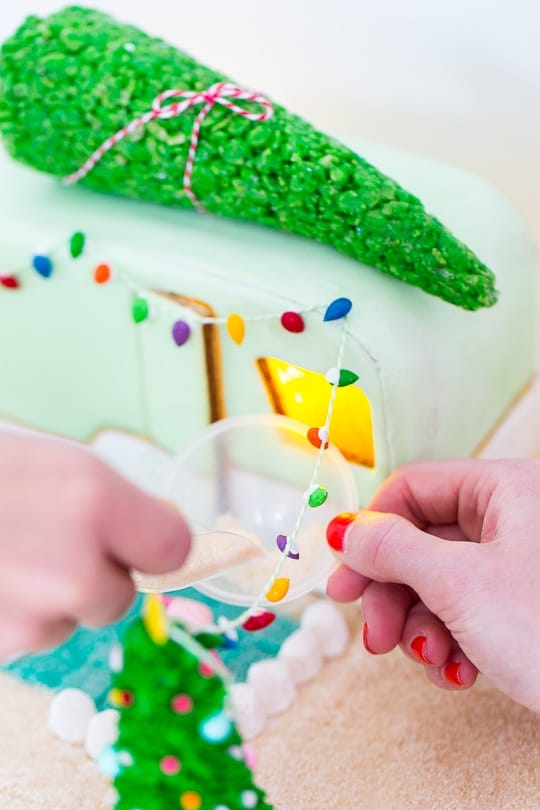
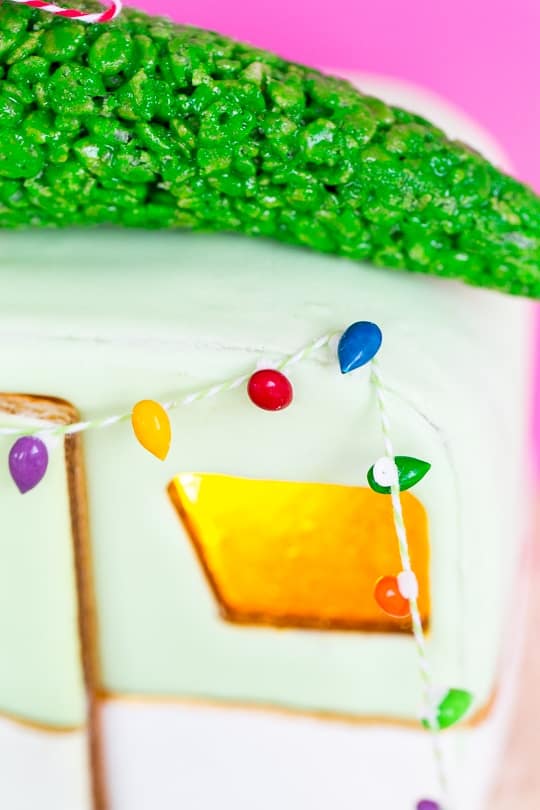
4 — To make the windows illuminate, we used small battery operated twinkle lights to sit inside the camper.

Thick Royal Icing Recipe for Building a Gingerbread House
For this gingerbread house template, we used two different types of icing. A thick royal icing for building/gluing the pieces together, and a thinner royal icing for “flooding” the colored sides.
Ingredients needed:
- 3 tablespoons meringue powder
- 4 cups powdered sugar
- 6 tablespoons water
Instructions:
1 — Mix all of the ingredients together and then store them in an air-tight container. Makes 3 cups of icing.
2 — Use this icing to bond the sides of your gingerbread house together.
You can use the same recipe but with additional tablespoons of water to decorate the sides of your gingerbread camper before assembling them.
Making your own royal icing as so easy, but also a good skill to know since it’s used in so many desserts. We also have a paintable royal icing recipe that’s useful to have.

Decorating Ideas for a Homemade Gingerbread House
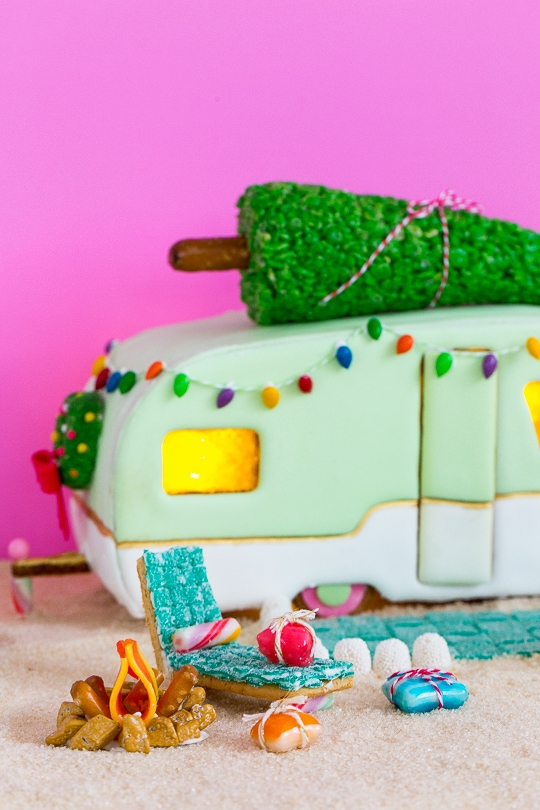
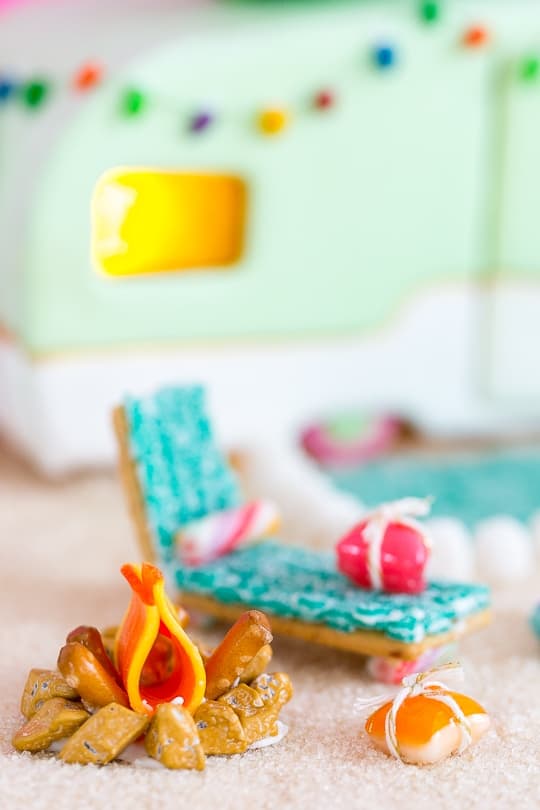
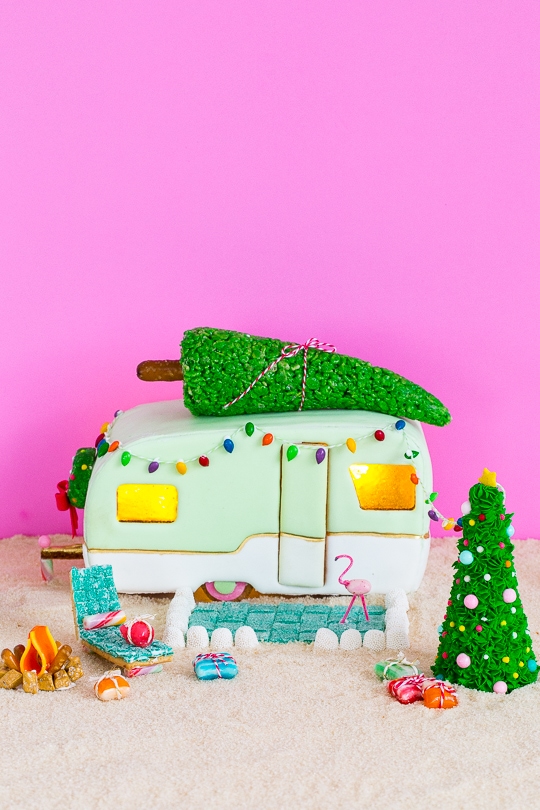
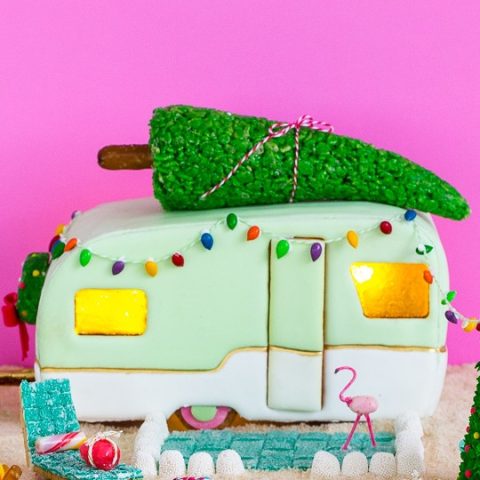
The sky is really the limit when it comes to what you can use to decorate your gingerbread camper house. This is a rough idea of what we used for the individual decor elements for ours —
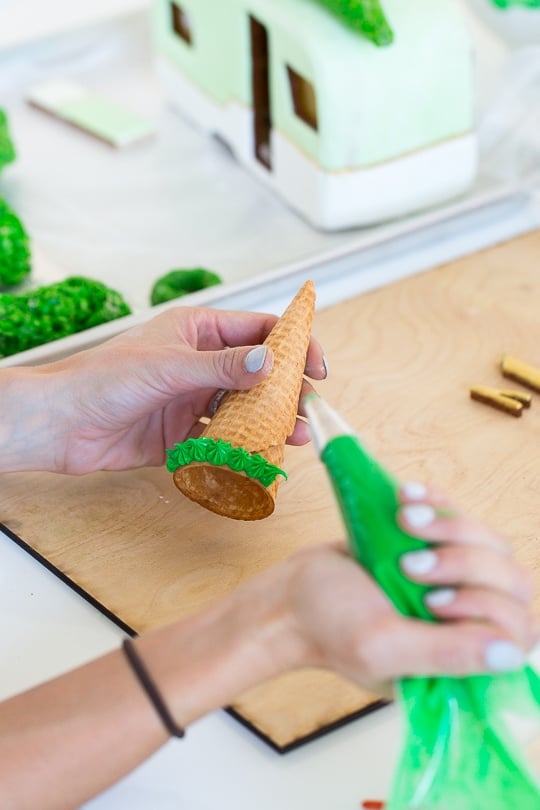
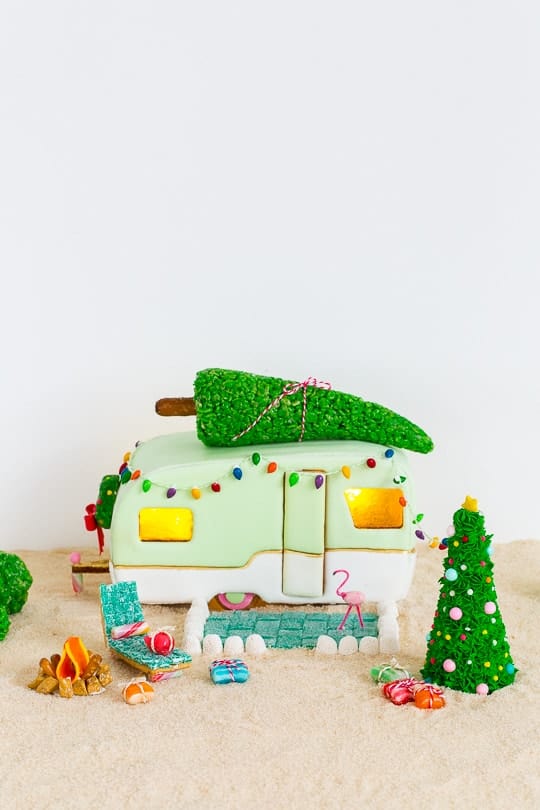
- Rug and fence: Green sour belts and champagne bubble jelly beans
- Tree: Waffle ice cream cone covered in green royal icing and sprinkle bulbs
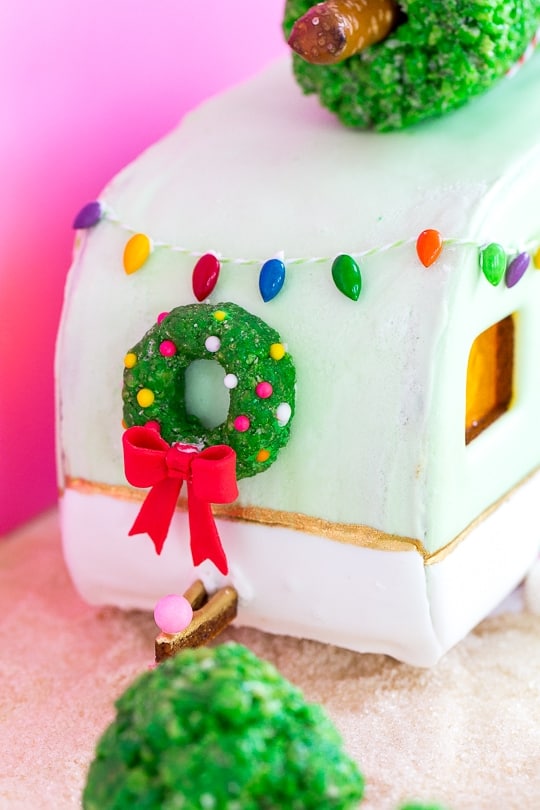
- Tree on top of the camper: Green Rice Krispies treat with a pretzel rod trunk and twine wrapped around
- Presents: Old fashioned candy mix wrapped in twine
- Wreath: Green Rice Krispies treat with sprinkles and a red fondant bow
- Wheels: Gingerbread cookie circles, pink melting chocolates, and jumbo confetti circles
- Flamingo: Pink jelly bean and white floral stems with pink food marker
- Toe hitch: Gingerbread V with striped candy cane and pink sprinkle
- Fire: Candy rocks, pretzel sticks, and orange and yellow ribbon candy
- String lights: Lime green twine and candied sunflower seeds glued on with royal icing
- Lawn chair: Woven sour belts, graham crackers, and candy cane feet help together with royal icing
- Sand: A mixture of brown sugar and coarse organic sugar
How to Display a DIY Camper Gingerbread House
To put your creations together, you can adhere them all to foamboard or a sheet of thin, sturdy wood with royal icing. We actually even ended up displaying ours in a white lacquer tray for our Christmas party so that we could contain the sand easily!
We realize this is quite the undertaking, but at least you can bask in the awesomeness of ours if you don’t want to spend hours on your own gingerbread house template!
Years later after our original creation, there has been a big trend with campers and RV’s. So you can also buy several store-bought camper gingerbread house templates now! Here and here are the best places to buy gingerbread houses. What’s the craziest gingerbread project you’ve ever made in the name of a Merry Christmas?

More Fun Christmas Projects to Try
And in case you’re new around here, here are a few of my all-time favorite Christmas projects to go with your gingerbread house decorating —
- DIY Mini Wooden Christmas trees
- Jumbo (over the top) balloon tree
- This very playful pom pom tree
- Colorful DIY Confetti Christmas tree
- Easy DIY cactus Christmas tree
- Bottle brush tree centerpiece for the table
- Super easy DIY gradient foam tree cones
Equipment
- Stand mixer or electric hand mixer
- Rolling pin
- Foil or parchment paper
- Pizza cutter
- Baking sheet
Ingredients
For the construction grade gingerbread house:
- ½ cup honey
- 1 ½ cup white granulated sugar
- 3 eggs
- 5 cup all-purpose flour and more for flouring surface
- 1 ½ tsp cinnamon
- 1 ½ tsp ground cloves
- 1 ½ tsp nutmeg
- 1 tbsp ground ginger
For the candy windows:
- Crushed butterscotch candies
For the thick royal icing for assembling:
- 3 tbsp meringue powder
- 4 cup powdered sugar
- 6 tbsp water
Instructions
For the construction grade gingerbread house:
- Cream eggs and sugar together in a stand mixer with a dough hook rather than the paddle attachment. Then, add honey and spices. Mix in flour, 1 cup at a time until mixed. Note that the dough will be very stiff. Wrap in plastic wrap and chill for 1 hour.
- Lightly wipe down the counter with a wet paper towel and place a large piece of foil on top. (The water helps it stay put).Flour your working surface and roll out the dough with a rolling pin to 1/8” thick on the foil or parchment paper.
- Place your printed template on the gingerbread dough and cut with a pizza cutter. Be sure to cut out all the windows and doors too!
- Transfer the foil to a baking sheet and bake the sides of the house pieces first and let them cool. Bake at 325ºF for 15-20 minutes for side pieces (until golden brown).
- For the edge pieces that you will curve, bake for 8-9 minutes until they're just starting to darken.
- With edge pieces, you'll need to work quickly while the pieces are still warm and bend to create the curve of the camper before fully cooled.
- Let all pieces cool to room temperature before gluing them together with royal icing. Let the royal icing harden for 4-5 hours before decorating.
For the candy windows:
- When you're using the gingerbread house template, cut out windows and doors before baking gingerbread dough. Then, bake the pieces per the instructions above.
- Once cooled, place the pieces needing “glass” on foil on a baking sheet. Fill with crushed butterscotch candy and bake at 350ºF for about 5 minutes, until candy has melted.
- Let them cool thoroughly, overnight is best, before removing from baking sheet/foil. Voila, you have edible windows!
For the thick royal icing:
- Mix all of the ingredients (meringue powder, powdered sugar and water) together. Then, store them in an air-tight container if not assembling right away. Makes 3 cups of icing.
Nutrition

47 Affordable Gifts Under $10 for Everyone
Shop budget-friendly gifts under $10 that look way more expensive.…
Gingerbread Muffin Recipe with Lemon Glaze
Add a touch of spice to your breakfast or snack…

Funfetti Reindeer Cookies Recipe
Bake holiday magic with these Funfetti Reindeer Cookie Sandwiches. Soft…

25 Easy Christmas Cocktail Recipes to Try for the Holidays
Deck the halls with these delicious Christmas cocktail recipes! From…
Continue Reading 25 Easy Christmas Cocktail Recipes to Try for the Holidays
Please note that we may earn a commission for some of the above affiliate links. However, products featured are independently selected and personally well-loved by us!
Template is super cute, but the dough is a poor recipe and very difficult to work with. Recommend the construction dough in joy of cooking instead.
Very good for the article here. will definitely come again
“flour and other dry ingredients” ? The spices were added in step before. Are there other dry ingredients?
Hi Lu! No, there are not any other dry ingredients! The recipe has been corrected. Thank you for catching that! No one ever has.
Hi. In looking at the be ding part for the middle of the camper, it appears to be way too long with the other bottom peices. What am I missing?
What is the color of the icing–can you tell us the colors you mixed to make the retro-green on the camper?
Hi Jeanine! To get the mint color, we just had to slowly mix in green gel coloring with a bit of yellow. It was a lot of testing to slowly get the color that we wanted!
Thank you admin for sharing this amazing post. It really helps me. Keep uploading these types of information.

Thank you for providing this information to us. Keep uploading these types of information. It really helps us.
Digital Marketing Website
Thank you admin for sharing this post on “Gingerbread House Template” with us. I really appreciate your hard work in writing this post. I like this post. I have learned something from this post. Keep uploading these types of information. It really helps us.

You have shared very interesting things, Thank you for providing this content.
http://alnuzhasafety.com/
You’re welcome, Al!
Thanks for sharing this nice information. https://www.aquaprouae.ae/
Great post thanks a lot
You must have tried so hard to do it, but it’s so great, I like it.
bubble shooter
Thank you!
Wow, the cake looks so delicious and amazing. I really want to enjoy it. Thank you for sharing the recipe.
atari breakout
I am definitely going to try this. I was wondering where you get your recipes. Also
you are only one stage away from any assistance or direction you requirement for your up-coming Dubai Mobile App Development services visit for more interesting deals and updates!
DIY gingerbread camper and formula that I’ve had latched onto my subconscious mind since last Christmas, We have best Dubai Mobile App Development services for more details visit us!
What a cute idea! It doesnt seem that hard either so I want to give it a try! Thanks for posting
It is easy! Let us know how it turns out!
Wondering how to set the curved peice? Drape it over what? Thank you in advance
This is the hands down cutest gingerbread house ever – and we LOVED the flavor of your gingerbread!
Thank you, Courtney!
This has to be the cutest gingerbread house EVER! Love all of the detail and color!
Thanks, Beth! XOXO
Cutest gingerbread house I have ever seen! So creative! I need to do this with my kids during Christmas break!
The kids will love it!
You have creative hands and minds of great food, really the recipes you share I feel very delicious and beautiful, thank you for sharing these great recipes. basketball legends
So happy to hear!
This is so cute and fun! I need to try this!
Paige
http://thehappyflammily.com
Thank you, Paige! It’s easy to do too!
Thank you for sharing. Your blog post is interesting and informative. I think many people like it and visit it often, including me.
boxnovel
You’re welcome!
Such a gorgeous idea and so unique.. cant wait to make it…💕💕
thanks for sharing
You’re welcome! Let us know how it turns out!
Wow, thank you so very much for sharing!! I look forward to giving it a try this holiday season – of course I don’t have access to some of those very cool sweets – I especially like the candied sunflower seeds!! – but I will see what I can substitute. Happy holidays!!
Thank you, Alexandra! You can definitely substitute a lot of the candy on gingerbread houses. I would try looking on Amazon too!
You will surely not regret choosing this holiday destination as it provides
you with time to bond with the family and friends. Without the local
assistance the trip will become vague and worthless.
Next day, we make introduction section with climbing members & Expedition crews
Hi there, wondering what kind of icing you used to decorate the body of the camper and if you have any tips to make it looks this beautiful! Thanks.
This is so fantastic I just had to make it!
However, step by step instructions and photos of actually putting the pieces together would be helpful. And of the icing process – do you ice first then put it together, or vice versa?
I am persevering without instructions but having a difficult time of it. Have made about 3 separate curved pieces as they keep breaking – how do you prevent this?
Is the pattern exact size as printed or do I need to enlarge it? Talking about the 2 sides. Love it!!
This is fantastic and I can not wait to try and make one. Thank you for sharing!
Woo hoo! Have fun! :)
That is amazing!!! Christmas is over and I still NEED to make it:D:D
this is super beautiful I love it!!!
Hi there, I am wondering if using a boxed gingerbread mix would work ok in lieu of making it homemade.
thanks!
Lisa
My daughter and I are making the retro camper and I am am unsure how to do the butterscotch windows. Am I baking on top of gingerbread window that was cut out?
Is the outside of the trailer decorated with royal icing (flood) or with fondant? I’m trying to figure out how to cover the curved parts.
Hi Meg, it’s all royal icing, no fondant was used! xoxo
This is the cut thing I’ve seen This holiday season!
Thanks, Donna! Glad you like it!
cutest
The Ginger isn’t STICKING TOGETHER is there no molasses?
better yet, how much free time do you think I have??
No one asked you to make it!
honestly, how much free time do you have??!!
This is unbelievably gorgeous! I’ve never seen anything like it! Love, Love, Love!!
So glad you like the camper, Kenna!
How did you attach the door back to the camper?!
Hi! What an amazing camper. Quick question…did you cover the camper in fondant icing or royal icing. It so hard to tell and id like to recreate this for our christmas this year. Thanks
Hi Kim, the camper is made with fondant icing!
or possibly a special pasta you have made. It can be spaghetti and meat balls and also a chicken casserole. Whatever you’re cooking for dinner, cook
Thanks for a marvelous posting! I actually enjoyed reading it, you may be a great author. I will make certain to bookmark your blog and will eventually come back sometime soon. I want to encourage yourself to continue your great work, have a nice weekend!|
lookie here
This is so amazing! Thank you for sharing all the details how to make it. I have always wanted to make a “different” gingerbread house and nothing caught my eye until I saw this beautiful creation.
How do you flood-ice the curved surfaces without it running right off the roof?
Love every little detail! Really amazing.
Its a piece of art! (Did you eat it in the end?)
This is the cutest thing ever!!! Off to Tweet via @InnTownCamp
Love this so much! Shared to our page…
This is the cutest thing ever made with Gingerbread in the history of Gingerbread!!!!
I just discovered this wonderful post via Facebook – what a great gingerbread house, and the instructions are so detailed – thanks so much and keep up the fab work!
This. Is. INSANE!!! I’m obsessed—absolutely obsessed!
This is simply awesome! We have a 1961 Shasta reissue trailer (in red), and I wish there was a way I could undertake something like this. I especially love the tree on top–the Rice Krispies give it a perfect texture. My only criticism would be that the trailer hitch is on the wrong end, but I’ll bet not many people notice that. Great job!
I dont see butter. Do i need butter?
Hi there, is there definitely no butter in this recipe?
Love, love, love it!
Blowing my mind. I even love that adorable flamingo!!
Wow, this is amazing! I love the iced trees and the string of lights. So clever!
This.Is.The.Best.Thing.EVER!
This is the cutest?
Is each piece flooded with RI??!
Can’t figure out how you did this.
Can’t get over how adorable this is!! LOVE it!
This is unbelievably good!
Carrie
http://www.wearwherewell.com
This is the cutest gingerbread house ever! You did an amazing job!
Paige
http://thehappyflammily.com
ZOMG. this is amazing!
Oh my goodness, this is absolutely adorable! We have a vintage camper and this makes me smile. Your creativity is amazing!
WHAT?! this is absolutely amazing!
I am so into this! What a cute twist on the classic gingerbread house, nice work!
I wish I had your crafting talent, because I think I seriously need one of these!
Are you kidding me!?!? This is insanely awesome.
Oh wow! how cute is this?! I absolutely love it!